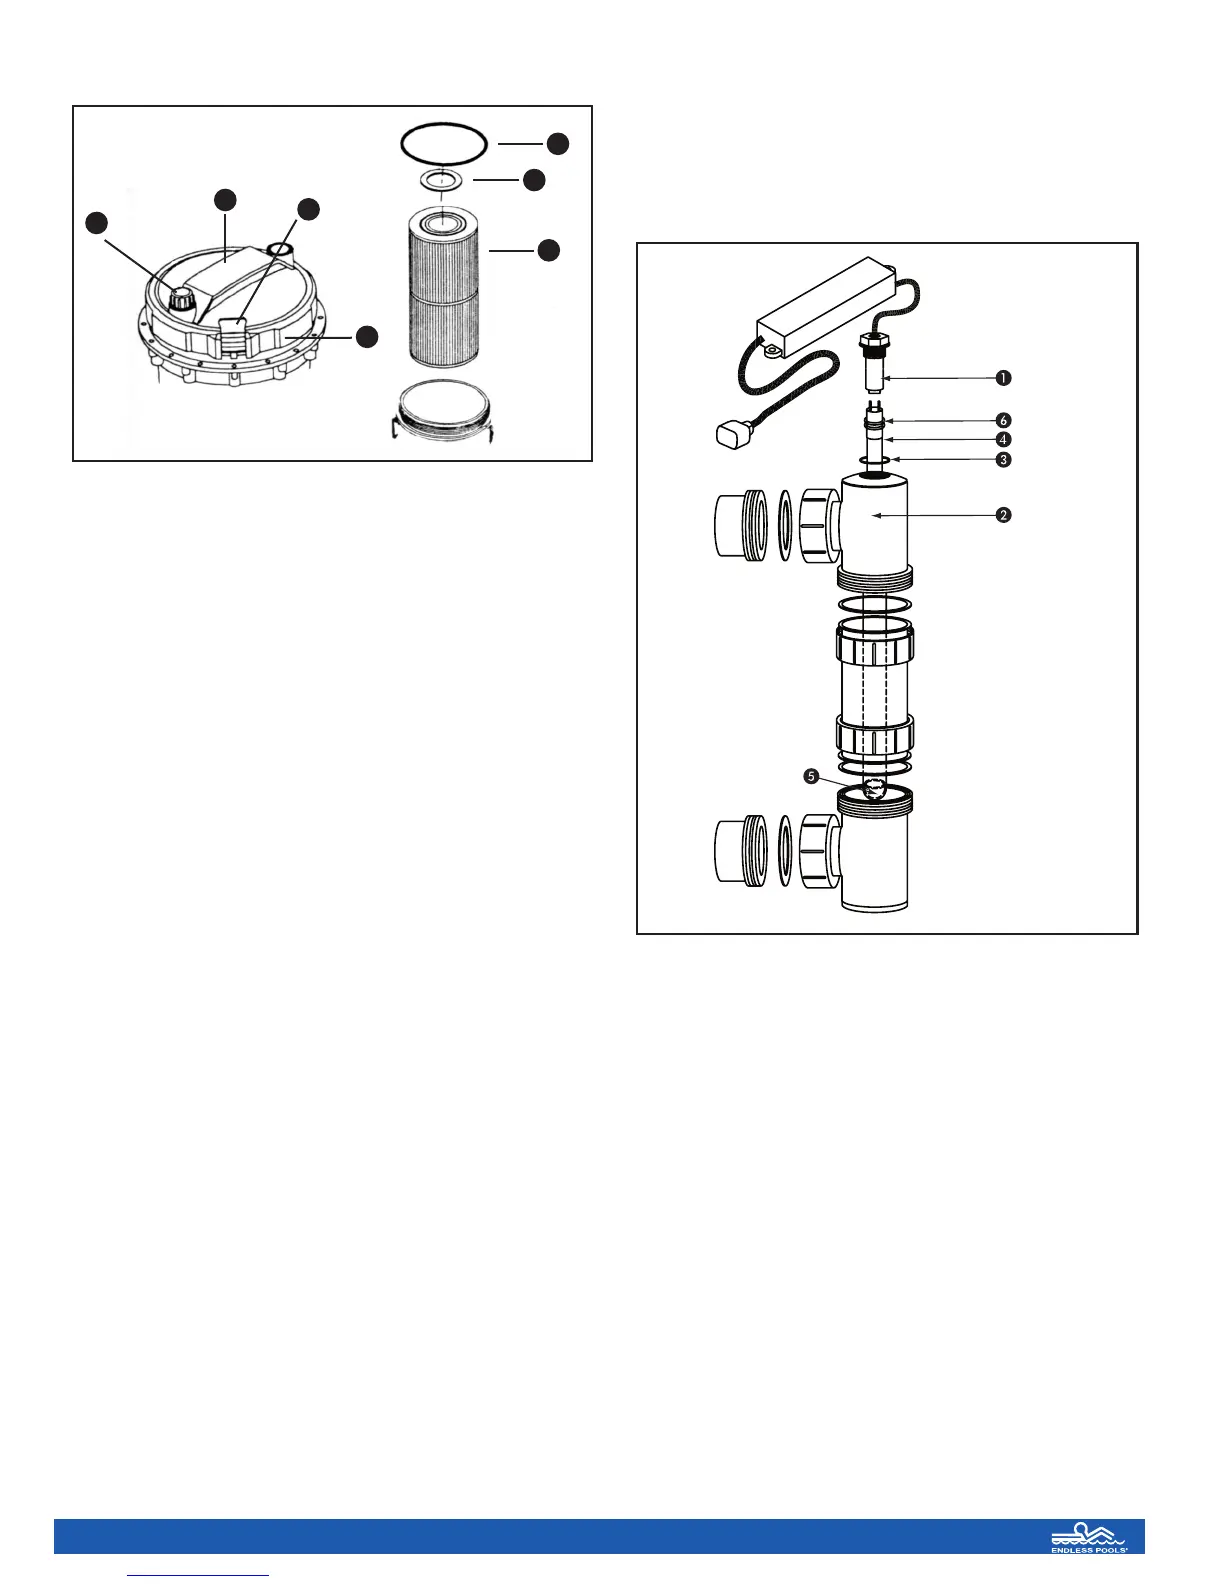
Remove Your Filter with the Power OFF
• Bleed air from the filter housing, turn knob (1) counter-
clockwise.
• Pull on the gray tab (2) and rotate filter ring (3) counter-
clockwise and remove.
• Pull on filter lid handle (4) and remove filter (5) to clean
or replace.
• Check o-ring (6) for damage.
Replace Your Filter with the Power OFF
• Replace ring (7) and reverse steps above turning filter ring
(3) clockwise until hand tight.
• Turn power ON.
• When water comes out of bleed knob (1), close, turn clock-
wise and hand tighten.
Annually:
After 1 year (9000hrs) the bulb of your UV Sanitizer must be
replaced. Start by turning off the circulation pump. Hold the
P1 button on your keypad for 5 seconds. Then unplug the UV
Sanitizer from the Heater Controller.
Unthread the electrical connector assembly (1) from the elec-
trical tee assembly (2). Note that there is an O-Ring (3)
between the electrical connector and the plastic body. Set the
o-ring aside for re-installation later.
Once the electrical connector has been unthreaded from the tee
assembly, carefully remove the UV bulb (4) from the UV
body. Note: pulling on the bulb too quickly could cause the
bulb to separate from the electrical connector. If this happens,
then the entire UV body will have to be removed and the bulb
will have to be carefully dropped out of the UV body. If this
occurs, it is very important to prevent the bulb from breaking.
When the bulb has been removed from the UV body separate
the bulb from the electrical connector.
Do not touch the new UV bulb with your bare hands. Skin
oils can remain on the bulb creating hotspots, which will
shorten the life of the bulb. Make sure that the bulb cushion
(5) and the 2 bulb o-rings (6) are in place. Connect the new
bulb to the electrical connector, making sure that the pins in
the bulb are aligned with the pin connectors.
Carefully insert the bulb into the UV body and thread the elec-
trical connector back into the electrical tee assembly. It is
important that the electrical connector o-ring is in place prior
to this step.
Press the P1 button on your keypad once to turn the circula-
tion pump on. Now that water is running through the system,
the UV can be plugged back into the heater controller.
Every five years:
• After five years of operation, we will send you a letter detail-
ing our recommendation that the submerged hydraulic motor
be changed. This procedure does require the swim spa to be
drained to 6” in the standard-depth section of the pool. This
may also be a convenient time to replace the propeller or
front grill in the pool; a list of recommended and optional
replacement parts is supplied with the tune-up letter.
As Needed:
• Clean the water line around the perimeter of the swim spa
and the underside of the cover as needed. Body oils and
mold may build up slowly in these areas and should be
cleaned off periodically.
• If you happen to get cloudy water, or if the surface feels slip-
pery, it likely means that you have algae in the pool. A pool
brush and pole may be purchased in order to wipe down all
the surfaces in the pool. Increasing free chlorine level tem-
porarily to 5 ppm will help, as will maintaining the free chlo-
rine level in the swim spa at 3 ppm until the water is clear.
Test the chlorine level frequently during this time.
5
Cartridge filter exploded view
1
4
2
3
5
7
6
SS Assembly 5-09 5/28/09 8:19 AM Page 7
 Loading...


