Do you have a question about the Enso flex EZZ FE1200 and is the answer not in the manual?
Do not open or tamper with warranty-covered components to avoid voiding the product warranty.
Dispose of packing materials and keep children/pets from under the bed. Supervise operation by minors/disabled persons.
Adjustable beds are for in-home comfort, not hospital use. Not designed for patients on extended recovery or near oxygen/explosive gases.
Massage units produce vibrations that may affect pacemakers. Consult a physician if experiencing sensations.
Covers non-excluded defects in workmanship/materials for two years, including repair/replacement labor.
Details warranty exclusions like damage, unauthorized repair, misuse, and liability limitations.
Bed lift motors have a duty cycle limit of 2 minutes per 18 minutes (10%), exceeding it may void the warranty.
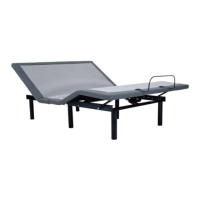
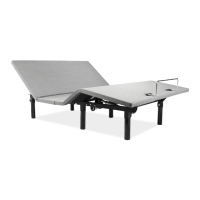
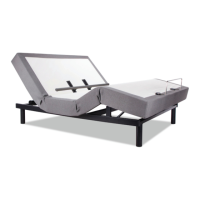
The bed supports 850 lbs evenly distributed. Do not exceed weight limits or sit on raised sections.
Humming sound during operation is normal. Massage feature creates a vibrating hum that increases with intensity.
Room acoustics affect noise. Use carpet or rubber cups to reduce resonance and prevent sliding on hard floors.
Unplug before cleaning/servicing. Ensure flat position and motors off before unplugging. Discontinue use if cord/plug is damaged.
Device complies with FCC rules for residential use, subject to interference conditions. Radio Frequency: 2.4 GHz.
Two AAA batteries are included for the remote control.
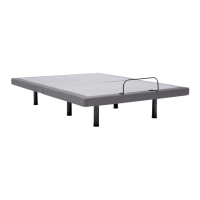
Six bed legs and bottom caps are part of the standard package.
Seven bed legs and bottom caps are provided for King/CK size beds.
One power supply unit is included to power the adjustable base.
One power cord is included to connect the power supply to the outlet.
One wireless remote control is included for operating the base.
One mattress retainer bar is included and attached to the bed frame.
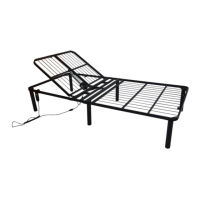
Identifies the motor responsible for the head section's movement.
The central unit connecting motors, power, and remote.
Identifies the motor responsible for the foot section's movement.
Button on the control box used for remote pairing.
Component that converts AC power for the base.
Connects the power supply to the wall outlet.
Unpack accessories, retainer bar, and carefully lift the folded frame onto a flat floor.
Thread legs into foundation frame nuts and tighten by hand, avoiding overtightening.
Connect the power cord from the control box to the power supply.
Connect the main power cord to the power supply.
Flip the foundation onto its legs with assistance. Do not drag or rest on its side to avoid damage.
Verify that the batteries are properly installed in the remote.
Slide the retainer bar into brackets on both sides of the frame to secure the mattress.
Buttons for lifting and lowering the head of the adjustable base.
Buttons for lifting and lowering the foot of the adjustable base.
Button 'M' to save and recall custom bed positions.
Button 'FLAT' to return the base to its horizontal position.
Button to turn the remote's flashlight on or off.
Use UP/DOWN arrows to lift and lower the head section.
Use UP/DOWN arrows to lift and lower the foot section.
Save custom bed positions by adjusting to desired level and pressing M after FLAT.
Instructions for pairing the remote if it's not already connected to the base.
Ensure remote batteries are functional; replace if necessary.
Connect the power cord to a working power source.
Press and hold head/foot lift and control box button for 3 seconds to pair the remote.
Backup battery is for power outages only, not for normal operation or repeated movement.
Use two 9V batteries (not included) in the power supply for temporary power during outages.
Unplug, open power supply, insert batteries, close, and plug back in. Remove batteries after power is restored.
Connect both adjustable bases (A and B) to a power source.
Ensure Remote A is paired to Base A and Remote B to Base B; re-pair if necessary.
Pair Remote A to Base B so both bases can be operated simultaneously by Remote A.
To operate beds separately, pair another remote to only one of the beds.
Align bracket slots with bed holes and secure with bolts and nuts, ensuring tightness.
Connect T-Brackets to Headboard Brackets using bolts and nuts, tightening with a 1/2" socket/wrench.
Attach headboard to bracket attachment plates using remaining bolts and nuts, securing them tightly.
Verify power connection, re-program remote, or check surge protector/outlet.
Unplug/replug to reset, test outlet, or check wired remote connection.
Replace the batteries in the wireless remote control.
Check for obstructions, or ensure sufficient distance from walls/headboard.
Check remote batteries, follow motor duty cycle, press buttons squarely, or check for RF interference.
This is normal as lift motor relays engage. No action is required.
| Brand | Enso |
|---|---|
| Model | flex EZZ FE1200 |
| Category | Indoor Furnishing |
| Language | English |