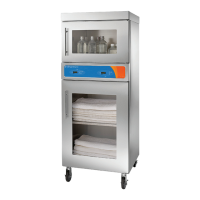
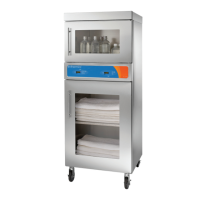
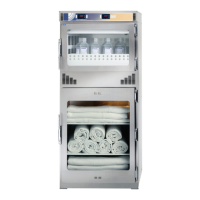
This document describes the Enthermics Combination Warming Cabinet, a medical device designed for safely warming and storing blankets, irrigation fluids, and injection fluids. The cabinet is available in three models: EC1260BL, EC1540BL, and EC1730BL, all operating at 120V.
Function Description:
The Enthermics Combination Warming Cabinet is a dual-chambered appliance, meaning it has two separate compartments: a blanket warming chamber and a fluid warming chamber. Each chamber is designed for specific warming purposes to ensure patient comfort and safety.
The blanket warming chamber is intended solely for warming dry, cotton blankets or towels. Its primary function is to elevate blanket temperatures to a level that enhances patient comfort. This chamber utilizes a low-heat-density electrothermal cable array positioned in the floor and two sides of the cabinet, providing even heating without the need for a heat circulating fan. The temperature controller for the blanket chamber has an adjustable range of 37°C to 93°C (98°F to 200°F). A timer feature allows users to program the controller to automatically switch on and off during a 24-hour period, enabling energy savings by turning off the chamber at night while ensuring warm blankets are available in the morning.
The fluid warming chamber is specifically designed for warming medical solutions for irrigation and injection prior to use. It is crucial to refer to the labeling of the manufacturer of the products being warmed for recommended temperatures and warming durations. This chamber can be programmed to warm either irrigation fluids (IRR) within a temperature range of 37°C to 66°C (98°F to 150°F) or injection fluids (INJ) within a range of 37°C to 40°C (98°F to 104°F). A fan inside the fluid chamber circulates air to prevent temperature stratification, ensuring an accurate and uniform chamber temperature for both modes. The temperature control for injection fluids maintains a precision of +0/-1.12°C (+0/-2°F) for set points between 37°C and 40°C, and for irrigation fluids, it maintains +0/-1.67°C (+0/-3°F) for set points between 43°C and 66°C. An alarm will sound if temperatures exceed 6°C (10°F) above the set-point temperature, and an overtemp indicator will blink, signaling an over-temperature condition.
The cabinet's construction features a stainless steel exterior casing and a door with a handle and hinges designed for heavy usage. A window in the door allows for observation of inventory without opening the door.
Usage Features:
The appliance is equipped with an electronic control system for each chamber, consisting of a 4-digit LED display, ON/OFF button, INCREASE and DECREASE buttons, an integrated lock-out control feature, and a series of prompt sequence indicators. This control system allows for easy setting of temperatures in either Fahrenheit or Celsius. In the event of a power failure, the cabinet's controller stores all settings and resumes operation with the previously set parameters once power is restored. A thermal shut-off system, separate from the electronic controls, is included as an additional safety feature.
Controller Operation:
- Setting Temperature Scale: While the controller is off, press and hold the up arrow button for five seconds, then press and hold it again to toggle between Fahrenheit (°F) and Celsius (°C).
- Setting Operational Sound: While the controller is off, press and hold the down arrow button for five seconds, then press and hold it again to toggle the sound on or off.
- Starting the Warmer: Connect the warmer to a hospital-grade receptacle, push the circuit breaker to the ON (I) position, and then press the ON/OFF button. The previous temperature set-point will be displayed.
- Displaying Compartment Temperature: Press and hold the "TIMER" button and the up arrow button simultaneously to display the temperature at the compartment sensor.
- Locking/Unlocking Controller: To lock, press the "ON/OFF" button and the up arrow button simultaneously; the "LOCK" icon will illuminate. To unlock, press the "ON/OFF" button and the down arrow button simultaneously; the "LOCK" icon will turn off.
- Power Fail Detection: The controller will alarm once and the on/off status indicator will flash after a power failure. Pressing the ON/OFF button once will stop the flashing and display the duration of the power outage before returning to the set operating temperature.
- Setting the Timer (Blanket Chamber): Press the "TIMER" button to display the current time, then press it again to set the start time, and a third time to set the stop time. Use the up/down arrows to adjust times. Press the "TIMER" button again to enable the timer feature.
- Disabling the Timer (Blanket Chamber): Press and hold the "TIMER" button until the timer status indicator turns off.
Chamber Loading:
- Blanket Chamber: Ensure the blanket support assembly and shelf are installed. Load only dry, cotton blankets or towels, ensuring they do not exceed the height of the support assembly and leaving a 1" (25mm) gap between the top interior walls or shelf and the blankets. Rotate the load daily to ensure even warming and prevent discoloration.
- Fluid Chamber: Load medical solutions packaged in bags or bottles. Do not overload baskets beyond recommended capacity to prevent lower or uneven temperatures and damage to the basket and rail supports. Open only one basket at a time to prevent tipping.
Safety Precautions:
- Always verify fluid temperature before use, referring to manufacturer's labeling.
- Do not warm injection fluids above 40°C (104°F); discard if warmed above this temperature.
- Do not use the warmer in the presence of flammable anesthetic mixtures.
- Do not steam clean, hose down, or flood the interior or exterior with water or liquid solutions.
- Do not use abrasive cleaning compounds, chloride-based cleaners, or cleaners containing quaternary salts on stainless steel surfaces.
- Ensure the fan in the fluid chamber is rotating freely. If not, discard inventory and contact service.
- If the fluid warmer controller fails or displays error messages, discard fluid inventory and contact service.
- Appliance and accessories may be heavy; use sufficient trained workers for moving or leveling.
- Transport the appliance only when the door is closed and secure.
Maintenance Features:
Regular cleaning and preventative maintenance are essential for the appliance's operating efficiency and longevity.
Daily Checklist:
- Ensure the operation and care manual is available to all users.
- Verify that all operators are properly trained in operation and safety.
- Do not overload the cabinet.
- For blanket warmers, maintain a 1" (25mm) gap from the top interior or shelf.
- For fluid warmers, refer to the electrical/capacity page for loading limits.
Weekly Checklist:
- Inspect the plug and cord for damage and replace if necessary.
- Clean dust from under inserts, outer vents, and around the top bonnet (if applicable).
- Check the blanket support assembly and shelf for proper installation and missing pieces.
- Check fluid warmer basket and side rail condition, ensuring smooth and free movement.
- Verify that all control and interior LEDs light up.
Monthly Checklist:
- Check door gasket integrity for tears, wear, or looseness, ensuring a tight seal. Replace if compromised.
- Check the air temperature sensor mount in the chamber, ensuring the guard is in place and secured.
- Check the condition of casters or feet, ensuring components are secure and tightly threaded.
- Check the control panel overlay for tears or excessive wear and verify button functionality.
- Compare the set temperature to the actual cavity air temperature using a quality thermocouple, monitoring for approximately one hour in an empty cavity.
Cleaning Materials and Procedures:
- Use non-abrasive, chloride-free cleaning products designed for stainless steel surfaces.
- Never use hydrochloric acid (muriatic acid).
- Use a soft, clean cloth for cleaning. For difficult areas, use a non-abrasive scouring pad, scrubbing with the grain of the metal.
- Never use wire brushes, metal scouring pads, or scrapers.
- Remove spilled items and wipe the area as soon as possible, or at least once daily.
- Thoroughly rinse surfaces after cleaning and wipe standing water quickly.
- Disconnect the cabinet from the power source before cleaning or servicing.
- Remove all detachable items (blanket support assembly, shelves, metal baskets, basket rail supports) and clean them separately.
- Clean interior metal surfaces with a damp cloth and mild commercial detergent, rinse with a sponge and warm water, and wipe dry. Leave doors open until the interior is completely dry.
- Sanitize the interior with an approved sanitizing solution after cleaning and rinsing.
- Clean the exterior with a cleaner recommended for stainless steel surfaces, spraying onto a clean cloth and wiping with the grain of the stainless steel.
- Clean window glass with a standard commercial glass cleaner.
- Thoroughly wipe control panel, door vents, door handles, and door gaskets.
- Wipe door gaskets and control panel dry with a clean, soft cloth.
- To maintain the protective film coating on polished stainless steel, clean the exterior with a recommended cleaner, spraying onto a clean cloth and wiping with the grain.
- Always follow applicable state or local health regulations for cleaning and sanitation.
Troubleshooting:
The manual provides a troubleshooting guide for qualified and trained service technicians, including error codes and required actions. For issues beyond basic troubleshooting, contact the manufacturer for authorized service. Do not attempt repairs or service beyond this point without authorization to avoid voiding the warranty. A manual reset button is located at the rear of the warmer for certain issues.