Page 7
710232A
&21752/)81&7,216
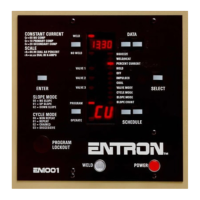
- See Figure 1, CONTROL PANEL LAYOUT.
32:(521/,*+7 - The red POWER (19) lamp on the light panel, at the top of the R
cabinet door or bottom of the S cabinet dialplate, indicates when power is applied to the
control.
9$/9(/('6 - The three LED'S (28 & 30 & 31) indicate, in the operating mode, when
the solenoid valves are activated in the control program. In the PROGRAM Mode these
same indicators indicate the valve that will be used by the selected valve code for the
selected schedule.
:(/'/,*+7 - The white WELD lamp (23) on the light panel at the top of the control door
or bottom of the S cabinet dial plate, is connected directly across the welding transformer
and will light when voltage is present at the welding transformer. The brilliance of the white
WELD lamp is an indication of the programmed PERCENT CURRENT and therefore,
provides a visual indication of the percent of RMS voltage supplied to the welding
transformer.
352*5$023(5$7(6(/(&7,21: Push Button (26) and LED indicators (27) and (25)
and PROGRAM LOCKOUT key switch (24).
Every time the PROGRAM/OPERATE Push Button (26) is pressed the control will toggle
between the PROGRAM (LED 27) and OPERATE (LED 25) modes.
PROGRAM mode is the mode in which the individual schedules can be entered or
modified. The different parameters of times, valves, etc. can be changed only in the
PROGRAM MODE.
OPERATE mode is the normal operating mode for the control and is the only mode
in which the control can be initiated for a weld schedule. When the control is in
OPERATE mode, and not initiated, the control is in a "Ready" or Operational state.
NOTE:A PROGRAM LOCKOUT (24) key switch can be ordered as a factory
installed option. It may also be added later by the customer, if desired. To install the
key switch, remove the hole plug from the lower left corner of the front panel and
mount the switch using the nut provided. Plug the wires from the switch onto the
mating 2 prong connector on the back of the control circuit board.
In "S" cabinets, mounting the key switch will be easier if the front panel and control
circuit board assembly is removed from the enclosure. Remove the POWER (19) and
WELD (23) lights and disconnect the electrical connectors from the back of the
control circuit board. Remove the four (4) mounting screws from the front panel and
lift it off of the enclosure.
To select the PROGRAM MODE using the PROGRAM LOCKOUT Switch, the
key must be rotated 45 degrees clockwise and held against spring pressure while the
PROGRAM/OPERATE Push Button is pressed. The OPERATE LED will now turn
off and the PROGRAM LED will turn on, indicating programmability of all
functions. Pressing the PROGRAM/OPERATE Push Button again will return the
control to the OPERATE Mode without the necessity of rotating the key.
 Loading...