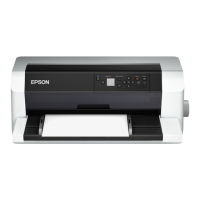
Single Sheets with the Automatic Sheet Alignment Unit (1/1)
EPSON DLQ-3500 Quick Guide
Single Sheets with the Automatic Sheet Alignment Unit
Follow these steps to load paper using the
automatic sheet alignment unit:
1. Make sure that Manual/CSF is selected
as the paper source on the control panel.
If not, select it by pressing the Paper
Source button.
2. Set the paper-thickness lever to the
appropriate position for the type of
single sheet you are using referring to
the table in “Paper-Thickness Settings.”
Normally set it to AUTO.
* paper-thickness lever
3. Insert paper into the automatic sheet
alignment unit so that the tip of the
paper goes behind the rollers of the unit.
The printer automatically aligns the
paper, recognizes the right and left
edges (the width) of the paper and starts
feeding.
1. inserted position
2. aligned position
3. arrow marks
Note:
Make sure to insert paper between the two
arrow marks on the unit.
c
Caution:
Use the knob on the right side of the
printer only to clear paper jams when
the printer is off.
4. The printer starts printing when it
receives data. The printing position (the
position of the first letter of the first line)
is set to 3 mm (0.12 inch) from the left
edge of the paper by default. See
“Adjusting the printing position” in the
Reference Guide for more information
on the printing position.
A. 3 mm
* the printing position
5. The printer automatically ejects paper
when it finishes printing. If the printed
sheet remains in the printer, press the
Load/Eject button to eject it.
-1
0
1
2
3
4
5
6
9
7
8
AUTO
A

 Loading...