5
English
1-4 Installing the Projector
• Install the projector away from fluorescent lighting, air conditioners and other
electrical items. Failure to do so can cause the remote control to malfunction.
• To limit the effect of external noise, we recommend that you position the projector
so that the cable connecting it to a computer or other device is no longer than 20
meters.
• The projector should be installed in a location that is free of dust and moisture to
prevent the lens and internal optical parts from becoming dirty.
• Do not install the projector in a location beyond its operating temperature range.
Doing so can cause it to malfunction.
• Closing the curtains in a bright room makes the projected image easier to see.
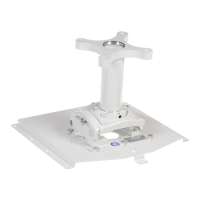
2 Assembly and Installation
2-1 Removing the Ceiling Plate from the Projector Plate
(1) When you open the package, make sure the ball joint can be moved.
(The tilt adjusting screw and tilt fixing screws are loose when the product leaves
the factory.)
If the ball joint cannot be moved, perform the following steps.
Remove the screw cap (protruding type) from the tilt adjusting screw.
Use the offset wrench provided to loosen the tilt adjusting screw.
• The tilt adjusting screw is designed to tighten again when turned more
than 180 degrees.
• There is no need to loosen the screw on the opposite side of the tilt
adjusting screw.
Use the hexagon wrench to loosen the two tilt fixing screws.
Screw cap
Tilt fixing screws (2 pcs.)
Tilt adjusting screw
Ball joint
Moveable