EasyManuals Logo

Epson L365 Service Manual

Epson L365
78 pages
To Next Page IconTo Next Page
To Previous Page IconTo Previous Page
Page #62 background imageLoading...
Page #62 background image
Confidential
Adjustment Mechanism Adjustment / Check 62
L365/L366,L360/L362,L310/L312,L220/L222,L130/L132 Series
Revision A
1. Move the CR Unit to the center of the printer.
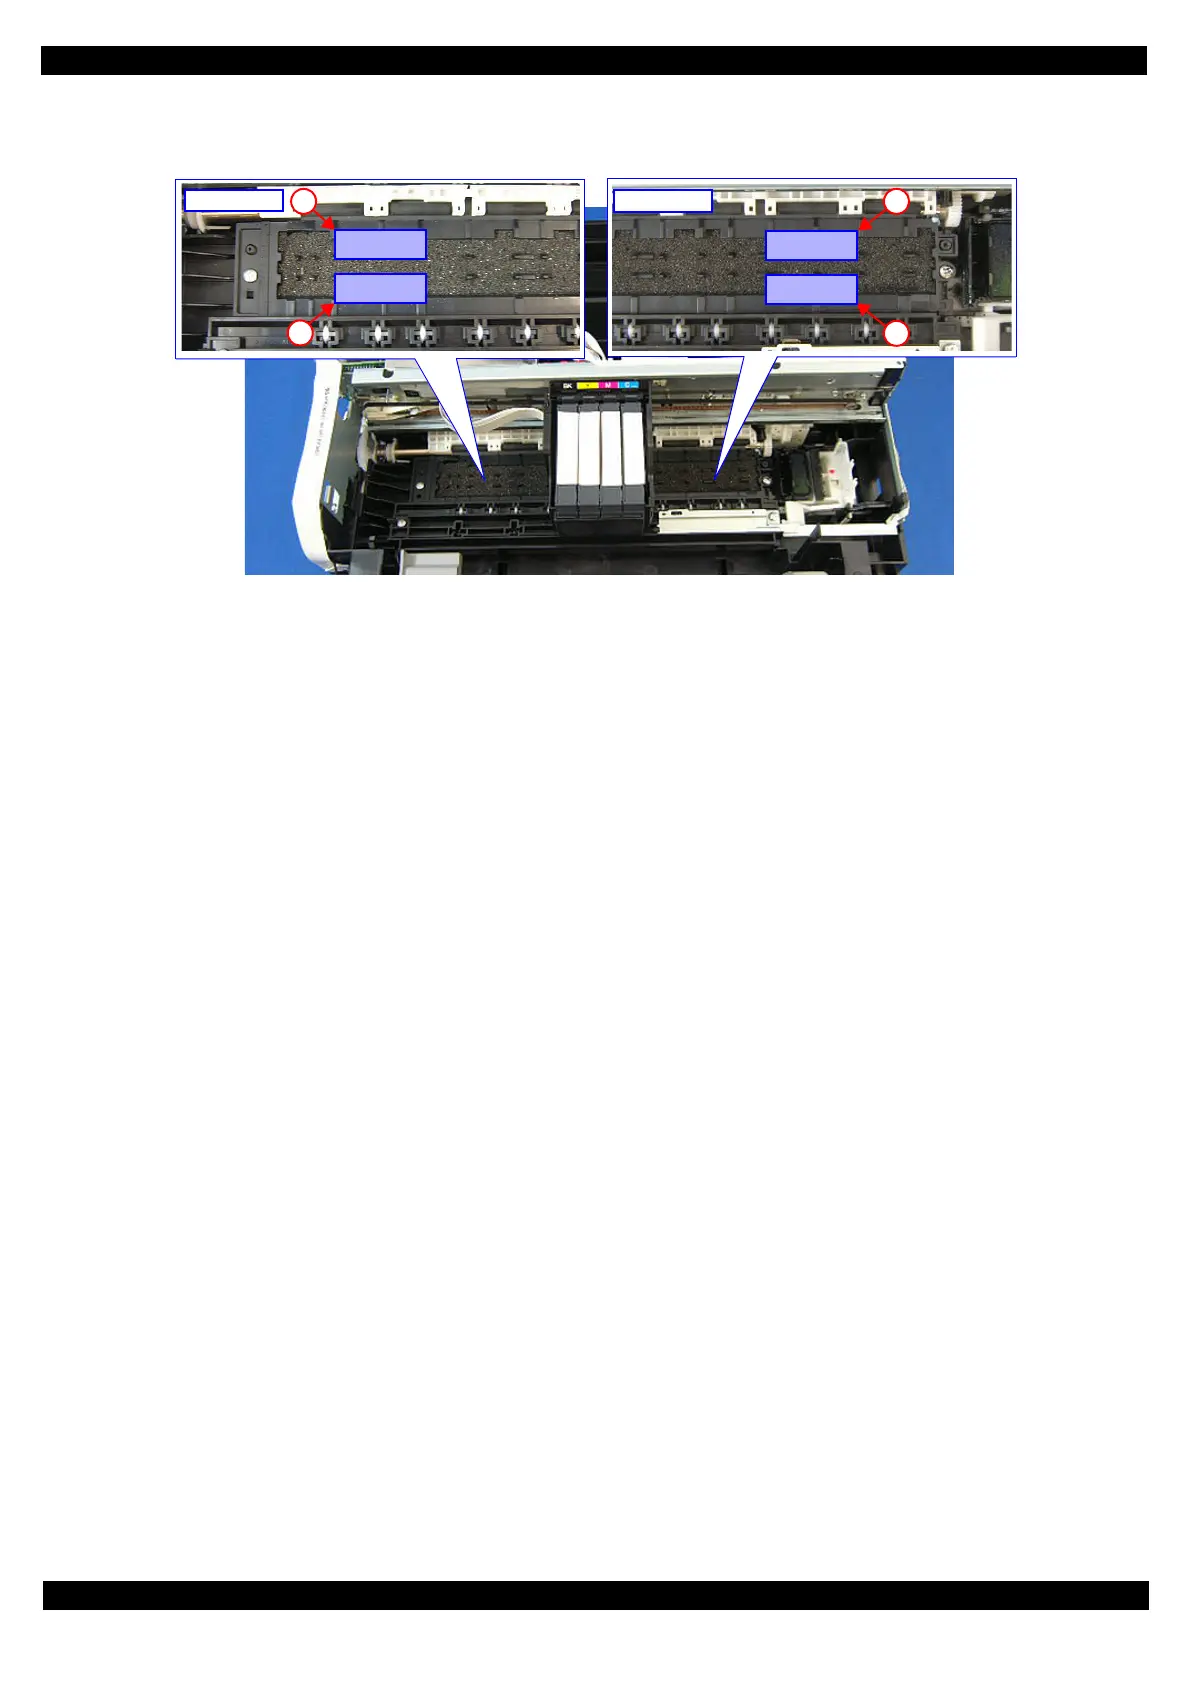
2. Place the thickness gauges (1.5 mm) on the position A shown in Figure 3-1.
Figure 3-1. Position of the Thickness Gauge
3. Pull the CR Timing Belt to move the CR Unit to both ends and confirm the CR Unit does not touch the
thickness gauges.
*1
4. Move the CR Unit to the center, and place the thickness gauges (1.5 mm) on the position B shown in Figure
3-1.
5. Pull the CR Timing Belt to move the CR Unit to both ends and confirm the CR Unit does not touch the
thickness gauges.
*1
6. Move the CR Unit to the center, and place the thickness gauges (2.0 mm) on the position A shown in Figure
3-1.
7. Pull the CR Timing Belt to move the CR Unit to both ends and confirm the CR Unit touches the thickness
gauges.
*2
8. Move the CR Unit to the center, and place the thickness gauges (2.0 mm) on the position B shown in Figure
3-1.
9. Pull the CR Timing Belt to move the CR Unit to both ends and confirm the CR Unit touches the thickness
gauges.
*2
Note "*1":If the CR Unit comes in contact with the thickness gauges, the PG is smaller than the standard value, therefore, check if the
unit is correctly reassembled. If not, reassemble the unit and perform PG check again. (If the unit is correctly reassembled,
replace the unit with a new/refurbished one.)
"*2":If the CR Unit does not come in contact with the thickness gauges, the PG is greater than the standard value, therefore, check
if the unit is correctly reassembled. If not, reassemble the unit and perform PG check again. (If the unit is correctly
reassembled, replace the unit with a new/refurbished one.)
80-digit side
A
B
0-digit side
A
B

Other manuals for Epson L365

Questions and Answers:

Question and Answer IconNeed help?

Do you have a question about the Epson L365 and is the answer not in the manual?

Epson L365 Specifications

General IconGeneral
Duplex printingNo
Print technologyInkjet
Maximum resolution5760 x 1440 DPI
Print speed (black, normal quality, A4/US Letter)9.2 ppm
Print speed (color, normal quality, A4/US Letter)4.5 ppm
Maximum copy resolution- DPI
Scanner typeFlatbed scanner
Scan speed (black)7.2 ppm
Scan speed (color)14.3 ppm
Image formats supportedJPG
Document formats supportedPDF
Optical scanning resolution1200 x 2400 DPI
Digital sender-
Printing colorsBlack, Cyan, Magenta, Yellow
Country of originPhilippines
Maximum duty cycle- pages per month
Number of print cartridges4
Total input capacity100 sheets
Total output capacity30 sheets
Paper tray media typesEnvelopes, Plain paper
ISO A-series sizes (A0...A9)A4, A5, A6
ISO B-series sizes (B0...B9)B5
ISO C-series sizes (C0...C9)C6
Maximum ISO A-series paper sizeA4
Wi-FiYes
Security algorithms128-bit WEP, 64-bit WEP, WPA-EAP, WPA-PSK, WPA-TKIP
Standard interfacesUSB 2.0, Wireless LAN
Sound pressure level (printing)38 dB
AC input voltage110 - 240 V
AC input frequency50 - 60 Hz
Power consumption (off)0.3 W
Power consumption (standby)1.3 W
Power consumption (average operating)11 W
Bundled softwareEpson Scan
Product colorBlack
Market positioningHome & office
Pallet width800 mm
Pallet height2100 mm
Pallet length1200 mm
Pallet width (UK)1000 mm
Quantity per pallet40 pc(s)
Quantity per pallet (UK)50 pc(s)
Quantity per pallet layer4 pc(s)
Quantity per pallet layer (UK)5 pc(s)
Package depth530 mm
Package width385 mm
Package height195 mm
Package weight6320 g
Quantity per pack1 pc(s)
Weight and Dimensions IconWeight and Dimensions
Depth300 mm
Width482 mm
Height145 mm

Related product manuals