Do you have a question about the Epson L6161 and is the answer not in the manual?
Open the ink tank cover and the cap for the ink tank to be filled.
Unpack an ink bottle, hold it upright, and turn the cap to remove it.
Position the ink bottle top at the filling port and stand it up.
Wait for ink to flow into the tank automatically.
Connect the power cord to the product and to an electrical outlet.
Insert CD or download and run the product's software package.
Follow the instructions on the computer screen to run the setup program.
Choose connection type: Wireless, Direct USB, or Wired network.
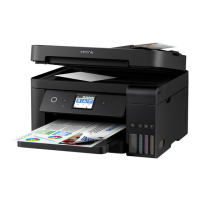
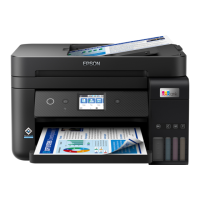
This document describes the setup, usage, and maintenance of the Epson L6161 all-in-one printer, designed to provide efficient printing, scanning, and copying capabilities. The printer utilizes an ink tank system, which is intended to offer a more economical and user-friendly ink refilling experience compared to traditional cartridge-based systems.
The Epson L6161 is a multi-function device capable of printing, scanning, and copying. It is designed for both home and small office environments, offering high-quality output for documents and photos. The printer features an integrated ink tank system that allows users to refill ink directly from bottles, reducing waste and potentially lowering the cost per print. It supports various connection methods, including wireless, direct USB, and wired network connections, providing flexibility in how users can connect and print from their computers, smartphones, and tablets. Mobile printing capabilities are a key feature, enabling users to print wirelessly from iOS and Android devices using Epson iPrint, Epson Print Enabler, Epson Connect, and Google Cloud Print.
The setup process begins with unpacking the printer and removing all protective materials. This includes lifting the scanner unit to access internal packing. The next critical step is filling the ink tanks. The printer uses color-coded ink tanks (Black, Cyan, Magenta, Yellow) and corresponding ink bottles. Users are instructed to open the ink tank cover and the cap of the specific ink tank they intend to fill. Ink bottles are designed to be inserted into the filling port, and the ink flows automatically into the tank, stopping when it reaches the upper line. This design aims to prevent overfilling and spillage. It is crucial not to shake or squeeze the ink bottles during this process. After filling, the ink tank caps and cover must be securely closed.
Once the ink tanks are filled, the printer needs to be connected to a power source. Users are advised not to connect the printer to a computer at this stage. The control panel can then be raised, and the power button pressed to turn on the device. The LCD screen will guide the user through language selection and the initial ink charging process. Ink charging takes approximately 10 minutes, and it is important not to turn off the product, raise the scanner unit, or load paper during this time to avoid wasting ink. After the initial charge, users will be prompted to complete filling the ink tanks with any remaining ink from the bottles. The printer also guides users through resetting ink levels and adjusting print quality via on-screen instructions.
Loading paper is another essential usage feature. The printer uses a paper cassette located at the front. Users need to open the cassette, pull it out, and slide the side edge guides all the way out. Paper should be inserted with the glossy or printable side down, ensuring it is loaded against the front edge guide and not sticking out from the end of the cassette. The side edge guides should then be slid against the paper, but not too tightly, before closing the front of the cassette and inserting it all the way into the printer. Finally, the output tray needs to be pulled out, and paper settings selected on the control panel.
Software installation is required to enable full functionality. Users can install software from a product CD or download it from the Epson support website. During software setup, users will select their preferred connection method: wireless, direct USB, or wired network. For wireless connections, the software installer typically attempts to set up the connection automatically, but users may need to enter their network name (SSID) and password. For direct USB, a USB cable is required, and for wired network, an Ethernet cable is needed. Mobile printing is facilitated through various Epson applications and services, allowing printing from smartphones and tablets connected to the same network.
The printer's design incorporates features that contribute to its maintenance and longevity. The ink tank system itself is a maintenance feature, as it simplifies the refilling process and reduces the mess associated with traditional cartridges. The clear visibility of ink levels in the tanks allows users to monitor consumption and refill proactively, preventing interruptions during printing.
Troubleshooting guidance is provided within the manual to address common issues. For print quality problems such as lines or incorrect colors, users are advised to run a nozzle check and, if necessary, clean the print head. These functions are typically accessible through the printer's control panel or the installed software. If the product's screen is dark, users are instructed to ensure the product is turned on and press any button to wake it from sleep mode.
For connectivity issues, such as the printer not being found after connecting with a USB cable, users are reminded to ensure the product is on and securely connected. For network setup problems, the manual suggests verifying the correct network name (SSID), restarting the router, and ensuring the printer is connecting to a 2.4 GHz network if the router offers both 2.4 GHz and 5 GHz connections. Firewall alerts may require users to click "Unblock" or "Allow" to continue setup. If network security is enabled, users must ensure they enter the correct network password (WEP key or WPA passphrase) with the correct case.
The manual also emphasizes the importance of using Genuine Epson Ink and specialty papers for optimal performance and brilliant results, suggesting that these can be purchased from authorized Epson resellers. This recommendation serves as a maintenance tip to ensure the printer operates as intended and produces high-quality output consistently. Technical support resources, including the Epson support website for drivers, manuals, FAQs, and contact numbers for service technicians, are provided for more complex issues, ensuring users have access to assistance when needed.
| Print technology | Inkjet |
|---|---|
| Maximum resolution | 4800 x 1200 DPI |
| Print speed (ISO/IEC 24734) mono | 15 ipm |
| Print speed (ISO/IEC 24734) color | 8 ipm |
| Print speed (black, normal quality, A4/US Letter) | 33 ppm |
| Print speed (color, normal quality, A4/US Letter) | 20 ppm |
| Duplex print speed (black, normal quality, A4/US Letter) | 6.5 ppm |
| Duplex print speed (color, normal quality, A4/US Letter) | 4.5 ppm |
| Copier resize | 25 - 400 % |
| ID-card copy function | Yes |
| Maximum copy resolution | - DPI |
| Maximum number of copies | 99 copies |
| Copy speed (black, normal quality, A4) | 11 cpm |
| Copy speed (color, normal quality, A4) | 5.5 cpm |
| Scan to | Cloud, E-mail, PC |
| Scanner type | Flatbed scanner |
| Input color depth | 48 bit |
| Maximum scan area | 216 x 297 mm |
| Output color depth | 24 bit |
| Maximum scan resolution | 9600 x 9600 DPI |
| Optical scanning resolution | 1200 x 2400 DPI |
| Faxing | No |
| Printing colors | Black, Cyan, Magenta, Yellow |
| Maximum duty cycle | 5000 pages per month |
| Recommended duty cycle | 0 - 800 pages per month |
| Number of print cartridges | 4 |
| Page description languages | ESC/P-R |
| Mac operating systems supported | Mac OS X 10.10 Yosemite, Mac OS X 10.11 El Capitan, Mac OS X 10.12 Sierra, Mac OS X 10.6 Snow Leopard, Mac OS X 10.7 Lion, Mac OS X 10.8 Mountain Lion, Mac OS X 10.9 Mavericks |
| Server operating systems supported | Windows Server 2003, Windows Server 2016 |
| Windows operating systems supported | Windows 10, Windows 10 Education, Windows 10 Education x64, Windows 10 Enterprise, Windows 10 Enterprise x64, Windows 10 Home, Windows 10 Home x64, Windows 10 IOT Core, Windows 10 Pro, Windows 10 Pro x64, Windows 7, Windows 7 Enterprise, Windows 7 Enterprise x64, Windows 7 Home Basic, Windows 7 Home Basic x64, Windows 7 Home Premium, Windows 7 Home Premium x64, Windows 7 Professional, Windows 7 Professional x64, Windows 7 Starter, Windows 7 Starter x64, Windows 7 Ultimate, Windows 7 Ultimate x64, Windows 7 x64, Windows 8, Windows 8 Enterprise, Windows 8 Enterprise x64, Windows 8 Pro, Windows 8 Pro x64, Windows 8 x64, Windows 8.1, Windows 8.1 Enterprise, Windows 8.1 Enterprise x64, Windows 8.1 Pro, Windows 8.1 Pro x64, Windows 8.1 x64, Windows Vista, Windows Vista Business, Windows Vista Business x64, Windows Vista Enterprise, Windows Vista Enterprise x64, Windows Vista Home Basic, Windows Vista Home Basic x64, Windows Vista Home Premium, Windows Vista Home Premium x64, Windows Vista Ultimate, Windows Vista Ultimate x64, Windows Vista x64 |
| Display | LCD |
| Product color | Black |
| Display diagonal | 2.4 \ |
| Market positioning | Home & office |
| Storage temperature (T-T) | -20 - 40 °C |
| Operating temperature (T-T) | 10 - 35 °C |
| Storage relative humidity (H-H) | -5 - 85 % |
| Operating relative humidity (H-H) | 20 - 80 % |
| Card reader integrated | - |
| Sound pressure level (printing) | 53 dB |
| Sustainability certificates | RoHS, ENERGY STAR |
| Standard interfaces | Ethernet, USB, Wireless LAN |
| Wi-Fi standards | 802.11b, 802.11g, Wi-Fi 4 (802.11n) |
| Cabling technology | 10/100Base-T(X) |
| Ethernet LAN data rates | 10, 100 Mbit/s |
| Mobile printing technologies | Apple AirPrint, Epson Connect, Epson Email Print, Epson Remote Print, Epson iPrint, Google Cloud Print, Mopria Print Service |
| Total input capacity | 180 sheets |
| Total output capacity | 30 sheets |
| Envelopes sizes | 10, C6, DL |
| Photo paper sizes | 9x13, 10x15, 13x18, 20x25 cm |
| Maximum print size | 216 x 1200 mm |
| Paper tray media types | Bond paper, Photo paper, Plain paper |
| Non-ISO print media sizes | Letter |
| ISO A-series sizes (A0...A9) | A4, A6 |
| Multi-purpose tray media types | Executive, Legal, Letter |
| Maximum ISO A-series paper size | A4 |
| AC input voltage | 100 - 240 V |
| AC input frequency | 50 - 60 Hz |
| Power consumption (off) | 0.2 W |
| Power consumption (sleep) | 0.7 W |
| Power consumption (standby) | 5.3 W |
| Power consumption (average operating) | 12 W |
| Depth | 347 mm |
|---|---|
| Width | 375 mm |
| Height | 187 mm |