Proof Sign-off:
K. Pipa
T. Takahashi
S.Fish
R4CA710/B370
Rev. C
SET_2400.FM A2 size
8/5/02
Unpacking
Unpacking Unpacking
Unpacking
1. Make sure the following items are included and not damaged. If any items are missing or
damaged, contact your EPSON dealer immediately.
2. Remove the packing tape from your scanner, but
leave the yellow sticker in place until
instructed to remove it.
m
Installing the Software
Installing the Software Installing the Software
Installing the Software
The scanner software CD-ROM contains the EPSON TWAIN driver, software, and electronic manuals.
You must install the software BEFORE connecting the scanner to your computer.
1. Insert the scanner software CD-ROM into the CD-ROM or DVD drive.
Macintosh users:
After inserting the CD-ROM, the EPSON folder appears
on the desktop. (If the EPSON folder does not appear,
double-click the
EPSON
icon on the desktop.)
Double-click the
EPSON
icon inside the folder.
2. The EPSON Installation Program dialog box appears.
Select
Install Software
and click .
Note for Windows users:
If the EPSON Installation Program dialog box does not
appear, double-click the
My Computer
icon. Click the
CD-ROM icon, then select
Open
from the File menu.
Double-click
Setup. exe
.
3. Follow the on-screen instructions until all of the software is installed. When a message appears
informing you that installation is complete, click
OK
.
4. Restart your computer if a message appears instructing you to do so.
Note for Mac OS X users:
The software will be installed for use in the Classic mode.
For Perfection 2400 Photo users
To install Adobe
®
Photoshop
®
Elements, insert the Photoshop CD into the CD-ROM or DVD drive,
then follow the on-screen instructions.
Macintosh users:
After inserting the CD-ROM, double-click the
Adobe
®
Photoshop
®
Elements
icon that appears on
the desktop. Then double-click the folder of your preferred language. and double-click the
Adobe
®
Photoshop
®
Elements
folder. To begin installation, double-click the installer icon . Then
follow the on-screen instructions.
Setting Up the Scanner
Setting Up the Scanner Setting Up the Scanner
Setting Up the Scanner
1. Remove the yellow sticker from the back of the
scanner.
2. Connect the integrated TPU connector to the
scanner's option connector.
3. Slide the transportation lock all the way to the
right.
4. Connect the power cord and AC adapter, as
shown.
5. Connect the AC adapter to the DC inlet on
the back of the scanner.
6. Plug the other end of the power cord into an electrical outlet.
c
Caution:
❏ It is not possible to change the AC adapter's input or output voltage. If the label on
the AC adapter does not show the correct voltage, contact your dealer. Do not plug
in the power cord.
❏ Whenever you unplug the scanner, wait at least 10 seconds before plugging it back
in. Rapidly plugging and unplugging the scanner can damage it.
Note:
This scanner does not have a power button. It turns on when you connect the AC adapter and
then plug in the power cord.
The scanner turns on and begins to warm up. The
]
Start button blinks green until the scanner finishes
warming up, then stops blinking and stays green.
This indicates that the scanner is ready for use.
Note:
The
]
Start button light turns off if you do not use the scanner for about 15 minutes.
7. Connect the square connector on the USB cable to the USB port on the back of the scanner.
Then connect the other end of the USB cable to any available USB port on your computer.
Note:
❏
Do not connect the scanner through any hubs.
❏
To turn off the scanner, unplug the power cord from the electrical outlet.
AC adapter
power cord
scanner software CD
USB cable
The contents may vary in certain locations.
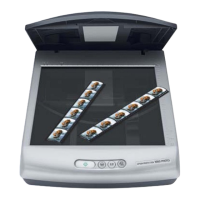
scanner
(Perfection 2400 Photo)
or
film holder
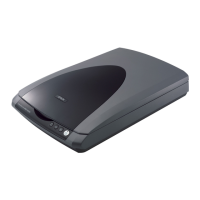
scanner
(Perfection 1660 Photo)
Important!
Leave the yellow
sticker in place until you
are instructed to
remove it.
transportation lock
option connector
integrated TPU connector
DC inlet
power cord
AC
adapter
USB port
Plug this end of the USB cable into
your computer.
4xxxxxx Rev.0
1-F BK
4xxxxxx Rev.0
1-F Y
4xxxxxx Rev.0
1-F M
4xxxxxx Rev.0
1-F C
4xxxxxx Rev.0
1-F BK2
English
4025230-00
xxx
c
Cautions
must be
observed to avoid damage
to your equipment.
Notes
contain important
information and useful tips on
the operation of your scanner.
Warnings, Cautions, and Notes
w
Warnings
must be
followed carefully to
avoid bodily injury.
Color Image Scanner
Setup
The appearance of dialog boxes on
this sheet may differ slightly from those
on your screen.