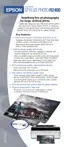
70 Printing Special Photos
Swapping the Black Ink Cartridges
Be sure you have the other black cartridge handy before you begin. Once you start
replacing a cartridge, you must complete all the steps in one session.
You can replace a cartridge whether the red H ink light is off, flashing, or on.
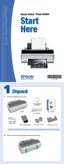
1. Make sure the printer is turned on (the green P power light should be on, but not
flashing). Then open the printer cover.
2. Press the H ink button.
The print head moves and the green P power light flashes.
3. Lift up the cartridge cover.
4. Press in the tab on the back of the black cartridge, and lift it out of the printer as
shown below. Store this cartridge in a sealable plastic bag for later use.
5. Shake the new cartridge four or five times before
opening its package. (Don’t shake it after it’s
unwrapped.)
6. Remove the new cartridge from its package.
7. Slide the new cartridge into its slot. The side with the green circuit board goes in
the front of the slot.
Caution: Don’t touch the green circuit board on
the front of the cartridge; you may inhibit normal
operation and printing.

 Loading...