Start Here
Caution: Do not remove any other labels or seals, or ink will
leak. Do not touch the areas shown here.
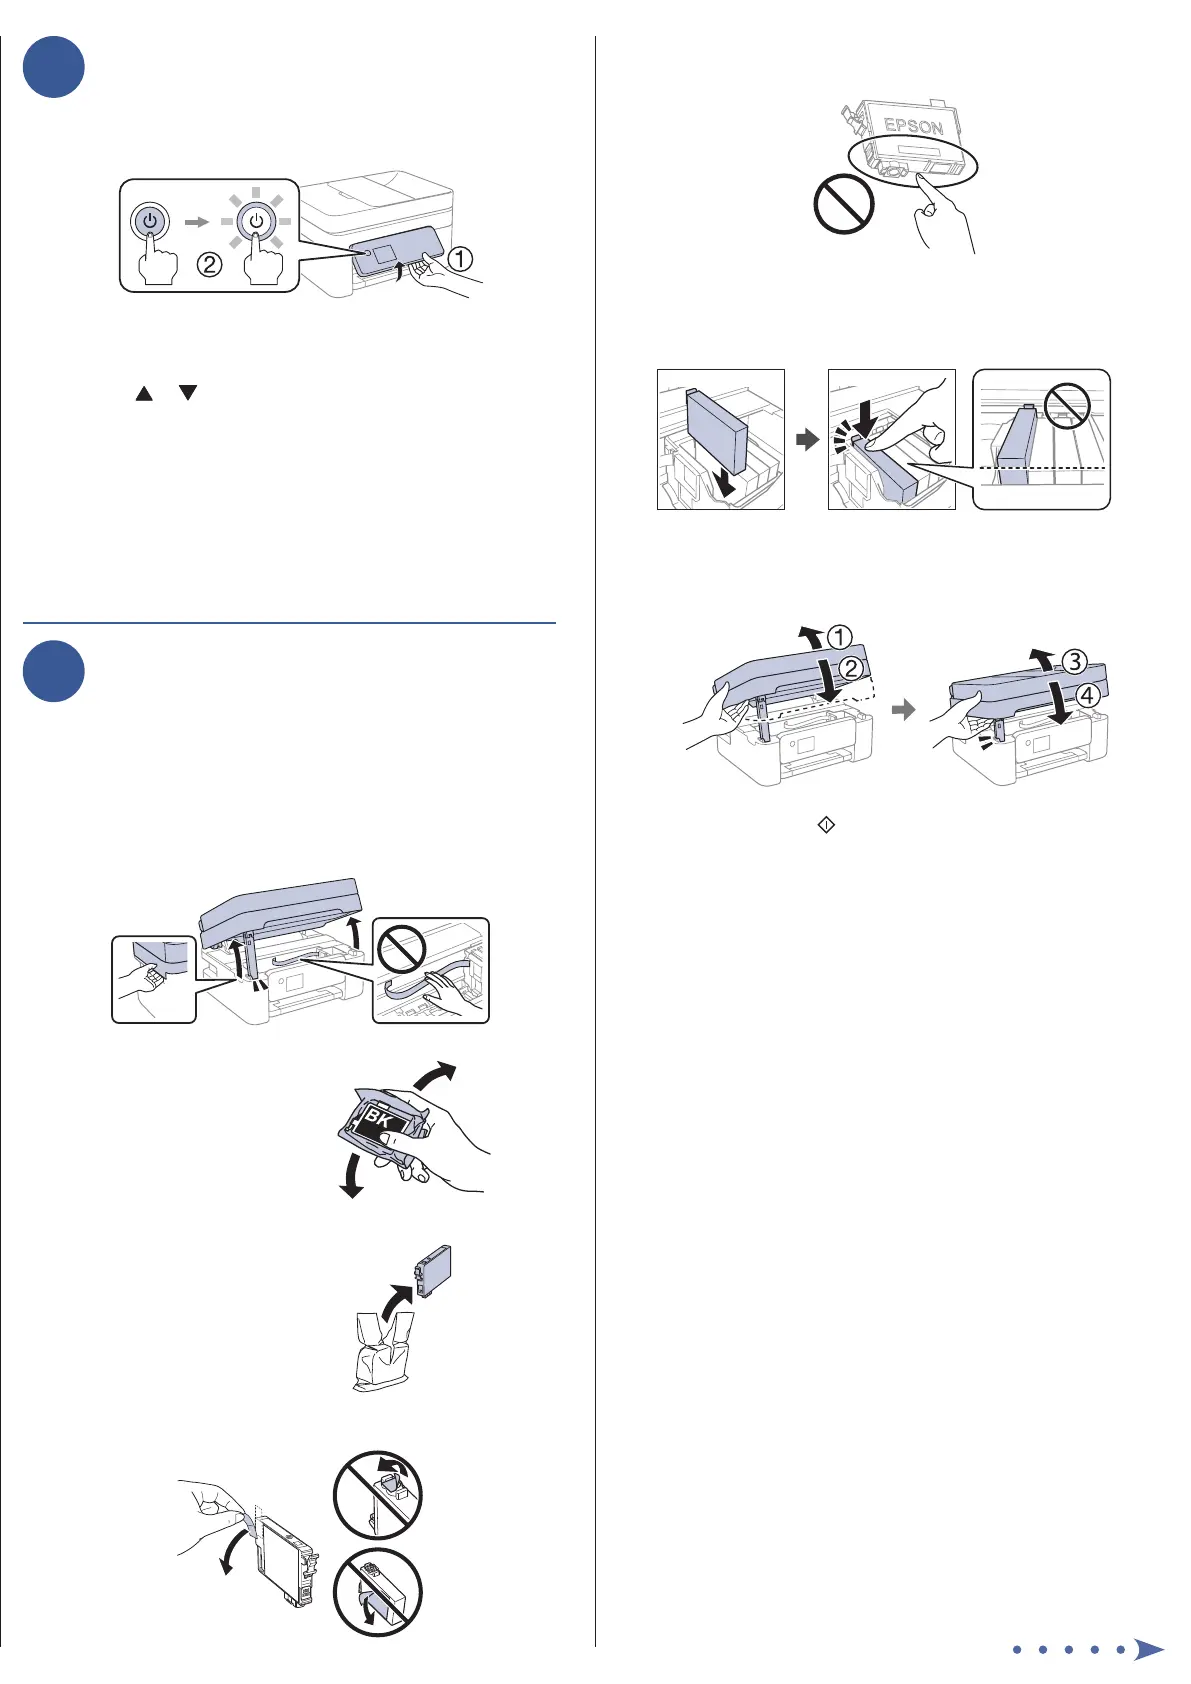
5 Insert the cartridge in the holder for each color. Press
each cartridge down until it clicks. Make sure all
cartridges are pushed down into place.
6 Lower the scanner unit: Lift the scanner unit up slightly
and lower it. When the scanner unit catches, lift it up
again and lower it completely.
7 WF-2930: Press .
WF-2950: Select Installed and press OK.
The printer starts charging the ink. When you see a
completion message on the printer’s LCD screen,
charging is complete.
Caution: Don’t turn o the printer or raise the scanner unit while
the printer is charging or you’ll waste ink.
Note: As part of setup, your product’s serial number will be
sent to a secure Epson server so that you can be eligible to
participate in programs we may oer from time to time, including
the Epson ink replenishment program. You will have a separate
opportunity to consent to participating in such programs.
8 Follow the on-screen instructions to adjust the print
quality of your product.
Note:
• You need to load 3 sheets of letter-size paper before you can
adjust the print quality. See “Load paper” on this sheet for
details.
• Select Adjust Later if you want to adjust the print quality later.
For more information, see the online User’s Guide.
IMPORTANT: Before using this product, make sure you read
these instructions and the safety instructions in the online
User’s Guide.
Note: This printer is designed for use with Epson
®
cartridges only, not
third-party cartridges or ink. For important ink information, visit
http://epson.com/epsonink (U.S.) or http://epson.ca/epsonink
(Canada) or see your printer box.
Important Safety Instructions: When using telephone equipment, you
should always follow basic safety precautions to reduce the risk of fire,
electric shock, and personal injury, including the following:
• Do not use the Epson product near water.
• Always keep this guide handy.
• Avoid using a telephone during an electrical storm. There may be a
remote risk of electric shock from lightning.
• Do not use a telephone to report a gas leak in the vicinity of the leak.
Caution: To reduce the risk of fire, use only a No. 26 AWG or larger
telecommunication line cord.
The illustrations show the WF-2950, but the steps are the same
for the WF-2930, unless otherwise specied.
1
Unpack
Note: Do not open the ink cartridge packages until you are ready to
install the ink. Cartridges are vacuum packed to maintain reliability.
1 Remove all protective materials from the product and lift
up the scanner unit until it locks into place.
2 Remove all protective materials from inside the product.
Caution: Do not touch the at white cable.
3 Lower the scanner unit: Lift the scanner unit up slightly
and lower it. When the scanner unit catches, lift it up
again and lower it completely.
Note: The scanner unit must be lowered completely before it can
be opened again.
4 Connect the power cord to the back of the product and to
an electrical outlet.
Caution: Do not connect to your computer yet.
2
Choose a setup method
The Epson Smart Panel
®
app can help you set up your printer
through an interactive, step-by-step process using your
smartphone or tablet.
If you do not want to use
a mobile device for setup,
skip to the “Turn on and
congure” section.
To use your mobile device
for setup, continue to
step 1.
OR
1 Download the Epson Smart Panel app
from your device’s app store. Do not
launch the app yet.
2 Hold the power button until it lights up to turn on the
product.
Note: Do not connect your product to your computer yet.
3 Launch the app and follow its instructions to set up your
product. If necessary, tap the + icon on the top right
corner of the app’s home screen, tap Start setting up,
and follow the instructions to set up your product.
For information on connecting your product to a computer,
using voice-activated printing, or solving problems, or for
details on reaching Epson support, see the sections on the
back of this sheet.
3
Turn on and configure
1 Raise up the control panel, then turn on the product and
wait for the power light to turn on.
Note: If an error code appears, turn o the product and check
that no protective material has been left inside the product.
2 Press or to select your language, then press OK.
3 When you see the Epson Smart Panel setup screen, select
the option to continue without the app and press OK.
4 Select your country, date, and time on the LCD screen
using the buttons on the control panel.
Note: You can change these settings later using the product’s
control panel. For more information, see the online User’s Guide.
4
Install ink cartridges
Caution: Keep the ink cartridges out the reach of children and do not
drink the ink.
Note: The included initial cartridges are designed for reliable printer
setup and cannot be used as replacement cartridges or resold. After
setup, the remaining ink is available for printing.
1 Lift up the scanner unit until it locks into place.
2 Gently shake the black ink
cartridge.
Caution: Do not shake the other
ink cartridges.
3 Unpack the ink cartridges.
4 Remove only the yellow tape from each ink cartridge.
WF-2930/WF-2950

 Loading...