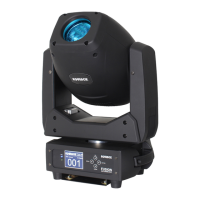
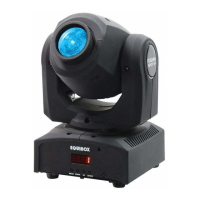
The Equinox Fusion Spot XP MKIII is a compact and lightweight moving head fixture designed for professional use, offering a range of control options and features for dynamic lighting displays.
Function Description:
This lighting fixture operates in various modes including Sound active, Auto, Master/slave, and DMX-512. It features 7 gobos plus open, 7 colors plus open, and electronic dimming from 0-100%. The unit is equipped with a 50W white LED light source, providing bright and efficient illumination. Its pan and tilt capabilities allow for a wide range of movement, with a pan of 540° and a tilt of 190°.
Important Technical Specifications:
- Voltage: 100V~240V, 50/60Hz
- Fuse: T6.3A 250V
- Power consumption: 82W
- Light source: 1 x 50W white LED
- Dimension: 159 x 147 x 265mm
- Weight: 2.6 kg
- Pan/Tilt: 540°/190°
- Power sockets: IEC power input
- XLR sockets: 3-Pin XLR input/output
- DMX Channels: 1CH/8CH/10CH
Usage Features:
Control Panel and Menu Navigation:
The unit's control panel includes a display and four buttons: MENU, DOWN, UP, and ENTER.
- MENU: Selects programming functions.
- DOWN: Moves backward in selected functions.
- UP: Moves forward in selected functions.
- ENTER: Confirms selected functions.
To select a function, press MENU until the desired function appears on the display. Press ENTER to select, then use DOWN and UP to change the mode. Confirm with ENTER. To exit without changes, press MENU again. Holding MENU for one second or waiting one minute returns to the main menu.
Main Functions:
- ADDR (DMX Address Setting): Sets the DMX address from 001-512. Press MENU to select ADDR, ENTER to blink the display, then use DOWN/UP to choose the address. Confirm with ENTER.
- CHND (Channel Mode): Selects DMX channel modes: 1CH, 8CH, or 10CH. Press MENU to select CHND, ENTER to blink the display, then use DOWN/UP to select the mode. Confirm with ENTER.
- SLMD (Master/Slave Mode): Sets the unit as Master (MAST), Slave 1 (SL1), or Slave 2 (SL2). Press MENU to select SLMD, ENTER to blink the display, then use DOWN/UP to select the mode. Confirm with ENTER.
- Master/Slave Built-In Preprogrammed Function: Link units via DMX cable. Set the first unit as master (MAST) and select a show (SH1, SH2, SH3, SH4). Other units should be set to Slave 1 (normal) or Slave 2 (2-light show) mode for synchronized light shows. Slave 2 provides a random mirror image, including pan and tilt inversion, for a more dynamic display.
- SHND (Show Mode): Selects one of four built-in shows (SH1, SH2, SH3, SH4). Press MENU to select SHND, ENTER to blink the display, then use DOWN/UP to select the show. Confirm with ENTER.
- SOUN (Sound Mode): Activates or deactivates sound-active mode (ON/OFF). Press MENU to select SOUN, ENTER to blink the display, then use DOWN/UP to select ON or OFF. Confirm with ENTER.
- SENS (Sound Sensitivity): Adjusts sound sensitivity from 0-100 when in sound-active mode. Press MENU to select SENS, then use UP/DOWN to set the value. Confirm with ENTER.
- BLND (Blackout): Enables or disables blackout (YES/NO). When set to ON, Show Modes will not run. Press MENU to select BLND, then use UP/DOWN to select YES or NO. Confirm with ENTER.
- LED (LED Display): Turns the LED display on or off (NO/OFF). Press MENU to select LED, then use DOWN/UP to select NO (display on) or OFF (display off). Confirm with ENTER.
- DISP INVERT (Display Inversion): Inverts the display (dISP for normal, d5IP for inverted). dISP is for floor standing, d5IP for hanging upside down. Press MENU to select dISP, ENTER to change the mode. It saves automatically after 8 seconds.
- PAN INVERT (Pan Inversion): Inverts pan movement (NO for normal, YES for inverted). Press MENU to select PAN, then use DOWN/UP to select NO or YES. Confirm with ENTER.
- TILT INVERT (Tilt Inversion): Inverts tilt movement (NO for normal, YES for inverted). Press MENU to select TILT, then use DOWN/UP to select NO or YES. Confirm with ENTER.
- TEST (Self-Test): Runs a built-in self-test program. Press MENU to select TEST, then ENTER to start.
- VER (Software Version): Displays the unit's software version. Press MENU to select VER, then ENTER to view.
- RSET (Reset): Resets all channels to their standard position. Press MENU to select RSET, then ENTER to confirm.
DMX 512 Configuration (Examples):
The manual provides detailed DMX channel assignments for 1, 8, and 10 channel modes, covering functions such as Pan, Tilt, Colour, Gobo, Shutter, Pan/Tilt Speed, Dimmer, and various effects like strobe, shake, and scroll.
Troubleshooting:
- Unit not working (no light, no fan): Check power connection and main fuse.
- Not responding to DMX controller: Ensure DMX LED is on, check DMX cable links, verify address settings and DMX polarity, or try a different DMX controller.
- No response to sound: Confirm the unit is not receiving a DMX signal and check the microphone by tapping it (located on the bottom plate).
Maintenance Features:
- General Safety: Always read instructions, keep the user guide, and check for transport damage. Ensure correct voltage/frequency, proper grounding, and indoor use only in a dry location. Maintain at least 50cm ventilation clearance and avoid blocking slots. Disconnect mains power before servicing. Keep flammable materials away.
- Installation: Mount securely via screw holes on the bracket. The structure must support 10 times the unit's weight. Always use a safety cable rated for 12 times the unit's weight. Installation must be performed by qualified professionals in an inaccessible location.
- Temperature: Maximum ambient temperature is 40°C. Do not operate above this.
- Repairs: In case of serious operating problems, stop use immediately. Do not attempt self-repair; contact an authorized technical assistance center and use only same-type spare parts.
- Electrical Safety: Do not touch power cables during operation due to high voltage. Do not open the unit within five minutes of switching off.
- Damage: Replace housing and lenses if visibly damaged.
- Product Use: This fixture is for professional use only, not household use.
- LED Warning: Risk Group 2 LED product (EN 62471). Do not view light output with optical instruments.
- Warranty: One year from date of purchase.
- Fixture Cleaning: Periodically clean external optical lenses to optimize light output. Frequency depends on the environment (damp, smoky, dirty). Use a soft cloth with normal glass cleaning fluid or mild soapy water. Dry parts carefully. Clean external optics at least every 20 days.