1312
Settings & Preferences
How to use Preferences
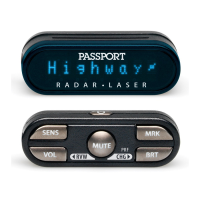
To access Preferences, press and hold both the MRK
and SEN buttons. PASSPORT Max2 will display
“Preferences,” indicating it is in program mode.
Once the unit is in Preferences mode, the MRK button
is used to review the preference categories, and
the VOLUME
+ AND − buttons are used to change
the individual settings within the selected option.
To exit Preferences, simply wait a few seconds
without pressing a button. The unit will display
“Completed” and return to normal operation.
Example:
Here’s how you would turn the AutoMute feature off:
1 Enter Preferences by pressing and holding both the
MRK and SEN buttons. PASSPORT Max2 will display
“Preferences.”
2 Press the MRK button to scroll through the
categories to “AutoMute.”
3 Since the factory setting is for AutoMute to be on,
PASSPORT Max2 will show AutoMute as ON.
4 Press the VOLUME + or − button to change from
ON to OFF.
5 To complete this change, simply wait a few seconds
without pressing a button. The unit will display
“Completed” to confirm your selection.
NOTE: You can only access and customize the AutoMute
feature while in the Advanced user mode. See Overview
of Preferences below for details on how to switch user
modes.
Overview of Preferences
Press and hold the MRK and SEN buttons to access
Preferences. To exit Preferences, simply wait a few
seconds without pressing a button. The unit will
display Completed to confirm your selections.
NOTE: AutoPower works only with constant-power
ignitions.
NOTE: When AutoPower is ON, the display will go
dark after the vehicle has been sitting still for 30
minutes, to save screen life. The screen will turn back on
automatically once your vehicle reaches a speed of 10
mph.
To restore PASSPORT Max2 to its original factory
settings, press and hold the SEN and BRT buttons
while powering on the detector. A “Restored”
message will display, acknowledging the reset.
To view your device’s serial number and software
version, press and hold the MRK and MUTE buttons
while powering on the detector.
Press MRK to go from Press VOLUME + or – to change
one category to the next your setting within a category
User Mode Advanced* Access and customize all Settings and Preferences
Novice Access and customize units and display color, (all other
Settings are set to factory defaults)
NOTE: Switch back to advance mode to view all Preferences
Pilot Scan Bar* Scanning Bar with Full Word
Full Word Full Word: Auto, Auto NoX, or Highway
Display Color Blue*/Green/Red/Amber Set color to match your vehicle’s dash display
Speed Display On* Displays current speed
Off Displays battery voltage
Cruise Alert 20 mph* Offers double beep alert tones below specified speed
Off / 20-90 mph
Over Speed 70 mph* Reminds you when you exceed a specified speed
Off / 20-90 mph
Meter Mode Standard* Single band with bar graph of signal strength
Spec Single band with numeric frequency
Expert Multiple bands with bar graph of signal strengths
Simple Simple messages replace bands:
Caution (if traveling below cruise alert limit)
Slow Down (if traveling above cruise alert limit)
Tones Standard* Standard ESCORT alert tones
Mild Mild doorbell chime alert tones
AutoMute On* / Off Automatically reduces audio during alert
AutoLearn On* / Off Automatically stores and locks out false alarms
Units English* / Metric Units for distance and speed
Language English* / Espanol Language for voice and text
Voice On* / Off Voice announcements
GPS Filter On* / Off Enables GPS-powered features
AutoPower Off Power turns on or off depending on your vehicle’s ignition
type (constant power or switched)
1 Hour Powers off automatically after 1 hour
2 Hours Powers off automatically after 2 hours
4 Hours* Powers off automatically after 4 hours
8 Hour Powers off automatically after 8 hours
NOTE: If auto power is on, the display screen goes blank after 30 minutes
to save screen life. Display screen will turn on automatically after you reach
10 MPH
Band Enables Default* Default Settings for North America
Modified Customize the bands you want to monitor
Press SEN to go from one Press VOLUME + or – to change
band category to the next your setting within a category
X Band On* / Off
K Band On* / Off
Ka Band On* / Off
Ka-POP On / Off*
Laser On* / Off
TSR On* / Off Automatically rejects traffic flow sensors-monitoring false alarms
Marker Enable On* / Off Other, Red Light Camera, Red and Speed Camera, and Speed Trap
Modified Customize the types of locations you want to mark for future reference
Press SEN to go from one Press VOLUME + or – to change
marker category to the next your setting within a category
Other On* /Off Other location
Redlight On* / Off Red light camera
Red & Speed On* / Off Red light & speed camera
Speed Cam On* / Off Speed camera
Speed Trp On* / Off Speed trap
Air Patrol On* / Off Known aircraft patroled areas
NOTE: User cannot mark an air patrol location
Clear Locations Marked Clear all user Marked locations. Press SEN button to confirm
Lockouts Clear all lockouts. Press SEN button to confirm
Defender Clear all DEFENDER data. Press SEN button to confirm
Format Clear DEFENDER database, all markers, and all lockouts.
Press SEN button to confirm
Press and hold
the MRK and
SEN buttons
to access
Preferences. To
exit Preferences,
simply wait a
few seconds
without pressing
a button. The
unit will display
Completed to
confirm your
selections
.
*Default Setting
 Loading...
