

А
АлексейMar 23, 2026
Время от времени пропадает так скрин на дисплее что делать
Время от времени пропадает так скрин на дисплее что делать
Internal video issues like loss of video or intermittent issues may indicate a failing or incorrectly set LVDS card.
Steps to replace LVDS cards, including removing covers, disconnecting cables, and checking switch settings.
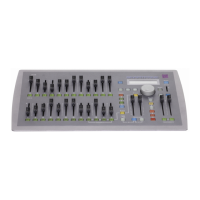
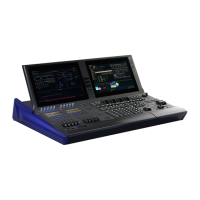
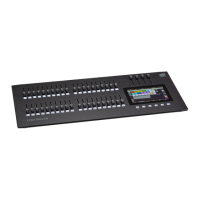
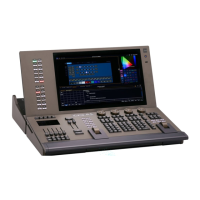
This document outlines the procedure for replacing LVDS (Low-Voltage Differential Signaling) cards in ETC Gio, Eos Ti, and Gio @5 lighting consoles. The LVDS cards are critical components responsible for video signal transmission to the console screens.
The LVDS cards serve as display drivers, converting digital video signals from the console's internal processing unit into a format suitable for the console's screens. A properly functioning LVDS card ensures clear, stable video output to the console's display panels, which are essential for operating the lighting software and visualizing programming. Issues such as loss of video, flickering, or intermittent display problems often point to a malfunction in these cards. Replacing a faulty LVDS card restores the console's display functionality, allowing users to interact with the software and monitor their lighting cues effectively. The process involves accessing the internal components of the console, specifically the area behind the display screens, to locate and replace these small blue circuit boards.
The replacement process is designed to be manageable for technicians with some experience in console maintenance. It begins by requiring the user to lift the screen panel and remove the lower chassis cover, providing initial access to the console's internal structure. For certain models or situations where space is restricted, the document suggests disconnecting the display panel lift piston(s). This step is crucial for creating enough room to access the lower screws of the panels located behind the screens, which might otherwise be difficult to reach. A key safety precaution highlighted is to prop up the screen securely once the piston(s) are disconnected to prevent it from falling and causing damage or injury.
Once the necessary covers are removed, the user will be able to locate the LVDS board, described as a 2x3" blue board attached to the back of the screen. For the Eos Ti model, an additional internal panel covers these boards, requiring an extra step to remove it. The document provides visual aids, including images of the LVDS board's location in different console models like Eos Ti, Gio/Cobalt, and Gio @5, to guide the user. These images clearly mark where the LVDS boards are situated behind the display panels, helping to identify the correct component for replacement.
Before proceeding with the physical replacement, the document emphasizes checking the switch settings on the existing LVDS board. Specifically, it advises checking switch S1. If S1 is found to be in the "on" position, the user is instructed to turn it "off" and then monitor the display issue. This is an important diagnostic step because S1 is identified as a programming switch that was sometimes left "on" during production, and it can cause intermittent video loss. By simply adjusting this switch, the problem might be resolved without needing a full board replacement. This highlights a troubleshooting feature that can save time and resources.
The physical removal of the LVDS board involves unscrewing four screws located at its corners. The document suggests removing the board first before disconnecting any cables, which can simplify the process and prevent accidental damage. A critical warning is issued regarding the delicacy of the cable connected directly to the screen itself, advising users to avoid pulling on it to prevent damage. This attention to detail in the instructions helps ensure a careful and successful replacement.
The maintenance aspect of this procedure is centered on ensuring proper configuration and careful handling of delicate components. After replacing the LVDS board, the final step involves checking the settings for the new board before reinstalling it. This is crucial because the LVDS boards have configurable settings that must match the console's requirements to function correctly. The document explicitly states that the settings shown in the provided images are not necessarily the correct ones for every console and directs the user to a linked article for more information on the correct settings. This emphasizes the importance of consulting specific documentation for proper configuration, ensuring compatibility and optimal performance of the new board.
The document includes a detailed image of an LVDS board, highlighting specific switches and components. For instance, it points out "Both OFF" for certain switches and "S5, set per console and right/left" for another, indicating that some settings are universal while others are console-specific. This level of detail is invaluable for technicians performing the replacement, as it guides them in configuring the new board correctly. The warning "Please note, these are not necessarily the correct settings. Check article linked below for more info." reinforces the need for precise configuration based on the specific console model and screen position (left or right display).
Overall, the document provides a structured and detailed guide for maintaining the display functionality of ETC Gio, Eos Ti, and Gio @5 consoles. It combines step-by-step instructions with critical warnings, diagnostic tips, and references to further information, empowering users to address video display issues effectively. The emphasis on careful handling, pre-replacement diagnostics, and post-replacement configuration ensures that the maintenance procedure is thorough and leads to a successful resolution of display problems. This comprehensive approach to maintenance helps prolong the life and reliability of these professional lighting consoles.
| Local I/O | Two Ethernet ports, Four USB ports |
|---|---|
| Control | MIDI, OSC |
| Connectivity | Two Ethernet ports, Four USB ports |
| Software | Eos Family software |
| Memory | Internal |
| Power Requirements | 100-240V AC, 50-60Hz |