18
7• OPERATING INSTRUCTIONS
7•1 PDI - PRE DELIVERY INSPECTION
• Because this is a highly technical operation, the PDI of your ride-on
mower is done by your ETESIA dealer.
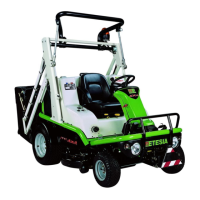
7•2 SAFETY SYSTEMS
• The mower is equipped with a safety frame (picture 2) and a seat
belt (a picture 4). For your safety, only use the mower with the
safety frame up. It can be folded down by removing the safety pin (a
picture 2) and pivoting the frame on its axis (picture 3). In the folded
position, the frame must be locked against rotation by the cord (a
picture 3).
Always fasten the seat belt when the ROPS is in the position
of use.
Never fasten the seat belt when the ROPS is not in the position
of use.
Lower and raise the ROPS frame cautiously so as not to pinch
your ngers between the xed and moving parts.
• The mower is tted with safety switches which are actioned by:
1. the drive transmission operating link
2. the rear part of the grassbox and/or the front of the grassbox (with
lift-emptying)
3. the parking brake
4. the seat.
• Engine can only be started if:
- the driver is sitting on the seat or the parking brake is on
- both driving pedals are in neutral position
- the cutting unit is not engaged.
• The engine stops if:
- the operator leaves the seat without putting on the parking brake
- the operator leaves the seat with the cutting unit engaged
- the operator presses a drive pedal with the parking brake on
- the operator is driving too fast without the bin in the working posi-
tion (with HVHP - HVHPX - BVHP - BVHPX models only).
• The cutting unit stops if:
- the operator leaves the seat
- a grassbox emptying operation is on its way.
• The cutting unit can only be started if:
- the driver is sitting on the seat
- the rear part of the grassbox is in the closed position
- the grassbox is in the working position.
REMARK: if the blade engagement indicator (item 12 page 9) is on,
you can start blades.
CAUTION! Opening the grassbox stops the cutting unit.
The cutting unit starts again as soon as the grassbox unit is
back in the working position.
• The machine only moves if:
- the driver is sitting on the seat
- the parking brake is off.
REMARK: for BPHP2 and BPHPX2 models, if the ‘safe to
move machine’ indicator (item 7 page 9) is on, you can move the
machine.
7•3 FUEL
The engine uses diesel for BPHP2 and BPHPX2 models. The engine
uses 95 unleaded fuel for the HVHP, HVHPX, BVHP and BVHPX
models.
WARNING ! Use clean and fresh fuel. Handle the fuel
with care. When lling the tank, use a funnel and wipe any
fuel splashes immediately.
Do not ll the tank with the engine running or when the engine is hot.
Never smoke. Avoid any ames or sparks.
• When lling the tank, please avoid fuel spilling.
• If, in spite of these precautions, should some fuel spilled please:
a) Clean all the contaminated parts scrupulously.
b) Only restart the machine after you have checked that all spilt fuel
has been eliminated.
• Ensure that the fuel tank cap is screwed on tightly.
• The tank must be emptied out of doors (in the open air).
NOTE: In cold weather, the viscosity of diesel increases and parafn
crystals form. This may affect the performance of the engine as its fuel
supply is defective. In this case, use winter quality diesel, which can
be used at temperatures as low as -20°C.
• To avoid the poor running of the engine, after it has been polluted
(condensation water, detritus), the fuel tank must be emptied every
1000 hours or once a year.
7•4 LONGITUDINAL SEAT ADJUST-
MENT
For maximum comfort, the seat can be adjusted (items 6 and 7 page 8).
• To unlock the seat, lift the lever (item 3 page 8).
• Move the seat into the position required.
• Release the lever and check that the seat is blocked in position.
REMARK: The seat can be folded forward in order to keep it clean
and dry.
7•5 STARTING AND STOPPING THE
ENGINE
Checks before starting
• The machine is delivered ready for use. Nevertheless you should
check:
- the engine oil level (see paragraph 10•1•1 page 25).
- the oil level in the hydraulic tank (see paragraph 10•2•1 page 27).
We ask you as well to ll up with fuel before using for the rst
time.
• Check that all the safety labels are stuck on the machine (page 6).
Be particularly sure to follow the instructions in paragraph 1 «Your
safety and that of others».