EasyManua.ls Logo

Eureka E65 User Manual

Eureka E65
51 pages
To Next Page IconTo Next Page
Page #1 background imageLoading...
Page #1 background image
2
INSTRUCTION MANUAL
E65 - E75/2 - E83
EUREKA S.p.A.
VIALE DELL’ARTIGIANATO 30/32, 35013 CITTADELLA (PD) ITALY
Tel. ++39 - 049 - 9481800 Fax. ++39 -049 9481899
INTERNET : www.eurekasweepers.com E-MAIL : info@eurekasweepers.com
Question and Answer IconNeed help?

Do you have a question about the Eureka E65 and is the answer not in the manual?

Eureka E65 Specifications

General IconGeneral
BrandEureka
ModelE65
CategoryFloor Machine
LanguageEnglish

Summary

INTRODUCTION

MACHINE IDENTIFICATION

GENERAL WARNINGS AND ADVICE

DANGER SIGNS - ATTENTION

Highlights operations representing a potentially hazardous situation for the operator.

SAFETY INSTRUCTIONS

Essential safety instructions including wearing protective gear and avoiding water.

EMERGENCY SITUATIONS

Guidelines for emergency scenarios, focusing on fire extinguishing methods.

RESPONSIBILITIES OF THE OPERATOR

IMPORTANT COMMUNICATION

CLEANING AND MAINTENANCE

STORING THE MACHINE

Guidelines for proper storage of the machine when not in use.

WARNING

PRECAUTIONS FOR THE SAFETY OF OPERATORS AND TECHNICIANS

UPDATING OF THE USER'S MANUAL

Procedure for updating the user's manual with modifications or new parts.

OBLIGATIONS OF THE EMPLOYER OR OWNER OF THE MACHINE

Outlines the responsibilities of employers/owners regarding the manual.

DISPOSAL

TRANSPORT – HANDLING

Guidelines for safe transport and handling of the machine.

TRANSPORTING THE MACHINE BY MANUAL PUSHING

UNPACKING

INSTALLING BATTERIES

BE VERY CAREFUL NOT TO TIP OVER THE BATTERIES AS ACID COULD SPILL AND DAMAGE THE MACHINE.

Crucial warning about handling batteries to prevent acid spills and damage.

RECHARGING BATTERIES USING AN EXTERNAL CHARGER

Battery acid safety precautions

Safety precautions for handling battery acid.

RECHARGING BATTERIES USING THE CHARGER ONBOARD THE MACHINE (OPTIONAL)

WARNING: MACHINE FUNCTIONS DISABLED WHEN PLUGGING IN ONBOARD CHARGER

Warning that machine functions are disabled when plugging in the onboard charger.

MACHINE COMPONENTS OVERVIEW

Operator Controls and Interface

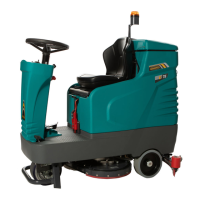
Hand-wheel, seat, control panel, and pedals for operating the machine.

Cleaning System Components

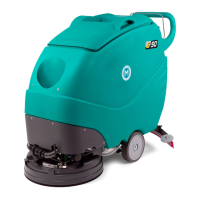
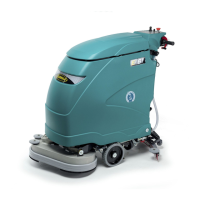
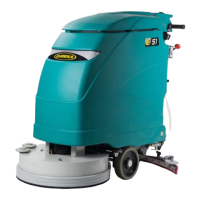
Brush motor, brushes, solution tank, squeegee, and vacuum system parts.

Power and Electrical Components

Batteries, connectors, fuses, and control cards.

MAIN FUNCTIONS AND CONTROLS

Control Panel Overview

Layout and components of the machine's control panel.

Key-Operated Switch

Switch for turning the machine on and off.

Drive Alarm Indicator

Red light indicating drive system faults.

Vacuum Button

Button to activate and deactivate the vacuum function.

Brush Drive Button

Button to activate and deactivate the brush function.

Battery Charging Indicator

Indicates the battery charging status.

Speed Selection

Button to select between normal and reduced speed settings.

EMERGENCY SITUATIONS

SETTING THE CHARGE INDICATOR ACCORDING TO THE BATTERY TYPE

INSTALLING THE SQUEEGEE

ADJUSTING THE SQUEEGEE

How to adjust squeegee inclination for optimal pressure and drying.

ADJUSTING THE SQUEEGEE WHEELS

Adjusting squeegee wheel pressure for different floor types.

MOVING THE BRUSH PLATE

INSTALLING THE ABRASIVE DISC INTO THE DISC PAD HOLDER

INSTALLING BRUSHES AND ABRASIVE DISCS

REMOVING BRUSHES AND ABRASIVE DISCS

FILLING THE DETERGENT SOLUTION TANK

WARNING: DO NOT POUR FLAMMABLE LIQUIDS INTO THE TANK.

Critical warning against using flammable liquids in the detergent tank.

ADJUSTING THE SOLUTION QUANTITY ON THE BRUSHES (WATER + DETERGENT)

SPLASH GUARD LIFTING FOR PRE-WASHING

DETERGENT DOSING SYSTEM (OPTIONAL)

WARNING: THE PUMP DETERGENT DOSING PUMP WORKS ONLY WHEN THE BRUSHES ARE ACTIVE.

Important note on when the detergent dosing pump operates.

USING THE MACHINE

Pre-Operation Checklist

Checklist of items to verify before starting the machine.

Machine Operation Procedure

Step-by-step guide for washing and drying operations.

Operational Precautions and Troubleshooting

Key tips to prevent damage and address common operational issues like wet streaks.

MAINTENANCE

WARNING

Crucial warning against performing maintenance without proper safety measures.

DRAINING AND CLEANING THE RECOVERY TANK

Steps for draining and cleaning the dirty water recovery tank.

CLEANING THE VACUUM FILTER

DRAINING AND CLEANING THE SOLUTION TANK

CHECKING BRUSHES OR ABRASIVE DISCS

CLEANING THE SQUEEGEE

REPLACING SQUEEGEE BLADES

REPLACING THE REAR BLADE

REPLACING THE FRONT BLADE

REPLACING THE SPLASH GUARD BLADES

CLEANING THE DETERGENT SOLUTION FILTER

CHECKING THE GASKET ON THE COVER

CHECKING OR REPLACING FUSES

TO REPLACE IT PROCEED AS FOLLOWS:

Steps for replacing the 50A and 30A fuses.

CHECKING OR REPLACING FUSES IN THE INSTRUMENT PANEL

CHECKING TO BE MADE EVERY 400 HOURS ON THE DRIVE WHEEL

DRIVE WHEEL

Checks for motor carbon brushes and their length.

ELECTRO BRAKE

Checks for correct functioning and values of the electro brake.

DIMENSIONAL TECHNICAL DRAWINGS

E65 SPARE PARTS RECOMMENDED

E75/2 SPARE PARTS RECOMMENDED

E83 SPARE PARTS RECOMMENDED

SERVICING

SERVICING AND MAINTENANCE FOR SCHEDULED SERVICING OF E65 - E75/2 - E83 - M650 - M750 - M830

SERVICING AND MAINTENANCE FOR SCHEDULED SERVICING OF E65 - E75/2 - E83 - M650 - M750 - M830

SERVICING AND MAINTENANCE FOR SCHEDULED MAINTENANCE OF E65 - E75/2 - E83 - M650 - M750 - M830

MOTOR CARBON BRUSHES CHECK

Vacuum Motor Brushes

Check carbon brushes in the vacuum motor.

Brushes Motor Brushes

Check carbon brushes in the brushes motor.

Motorwheel Brushes and Oil

Check carbon brushes and oil level in the motorwheel.

MACHINE SERVICING CHECKLIST

TROUBLESHOOTING TABLE

BEFORE ANY INTERVENTIONS CHECK THE CORRECT VOLTAGE OF THE BATTERY: 24V

Essential pre-intervention check for battery voltage.

The battery does not charge

Troubleshooting steps for battery charging issues.

The brush motor is not spinning

Troubleshooting steps when the brush motor fails to spin.

The drive will not work

Troubleshooting steps for when the machine's drive system is not functioning.

TRACTION BOARD: FLASHING TROUBLESHOOTING:

Guide to interpreting flashing codes on the traction board for diagnosis.

Little or no detergent solution flow on the brush

Troubleshooting steps for low or no detergent solution flow.

The vacuum motor does not work

Troubleshooting steps for a non-functional vacuum motor.

When you start the vacuum motor, it works for 6/7 seconds, then it stops

Troubleshooting for vacuum motor stopping after a short period.

Poor suction on the squeegee

Troubleshooting steps for reduced suction performance of the squeegee.

Battery charger flashing troubleshooting

Interpreting flashing lights on the battery charger for troubleshooting.

TECHNICAL CHART

PRODUCT WARRANTY

IMPORTANT!

Important note regarding warranty claims evaluation process.

INSTALLATION FORM NECESSARY TO ACTIVATE WARRANTY

DICHIARAZIONE DI CONFORMITA' (Declaration of Conformity)

Related product manuals