WARNING! ANY MAINTENANCE SERVICE OR TEST, EXCEPT FOR THOSE DESCRIBED IN THE MANUAL, MUST BE
PERFORMED EXCLUSIVELY BY AN AUTHORISED ASSISTANCE CENTRE (AAC)
BEFORE ANY INTERVENTIONS CHECK THE CORRECT VOLTAGE OF THE
BATTERY: 24V
The battery does not charge
1. Faulty or worn elements
The instruments on the panel do not
work when placing the key
2. Low Battery
3. Burnt fuse
4. Battery connector unplugged
5. Faulty ignition key
6. For machines with on-board battery charger:
Faulty internal remote switch
7. For machines with on-board battery charger:
Machine charging
Recharge the battery
Replace the fuse
Plug the battery connector
Replace the key
Replace the battery charger
Unplug the battery charger from the mains
The brush motor is not spinning
8. Low Battery
9. Faulty electric motor remote switch
10. Faulty brush switch
11. Carbon contacts worn out
12. 30A magnetothermic circuit breaker engaged
13. Faulty motor
14. Brush plate lifted
15. Faulty micro-switch on the brush plate
16. Locked or damaged electrobrake
17. Faulty traction board
Recharge the battery
Replace the electric motor remote switch
Replace the brush switch
Replace the contacts
Reset the magnetothermic circuit breaker
Replace the motor
Lower the brush plate
Replace the micro-switch
Check the correct functioning and the
absorptions (absorption 0.9 – 1.1 A; resistance
22 - 25Ω)
Replace the traction board
18. Low Battery
19. Seat safety engaged
20. Key not inserted
21. Faulty 50A drive system protection fuse
22. Faulty drive wheel
23. Locked or damaged electrobrake
24. Drive wheel carbon contacts worn out
25. Fault electronic control
26. Fault pedal control
Recharge the battery
Sit down
Insert the key
Replace the fuse
Replace or repair the drive wheel
Check the correct functioning and the
absorptions (absorption 0.9 – 1.1 A; resistance
22 - 25Ω)
Replace the contacts
Replace the electronic control
Replace or repair the pedal control
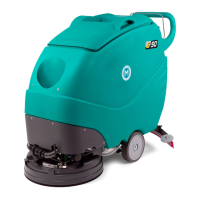
TRACTION BOARD: FLASHING TROUBLESHOOTING:
- OFF NO ERROR, NORMAL CONDITION
- 1 FLASH: forward gear microswitch
engaged upon ignition
- Bring the drive control to zero position and
make sure that it resumes operation.
- 2 FLASHES: reverse gear microswitch
engaged upon ignition
- Check the microswitch on the drive control
- 3 FLASHES: interruption of potentiometer signal
Check the potentiometer cables
- 4 FLASHES: potentiometer not idle upon ignition
- Bring the drive control to zero position.
- Make sure that the control returns to zero
correctly.
- Check the potentiometer on the drive control.
- 5 FLASHES:
- Thermal protection
- Locked or damaged electrobrake
Stop the machine, wait for several minutes, start
the machine, and check the power draw of the
motor.
- Check the correct functioning and the
absorptions (absorption 0.9 – 1.1 A; resistance
22 - 25Ω)
- 6 FLASHES:
- Faulty power fuse
- Make sure that the 50A fuse from the + battery
works CORRECTLY upon ignition and that the
battery cables and motor cables are connected
correctly.
- Replace the traction board
- Locked or damaged electrobrake
- Check the correct functioning and the
absorptions (absorption 0.9 – 1.1 A; resistance
22 - 25Ω). See instructions.
Cables from the battery to the traction board or
from the traction board to the motor are loose,
oxidised or plugged incorrectly.
Check the cables.
Make sure that the 50A fuse from the + battery