Jasper Freestanding Jasper Freestanding
9 6
Installation (continued)
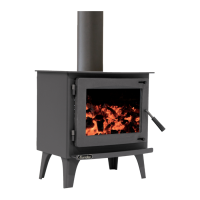
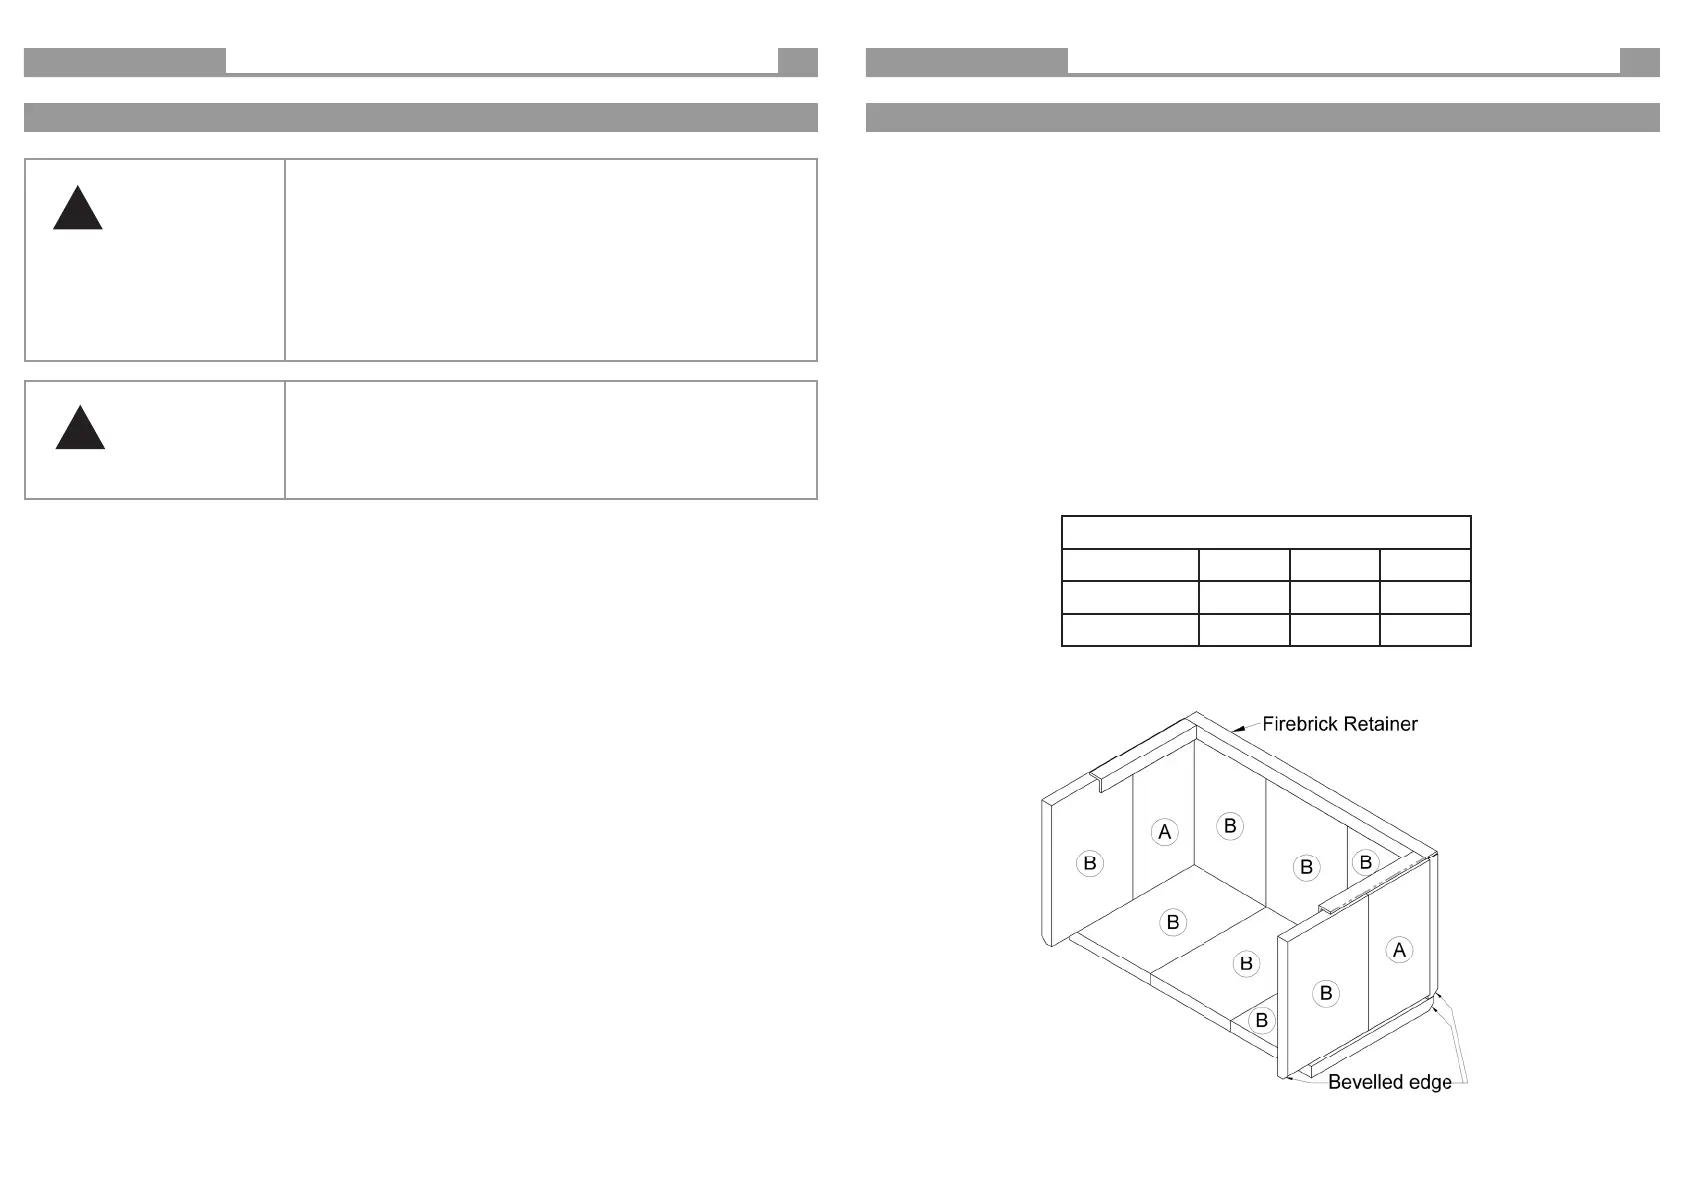
Fitting the Firebricks and Firebrick Retainer
Your Eureka Jasper requires rebricks to be installed, to ensure that the re operates correctly, and to prevent damage to
the rebox through excessive heat.
This replace uses two dierent size rebricks. Please use table B and gure 5 below to dierentiate between each brick
and its installation location.
Fitment is as follows:
1. Feed the lower rebricks into the re box, orrientated as shown below in gure 5, ensuring the bevelled edge of the
rebricks are facing down and towards the rear of the rebox.
2. Feed the rebrick retainer into the rebox, so that the long edge faces towards the rear of the rebox, with the at
face pointing up.
3. Lift the long edge of the retainer up, allowing you to slip the rear rebricks into place.
4. Lift the front ends of the retainer and t the side rebricks in the same manner as the rear, starting with the two
front bricks.
5. Ensure that the rebrick retainer is sitting properly in position over the rebricks.
Removal of the rebricks and retainer is carried out in reverse order of installation.
Table B - Firebricks
Designation Width Length QTY
A 155 310 2
B 205 310 8
Figure 5
!
WARNING
DO NOT ATTEMPT TO OPERATE THIS APPLIANCE WITHOUT READING AND
UNDERSTANDING THESE OPERATING INSTRUCTIONS THOROUGHLY. FAIL-
URE TO OPERATE THIS APPLIANCE CORRECTLY MAY RESULT IN DAMAGE TO
THE APPLIANCE OR RESULT IN A FLUE FIRE.
Features and operating methods of the Eureka Jasper are not typical of all
wood heaters. As such it is imperative that you read and understand these
instructions, and operate the heater accordingly. Failure to do so is likely to
result in poor performance of the unit, and may present a safety risk to the
user.
Read these instructions
Building your Fire
Place a relighter in the bottom of the rebox near the centre, then place a large amount of dry kindling in a criss-cross
pattern, such that the pile is at least half the height of the rebox. Kindling pieces should be around 2cm thick, and
around 25cm long. On top of the kindling, place 3-4 larger wood pieces, around 6cm thick and 25cm long. Building your
re in this manner ensures that it will get going quickly and provide you with warmth sooner. Attempting to light a re
with small quantities of kindling will more than likely generate excessive smoke and prolong the start-up process.
Lighting your Fire
Ensure that both air slides on the door are fully open (to the right). Ignite the relighter you have placed underneath the
kindling, and close the door once ignition has begun.
Do not leave the door ajar to get the re going as you would with some other heaters; the upper and lower air inlets will
only draw correctly when the door is fully closed.
After around 20 minutes or once the re is established, close the lower air slide (slide the knob to the left) and adjust
the upper air slide position to suit your desired heat output from the re. DO NOT LEAVE THE LOWER AIR SLIDE OPEN
THROUGHOUT THE BURN CYCLE.
On the initial re up you may detect smoke coming from the paint nish, and from any oils that may be impregnated in
the steel of the rebox. This is normal. It is suggested to well ventilate your home on the initial re up. During the initial
re up, the upper air slide should only be opened to half way and the lower air slide should be fully closed, once the re
has been established. Please refer to our instructions on “Paint Curing & Care” on page 1.
Operating your Eureka Jasper Wood Heater
!
WARNING
Air slide operation
DO NOT LEAVE THE LOWER AIR SLIDE OPEN THROUGHOUT THE BURN
CYCLE. REFERE TO SECTION “LIGHTING YOUR FIRE” (BELOW) FOR CORRECT
OPERATING PROCEDURE.
 Loading...