EasyManua.ls Logo

Exmark Ultra Vac QDS - User Manual

Exmark Ultra Vac QDS
28 pages
Print Icon
To Next Page IconTo Next Page
Loading...
Part No. 109-1159 Rev. A
For Ultra Vac Serial Nos.
600,000 & Higher
(to fit Units 352,000 & Higher)

Questions and Answers

  • M
    Mrs. Crystal WeaverSep 2, 2025
    What does it mean if the oil pressure light is on and the engine RPM is low on my Exmark Lawn Mower?
    • T
      tylerandreaSep 2, 2025
      If the oil pressure light is on and the engine RPM is low on your Exmark Lawn Mower, it means that the Engine Control Unit has limited engine RPMs, known as “limp” mode. Let engine cool and check oil level. If level is above 'add', contact an Authorized Service Dealer.
  • J
    Justin KirkSep 14, 2025
    Why won't the deck raise or lower on my Exmark Ultra Vac QDS Lawn Mower?
    • M
      melissa71Sep 14, 2025
      If the deck on your Exmark Lawn Mower will not raise or lower, here are a few things to check: * Ensure the operator is in the seat. * Make sure the key is in the “RUN” position. * Check the fluid level.
  • T
    Thomas LewisSep 1, 2025
    What to do if my Exmark Lawn Mower pulls to the left or right?
    • Z
      Zachary WeaverSep 1, 2025
      If your Exmark Lawn Mower pulls to the left or right with the levers fully forward, you should: * Check the air pressure in the tires, ensuring 13 psi for drive tires and 13 psi for pneumatic casters. * Check the reverse indicator and motion control linkage adjustment.
  • E
    eric85Sep 18, 2025
    Why does my Exmark Ultra Vac QDS Lawn Mower have abnormal vibration?
    • J
      James HarrisSep 18, 2025
      Abnormal vibration in your Exmark Lawn Mower may be due to: * Cutting blade(s) is/are bent or unbalanced: Install new cutting blade(s). * The blade mounting bolt is loose: Tighten the blade mounting bolt. * The engine mounting bolts are loose: Tighten the engine mounting bolts. * Loose engine pulley, idler pulley, or blade pulley: Tighten the appropriate pulley. * The engine pulley is damaged: Contact an Authorized Service Dealer. * The blade spindle is bent: Contact an Authorized Service Dealer. * The belt is damaged: Install new belt.
  • M
    Mrs. Traci BenjaminSep 16, 2025
    What causes uneven cutting height on my Exmark Lawn Mower?
    • B
      Barbara HarrisSep 16, 2025
      Uneven cutting height on your Exmark Lawn Mower can be caused by: * Blade(s) not sharp: Sharpen the blade(s). * Cutting blade(s) is/are bent: Install new cutting blade(s). * Mower deck is not level: Level mower deck from side-to-side and front-to-rear. * Underside of mower is dirty: Clean the underside of the mower. * Tire pressure in drive tires not correct: Adjust tire pressure in the drive tires. * Blade spindle bent: Contact an Authorized Service Dealer. * Tips of adjacent blades are at an uneven cutting height. Blades tips should be even within 3/16 inch which is approximately one blade thickness: Replace blades, spindles and (or) check for damage to mower deck.
  • T
    Taylor MooreSep 23, 2025
    What to do if the deck will not raise or lower on my Exmark Ultra Vac QDS Lawn Mower?
    • C
      Connor CopelandSep 23, 2025
      If the deck will not raise or lower on your Exmark Lawn Mower: * Ensure the operator is in the seat: Operator sit in seat. * Ensure the key is in the “RUN” position: Turn key to “RUN” position. * Check the fluid level: Check fluid level.
  • T
    Tiffany CarlsonAug 28, 2025
    How to fix an Exmark Ultra Vac QDS Lawn Mower that cuts unevenly?
    • M
      Mrs. Whitney Reyes DVMAug 28, 2025
      If your Exmark Lawn Mower cuts unevenly, consider the following: * Check the air pressure in the drive tires, it should be 13 psi. Semi-pneumatic casters do not require inflation. * Inspect the deck support chains. * Check the blades tip to tip for straightness (they should be within 3/16" or one blade width from being in line.)
  • W
    william58Aug 27, 2025
    Why won't my Exmark Ultra Vac QDS Lawn Mower starter crank?
    • N
      Nancy FullerAug 27, 2025
      The starter may not crank for several reasons: * The PTO might be engaged: Disengage the PTO. * The parking brake might not be engaged: Set the parking brake. * The drive levers might not be in the neutral lock position: Ensure the drive levers are in the neutral lock position. * The battery might not have a full charge: Charge the battery. * Electrical connections might be corroded, loose, or faulty: Check the electrical connections for good contact, clean connector terminals, apply dielectric grease, and reconnect. * A fuse might be blown: Replace the blown fuse. * Relay or switch is defective: Contact an Authorized Service Dealer. * Faulty module: Replace module.
  • A
    Alejandro ParrishAug 26, 2025
    Why won't my Exmark Ultra Vac QDS Lawn Mower engine start?
    • E
      Edward CummingsAug 26, 2025
      If your Exmark Lawn Mower engine won't start, several factors could be the cause. Here are some things to check: * Ensure the battery is fully charged. * Position the throttle control midway between “SLOW” and “FAST,” and set the choke to “ON” for a cold engine or “OFF” for a warm one. * Confirm there's fuel in the tank and the fuel valve is open. * Verify the seat switch is properly adjusted. * Make sure the parking brake is set and motion control levers are in the neutral lock position. * Confirm the PTO is disengaged. * Check that the spark plug wires are properly connected. * Inspect for loose or faulty wiring connections and corrosion at all wiring connections. Clean any corrosion with electrical contact cleaner, apply dielectric grease, and reconnect.
  • J
    Jay JohnsonAug 25, 2025
    What to do if my Exmark Ultra Vac QDS engine will not start?
    • E
      eric26Aug 26, 2025
      If your Exmark Lawn Mower engine won't start, starts hard, or fails to keep running, consider the following: * The fuel tank might be empty, so fill it up. * The fuel shutoff valve could be closed, so open it. * The oil level in the crankcase might be low, so add oil. * The throttle and choke may not be correctly positioned; ensure the throttle is midway between “SLOW” and “FAST,” and the choke is “ON” for a cold engine or “OFF” for a warm engine. * A dirty fuel filter can cause starting issues, so replace it. * A dirty air cleaner can prevent the engine from starting; clean or replace the air cleaner element. * Check the seat switch indicator. Replace seat if needed. * Also, check the spark plug wire connection and clean, adjust, or replace the spark plug if faulty.

Overview

This document is an operator's manual for the Exmark Ultra Vac QDS (Quick Disposal System), a bagging system designed for use with Exmark Lazer Z, Lazer Z XP, and Lazer Z XS mower models. It is specifically for Ultra Vac Serial Numbers 600,000 and higher, designed to fit mower units with serial numbers 352,000 and higher.

Function Description:

The Exmark Ultra Vac QDS is a power equipment attachment that collects grass clippings during mowing operations. It integrates with the mower deck to vacuum clippings into a collection hopper, allowing for efficient bagging rather than side discharge or mulching. The system is designed for quick disposal of collected material, enhancing productivity for commercial and residential turf care.

Important Technical Specifications:

The manual provides detailed dimensions and weights for various configurations of the Ultra Vac QDS across different Lazer Z deck sizes and engine types (Air Cooled, Liquid Cooled, Lazer AS, Lazer XS).

  • Overall Length with Ultra Vac:

    • 60" Deck (SN 599,999 and Lower Air Cooled): 105.20" (267.2 cm)
    • 60" Deck (SN 600,000 and Higher Air Cooled): 108.59" (275.8 cm)
    • 60" Deck (SN 599,999 and Lower Liquid Cooled): 105.45" (267.8 cm)
    • 60" Deck (SN 599,999 and Lower Lazer XS): 106.45" (270.4 cm)
    • 60" Deck (SN 600,000 and Higher Lazer XS): 109.43" (277.9 cm)
    • 66" Deck (Air Cooled): 110.14" (279.8 cm)
    • 66" Deck (Lazer XS): 110.95" (281.8 cm)
    • 72" Deck (SN 599,999 and Lower Air Cooled): 109.30" (277.6 cm)
    • 72" Deck (SN 600,000 and Higher Air Cooled): 112.67" (286.2 cm)
    • 72" Deck (SN 600,000 and Higher Air Cooled): 105.20" (267.2 cm) - Note: This appears to be a duplicate entry with the 60" deck (SN 599,999 and Lower Air Cooled) length.
    • 72" Deck (SN 599,999 and Lower Liquid Cooled): 109.55" (278.3 cm)
    • 72" Deck (SN 599,999 and Lower Lazer XS): 110.55" (280.8 cm)
    • 72" Deck (SN 600,000 and Higher Lazer XS): 113.92" (289.4 cm)
  • Overall Unit Width with Ultra Vac:

    • 60" Deck (SN 599,999 and Lower & All Lazer AS): 74.44" (189.1 cm)
    • 60" Deck (SN 600,000 and Higher): 74.94" (190.3 cm)
    • 66" Deck (All): 81.50" (207.0 cm)
    • 72" Deck (SN 599,999 and Lower): 86.49" (219.7 cm)
    • 72" Deck (SN 600,000 and Higher): 87.38" (221.9 cm)
  • Overall Weight:

    • 60" Deck (SN 599,999 and Lower & All Lazer AS): 394 lbs (178 kg)
    • 60" Deck (SN 600,000 and Higher Air Cooled (except AS)): 313 lbs (142 kg)
    • 60" Deck (SN 600,000 and Higher Liquid Cooled): 333 lbs (151 kg)
    • 66" Deck (All Air Cooled): 260 lbs (119 kg)
    • 66" Deck (All Liquid Cooled): 278 lbs (126 kg)
    • 72" Deck (SN 599,999 and Lower): 341 lbs (155 kg)
    • 72" Deck (SN 600,000 and Higher Air Cooled): 260 lbs (118 kg)
    • 72" Deck (SN 600,000 and Higher Liquid Cooled): 278 lbs (126 kg)
  • Bagging System:

    • Collection Hopper: Steel and Polyethylene hopper with a commercial grade, cloth mesh door and reinforced bottom.
    • Capacity: 11.0 bushels
    • Dump Mechanism: Manual dump from the seat.
    • Blower Tube: Fixed, abrasion-resistant molded polyethylene.
    • Impeller: 5-bladed, 0.25" thick abrasion-resistant steel, with a vertical axis.
    • Impeller Bearings: 1" (2.54 cm) sealed, non-greaseable bearings.

Usage Features:

  • Safety First: The manual emphasizes reading and understanding both the Ultra Vac QDS manual and the mower's operator manual before use. It highlights the importance of safety alert symbols (DANGER, WARNING, CAUTION) and personal protective equipment.
  • Blower Operation: The Ultra Vac QDS blower operates when the mower's deck drive (PTO) is engaged. The throttle should be set to "midway" before engaging the PTO, then accelerated to full throttle for mowing.
  • Hopper Emptying: To empty the hopper, the deck drive must first be shut off. The door is opened by lifting a handle. A critical safety instruction advises backing the unit up a ramp when driving a full hopper onto a truck or trailer to reduce the chance of rearward tip-up. The door must be closed and latched before resuming mowing.
  • Side Discharge Conversion: The system can be converted for side discharge mowing by removing the hopper assembly, discharge tube, and blower. A discharge chute is installed in place of the blower. Removable caster and front floor pan weights must also be removed when the bagger is not installed to maintain stability and traction.
  • Bagger Installation: Installation involves securing the hopper assembly, mounting the blower, connecting the handle link, and installing the discharge tube and belt cover. For units with Triton decks (SN > 600,000), the dog leg baffle position needs adjustment to match the blower intake.
  • Weight Management: The Ultra Vac QDS includes removable weight assemblies (caster weights and/or front floor pan weights) that must be installed when the bagger is in use to maintain stability and traction. These weights are heavy, and caution is advised during lifting and positioning.
  • Slope Operation: Extreme caution is advised when mowing on slopes due to potential loss of traction or tip-over. Recommendations include avoiding wet grass, steep slopes (greater than 15 degrees), sudden turns, and rapid speed changes. The stability of the machine changes as the hopper fills, requiring progressively greater care on slopes.
  • Noise Level: The machine produces sound levels in excess of 85 dBA at the operator's ear, requiring hearing protection.
  • Transporting: The unit should be transported on a heavy-duty trailer or truck, with the brake locked and wheels blocked. It must be securely fastened with straps, chains, or ropes. The hopper contents should be dumped before transport. The manual warns against driving the unit on public streets or roadways due to lack of proper turn signals, lights, reflective markings, or a slow-moving vehicle emblem.
  • Loading on Ramps: Use extreme caution. A single, full-width ramp is recommended. If individual ramps are used, they must create an unbroken ramp surface wider than the unit. The angle between the ramp and ground/trailer should not exceed 15 degrees. Avoid sudden acceleration or deceleration on ramps.

Maintenance Features:

  • Pre-Maintenance Safety: Before any maintenance or adjustments, the PTO must be disengaged, the engine stopped, and all moving parts allowed to stop. The key should be removed from the ignition switch, and spark plug wire(s) pulled off and pushed aside to prevent accidental starting. The engine must be allowed to cool before working around it due to high temperatures.
  • Periodic Maintenance Schedule:
    • Daily: Blower Housing/Impeller, Door Cloth Mesh, Muffler/Rear Frame, Rear Screen.
    • 25 hours: Idler Bushings, Door Handle.
    • 50 hours: Belts.
  • Blower Housing/Impeller: Inspect daily for wear or damage. Low lift blades and higher cutting heights are recommended in sandy soil to minimize wear on blower components.
  • Idler Bushings & Door Handle: Lubricate with 1-2 pumps of SAE No. 2 multi-purpose grease every 25 hours.
  • Door Cloth Mesh: Inspect daily for wear, tears, or damage. Replace if worn, as objects can exit through worn mesh at high speeds.
  • Belts: Inspect for damage or wear every 50 hours. The manual lists specific belt part numbers for different deck sizes and models.
  • Muffler/Rear Frame: Clean regularly to remove accumulated debris (leaves, grass, brush) to prevent fire hazards. Ensure a spark arrester is installed and maintained if operating on forest-covered, grass-covered, or brush-covered land.
  • Rear Screen: Clean clippings from the rear screen in the hood.
  • Adjustments:
    • Door Closing: Controlled by two hinge links and two stop screws. Adjust link length to provide complete closing and reasonable force on the handle.
    • Door Opening: Controlled by the handle link. Adjust link length for desired opening. Maximum opening is limited by a non-adjustable stop.
    • Latches: Adjust so the latch plate completely engages and contacts the latch rod when the door is closed, allowing for a slight "wiggle."
  • Troubleshooting Tips: Includes advice on using low lift blades in sandy or wet conditions, emptying bags before they are completely full to prevent plugging, cleaning the rear screen and bag mesh for proper airflow, checking engine air cleaners and cooling fins in dry conditions, maintaining optimal ground speed, cleaning the blower before storage, and replacing worn belts or addressing sticking idler arms. For units below SN 600,000, anti-blowout kits are available for leaf collection. For Triton units, adjusting the front baffle can reduce "plowing" leaves.

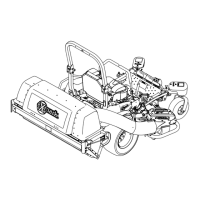
Exmark Ultra Vac QDS Specifications

General IconGeneral
BrandExmark
ModelUltra Vac QDS
CategoryLawn Mower
LanguageEnglish

Related product manuals