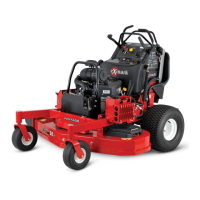
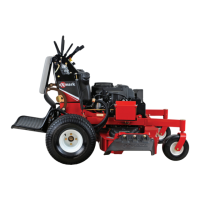
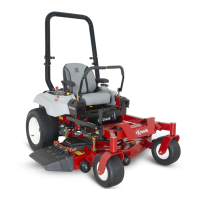
This document is an operator's manual for the Exmark Ultra Vac QDS (Quick Disposal System), a bagging system designed for use with Exmark Lazer Z, Lazer Z XP, and Lazer Z XS mower models. It is specifically for Ultra Vac Serial Numbers 600,000 and higher, designed to fit mower units with serial numbers 352,000 and higher.
Function Description:
The Exmark Ultra Vac QDS is a power equipment attachment that collects grass clippings during mowing operations. It integrates with the mower deck to vacuum clippings into a collection hopper, allowing for efficient bagging rather than side discharge or mulching. The system is designed for quick disposal of collected material, enhancing productivity for commercial and residential turf care.
Important Technical Specifications:
The manual provides detailed dimensions and weights for various configurations of the Ultra Vac QDS across different Lazer Z deck sizes and engine types (Air Cooled, Liquid Cooled, Lazer AS, Lazer XS).
Usage Features:
- Safety First: The manual emphasizes reading and understanding both the Ultra Vac QDS manual and the mower's operator manual before use. It highlights the importance of safety alert symbols (DANGER, WARNING, CAUTION) and personal protective equipment.
- Blower Operation: The Ultra Vac QDS blower operates when the mower's deck drive (PTO) is engaged. The throttle should be set to "midway" before engaging the PTO, then accelerated to full throttle for mowing.
- Hopper Emptying: To empty the hopper, the deck drive must first be shut off. The door is opened by lifting a handle. A critical safety instruction advises backing the unit up a ramp when driving a full hopper onto a truck or trailer to reduce the chance of rearward tip-up. The door must be closed and latched before resuming mowing.
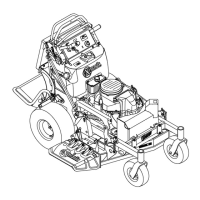
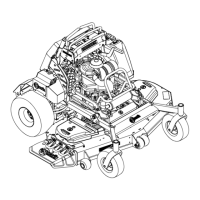
- Side Discharge Conversion: The system can be converted for side discharge mowing by removing the hopper assembly, discharge tube, and blower. A discharge chute is installed in place of the blower. Removable caster and front floor pan weights must also be removed when the bagger is not installed to maintain stability and traction.
- Bagger Installation: Installation involves securing the hopper assembly, mounting the blower, connecting the handle link, and installing the discharge tube and belt cover. For units with Triton decks (SN > 600,000), the dog leg baffle position needs adjustment to match the blower intake.
- Weight Management: The Ultra Vac QDS includes removable weight assemblies (caster weights and/or front floor pan weights) that must be installed when the bagger is in use to maintain stability and traction. These weights are heavy, and caution is advised during lifting and positioning.
- Slope Operation: Extreme caution is advised when mowing on slopes due to potential loss of traction or tip-over. Recommendations include avoiding wet grass, steep slopes (greater than 15 degrees), sudden turns, and rapid speed changes. The stability of the machine changes as the hopper fills, requiring progressively greater care on slopes.
- Noise Level: The machine produces sound levels in excess of 85 dBA at the operator's ear, requiring hearing protection.
- Transporting: The unit should be transported on a heavy-duty trailer or truck, with the brake locked and wheels blocked. It must be securely fastened with straps, chains, or ropes. The hopper contents should be dumped before transport. The manual warns against driving the unit on public streets or roadways due to lack of proper turn signals, lights, reflective markings, or a slow-moving vehicle emblem.
- Loading on Ramps: Use extreme caution. A single, full-width ramp is recommended. If individual ramps are used, they must create an unbroken ramp surface wider than the unit. The angle between the ramp and ground/trailer should not exceed 15 degrees. Avoid sudden acceleration or deceleration on ramps.
Maintenance Features:
- Pre-Maintenance Safety: Before any maintenance or adjustments, the PTO must be disengaged, the engine stopped, and all moving parts allowed to stop. The key should be removed from the ignition switch, and spark plug wire(s) pulled off and pushed aside to prevent accidental starting. The engine must be allowed to cool before working around it due to high temperatures.
- Periodic Maintenance Schedule:
- Daily: Blower Housing/Impeller, Door Cloth Mesh, Muffler/Rear Frame, Rear Screen.
- 25 hours: Idler Bushings, Door Handle.
- 50 hours: Belts.
- Blower Housing/Impeller: Inspect daily for wear or damage. Low lift blades and higher cutting heights are recommended in sandy soil to minimize wear on blower components.
- Idler Bushings & Door Handle: Lubricate with 1-2 pumps of SAE No. 2 multi-purpose grease every 25 hours.
- Door Cloth Mesh: Inspect daily for wear, tears, or damage. Replace if worn, as objects can exit through worn mesh at high speeds.
- Belts: Inspect for damage or wear every 50 hours. The manual lists specific belt part numbers for different deck sizes and models.
- Muffler/Rear Frame: Clean regularly to remove accumulated debris (leaves, grass, brush) to prevent fire hazards. Ensure a spark arrester is installed and maintained if operating on forest-covered, grass-covered, or brush-covered land.
- Rear Screen: Clean clippings from the rear screen in the hood.
- Adjustments:
- Door Closing: Controlled by two hinge links and two stop screws. Adjust link length to provide complete closing and reasonable force on the handle.
- Door Opening: Controlled by the handle link. Adjust link length for desired opening. Maximum opening is limited by a non-adjustable stop.
- Latches: Adjust so the latch plate completely engages and contacts the latch rod when the door is closed, allowing for a slight "wiggle."
- Troubleshooting Tips: Includes advice on using low lift blades in sandy or wet conditions, emptying bags before they are completely full to prevent plugging, cleaning the rear screen and bag mesh for proper airflow, checking engine air cleaners and cooling fins in dry conditions, maintaining optimal ground speed, cleaning the blower before storage, and replacing worn belts or addressing sticking idler arms. For units below SN 600,000, anti-blowout kits are available for leaf collection. For Triton units, adjusting the front baffle can reduce "plowing" leaves.