Do you have a question about the Extech Instruments RH520 and is the answer not in the manual?
Details about power sources, battery backup, and indicators.
Describes table top and wall mounting options for the device.
Information on the probe's cable and usage.
Instructions for locking and unlocking the device's push-buttons.
Procedure for setting the device's time and date parameters.
Instructions for clearing recorded data and alarm history.
How to switch between Celsius and Fahrenheit temperature units.
Configuring the temperature graph's vertical scale limits.
Configuring the RH graph's vertical scale limits.
The default display state when the RH520 is turned on.
Describes cursor location and movement for data point selection.
Lists the default configurations for LCD mode, resolution, and limits.
Step-by-step guide for replacing the device's batteries.
Information on connecting and using the optional alarm relay module.
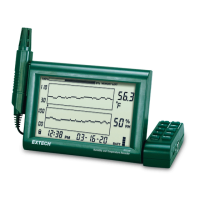
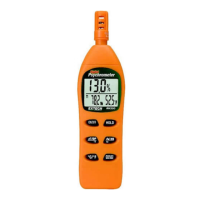
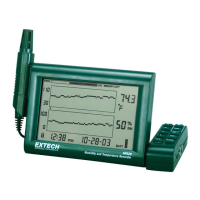
The Extech RH520 is a Humidity-Temperature Chart Recorder designed to measure and display temperature, humidity, and dew point. This device is equipped with a remote, detachable probe that senses ambient conditions, while a large, backlit graphical LCD provides both graphical and numerical representations of the readings. A key feature of the RH520 is its programmable audio-visual alarms, which alert the user when ambient conditions reach predefined alarm presets. For more advanced applications, an optional alarm module allows for automatic relay switching when these alarm presets are met.
The RH520 boasts an internal memory capable of storing up to 49,152 complete measurement sets, which can later be transferred to a PC for analysis. The device offers selectable recording rates ranging from 0.1 to 199.9 minutes, allowing users to customize data logging frequency based on their needs. Graph scaling is user-selectable in 10°F, 5°C, and 10% increments, providing flexibility in how data is visualized.
For ease of use, the RH520 incorporates a 5-segment battery indicator to track battery status, ensuring users are aware of when replacement is needed. The device can be powered by three 'AA' batteries or an included AC adaptor, with batteries providing approximately four weeks of typical use. The control module and display operate within a temperature range of 32 to 120°F (0 to 50°C) and a humidity range of up to 90% RH max. The sensor itself has a wider operating temperature range of -20 to 140°F (-28 to 60°C) and can handle up to 95% RH max.
The RH520 offers several usage features to enhance its functionality. It can be placed on a tabletop using its swivel keypad as a stand or wall-mounted using the rear mounting holes. The remote sensor, connected via a 1-meter cable, can be stored in the RH520's probe cradle or held manually.
A push-button lock-out security feature prevents tampering by allowing users to lock the device's buttons. This is achieved by simultaneously pressing and releasing the UP, DOWN, LEFT, and SET arrow buttons for approximately one second from the main view screen. The same action unlocks the buttons.
Setting the time and date is straightforward: from the Standard View, users press SET and TIME simultaneously, then use the UP and DOWN arrow buttons to adjust values and the LEFT and RIGHT arrow buttons to navigate through minutes, hours, AM/PM/24-Hour, day, month, and year parameters. The date format automatically adjusts based on the 12-hour (MONTH-DAY-YEAR) or 24-hour (DAY-MONTH-YEAR) selection.
Clearing internal memory can be done in two ways: pressing the RESET button inside the battery compartment clears the display and measurement parameters (sample rate, vertical resolution) and resets the display. Pressing the DATA RESET button on the back of the unit clears all stored readings, MAX/MIN values, and alarm history.
Users can select the unit of measure for temperature (°C/°F) using a switch located inside the battery compartment. The vertical resolution for the temperature graphic display is set by simultaneously pressing SET, TEMP, and UP. The upper temperature range indicator flashes, and users adjust the value in 10°F or 5°C increments using the UP-DOWN buttons. Pressing TEMP again allows adjustment of the lower temperature range. Similarly, the vertical resolution for the RH graphic display is set by pressing SET, RH, and UP simultaneously, with adjustments made in 10% increments.
The recording sample rate is configured by pressing SET, VIEW, and TIME simultaneously from the Standard View. The current sample rate in minutes appears, and the projected time until internal memory is full is displayed. Users adjust the rate using the UP-DOWN and LEFT-RIGHT arrow buttons.
Temperature alarm limits are set by pressing SET, TEMP, and ALARM simultaneously. The ALARM, SET, and MAX indicators illuminate, and users adjust the HIGH temperature alarm limit using UP-DOWN and LEFT-RIGHT arrows. Pressing ALARM again allows adjustment of the LOW temperature alarm limit. RH alarm limits are set similarly by pressing SET, RH, and ALARM simultaneously.
The RH520 offers various display modes. The Standard View is the default display state upon power-on, showing real-time data. The display automatically reverts to Standard View five minutes after the last button press. A cursor feature allows users to navigate through stored data points on the graph. The cursor, indicated by a small diamond, highlights the date, time, and measurements for the selected data point. RIGHT and LEFT arrow buttons move the cursor horizontally, while UP and DOWN arrow buttons shift the graph to display different sets of 64 values.
MAX-MIN displays are accessed by pressing the VIEW button in Standard View, showing the highest and lowest temperature and RH readings. The MAX or MIN indicator illuminates, and the cursor moves to the location of these extreme readings within the graph. Repeated presses of VIEW cycle through MAX/MIN temperature and RH readings.
Alarm displays are accessed by pressing the ALARM button from Standard View. This shows the most recent alarm activity, with the ALARM display icon and relevant graph pixel flashing. The cursor moves to the alarm location, and repeated presses of ALARM cycle through the alarm history.
The clock can be used to sort through stored readings by pressing the TIME button in Standard View. Users select a specific time of day using the ARROW buttons, and the temperature and humidity readings for that time are displayed.
Dew Point readings are viewed by simultaneously pressing TEMP and RH. The DEW POINT display icon illuminates above the temperature reading.
The sample rate display, accessed by pressing VIEW and TIME simultaneously, shows the current sample rate in minutes and the projected time until the internal memory is full.
For maintenance, battery replacement is indicated by the 5-segment battery life indicator. When only one segment remains, batteries should be replaced immediately. To replace batteries, open the compartment on the rear, remove the old batteries, and insert three new 'AA' alkaline batteries, observing polarity. After battery replacement, a "Programming Reset" is required, which involves pressing the RESET button inside the battery compartment. This clears all settings, requiring the time, date, and logging interval to be re-entered, though measurement data and alarm history remain in non-volatile memory.
The optional Alarm Relay Module connects to the alarm output jack on the swivel push-button stand. This module allows the RH520 to power external warning or switching devices when programmed alarm limits are reached. Operational instructions for the ExTerm software and data download are provided on the software disc.
| Resolution | 0.1% RH |
|---|---|
| Temperature Range | 14°F to 140°F (-10°C to 60°C) |
| Power Supply | Four (4) AAA batteries |
| Sampling Rate | 1 second to 24 hours |
| PC Interface | USB |
| Wet Bulb Range | 14°F to 140°F (-10°C to 60°C) |
| Operating Temperature | 14°F to 140°F (-10 to 60°C) |