Page 11
ELECTRIC POWERED PERSONNEL CARRIERS & GOLF CAR
Owner’s Manual and Service Guide
Read all of manual to become thoroughly familiar with this vehicle. Pay particular attention to all Notes, Cautions and Warnings
lower pressure prevents tires from cutting into the turf.
For vehicles being used on paved or hard surfaces, tire
inflation pressure should be in the higher allowable
range, but under no condition should inflation pressure
be higher than recommended on tire sidewall. All four
tires should have the same pressure for optimum han-
dling characteristics. Be careful not to overinflate. Due to
the low volume of these small tires, overinflation can
occur in a matter of seconds. Be sure to install the valve
dust cap after checking or inflating.
Tire Repair
The vehicle is fitted with low pressure tubeless tires
mounted on one piece rims.
Generally, the most cost effective way to repair a flat tire
resulting from a puncture in the tread portion of the tire is
to use a commercial tire plug.
Tire plug tools and plugs are available at most
automotive parts outlets and have the advan-
tage of not requiring the tire be removed from the wheel.
If the tire is flat, remove the wheel and inflate the tire to
the maximum recommended pressure for the tire.
Immerse the tire in water to locate the leak and mark with
chalk. Insert tire plug in accordance with manufacturer’s
specifications.
If the tire is to be removed or mounted, the tire changing
machine manufacturer’s recommendations must be fol-
lowed in order to minimize the possibility of personal
injury.
To prevent injury, be
sure mounting/demount-
ing machine is anchored
to floor. Wear OSHA approved safety equipment when
mounting/demounting tires.
Follow all instructions and safety warnings provided by
the mounting/demounting machine manufacturer.
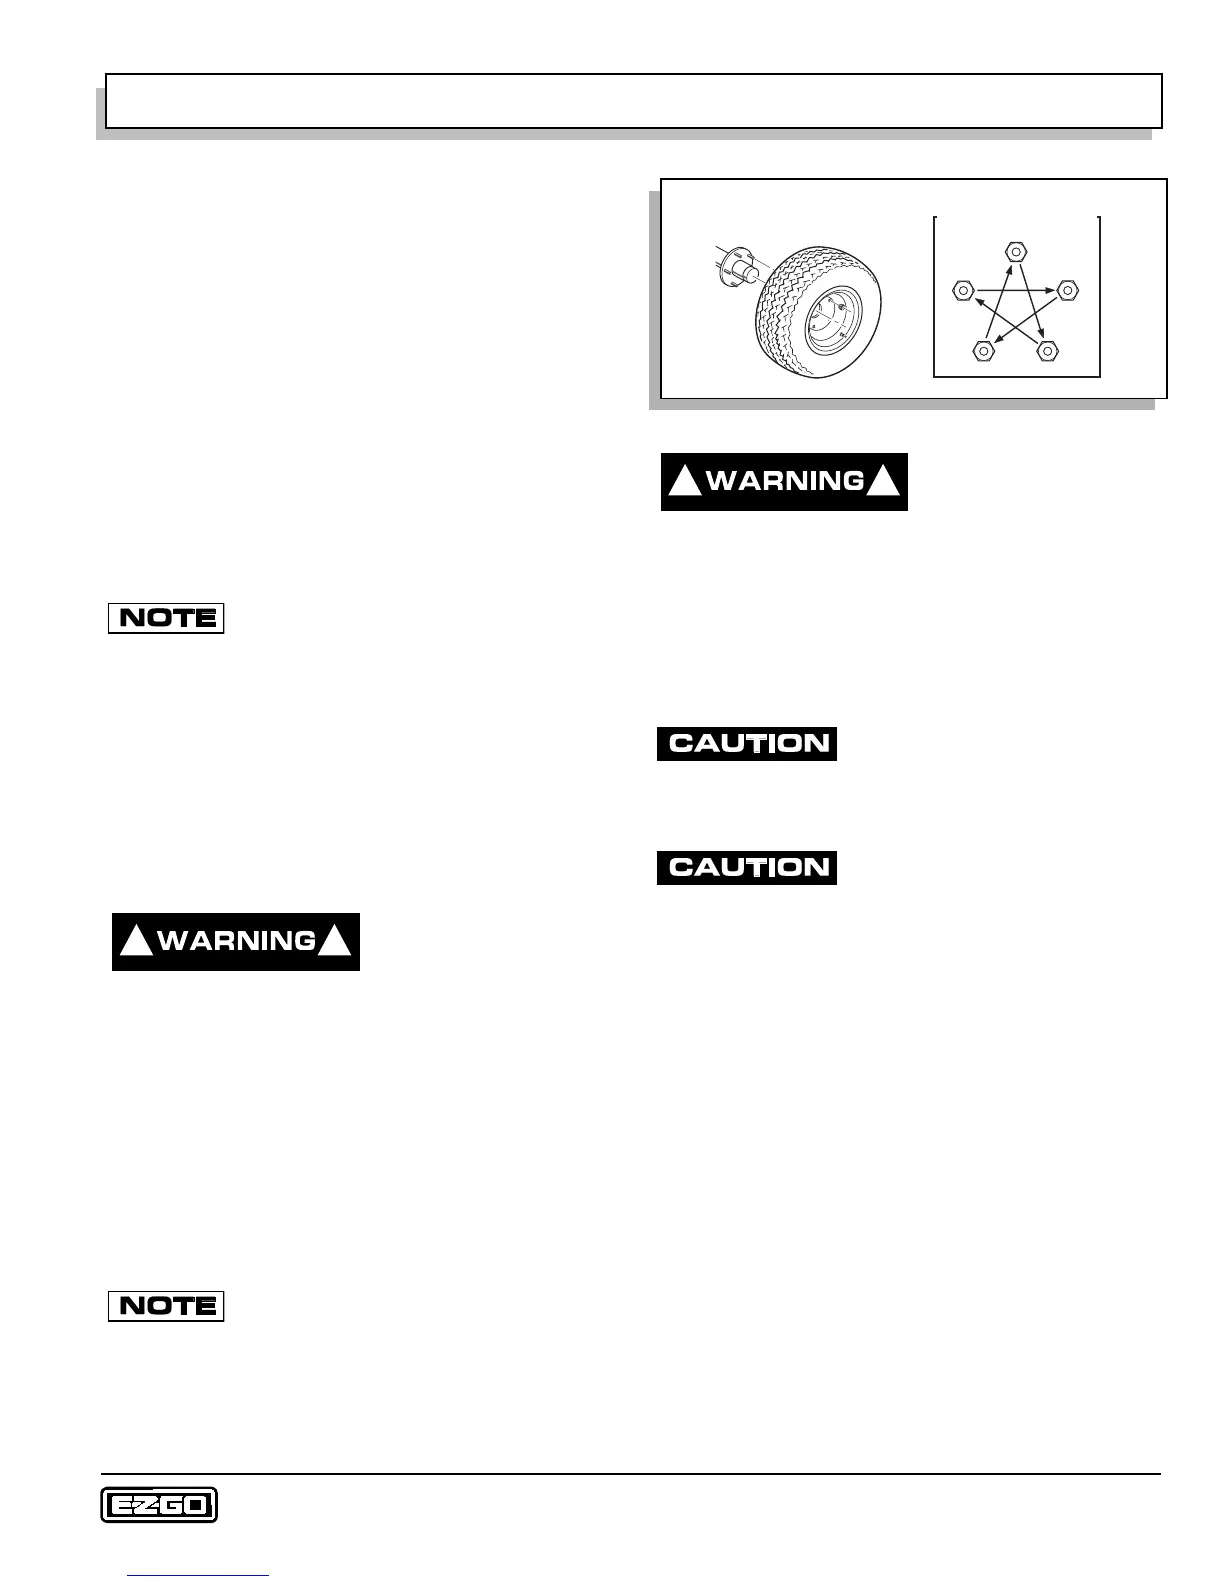
Wheel Installation
With the valve stem to the outside, mount the wheel onto
the hub with lug nuts. Finger tighten lug nuts in a ‘cross
sequence’ pattern (Ref Fig. 14 on page 11). Then, tighten
lug nuts to 50 - 85 ft. lbs. (70 - 115 Nm) torque in 20 ft.
lbs. (30 Nm) increments following the same ‘cross
sequence’ pattern.
It is important to follow the ‘cross sequence’
pattern when installing lug nuts. This will
assure even seating of the wheel against the hub.
To prevent injury caused
by a broken socket, use
only sockets designed
for impact wrench use.
Tire condition should be inspected on a daily basis. Infla-
tion pressures should be checked on a weekly basis
when the tires are cool. When removing wheels with an
impact wrench, use only impact sockets. Regular sock-
ets are not designed for impact pressures exerted by
power tools.
Do not tighten lug nuts to more than 85
ft. lbs. (115 Nm) torque.
LIGHT BULB REPLACEMENT
To prevent premature bulb failure, do
not touch new bulbs with bare fingers.
Use a clean, dry tissue or paper towel to handle the glass portion
of the bulb
.
Always hold bulbs with a clean, dry tissue or paper towel.
Natural oils from fingers will cause halogen bulbs to fail
prematurely.
Determine which bulb needs to be replaced. Reach
underneath light bar to access bulb from rear. Turn the
bulb socket a quarter turn counterclockwise to unlock
and pull out bulb. Insert new bulb and rotate quarter turn
clockwise to secure.
To replace the taillight bulb, remove hardware securing
lens and remove lens. Install replacement bulb and rein-
stall lens.
! !
Fig. 14 Wheel Installation
Tire/wheel style
may vary
'Cross Sequence'
1
25
3
4
! !