Do you have a question about the Factor OSTRO and is the answer not in the manual?
Instructions for installing the Factor OSTRO seatpost and adjusting saddle position.
Procedure for routing the rear brake hose through the frame and headset.
Guide for routing Di2 cables internally through the frame and components.
Steps for assembling the fork, including steerer tube preparation and headset installation.
Instructions for cleaning, greasing, and installing the bottom bracket cups.
Steps to install the computer mount and tighten the securing bolts.
Procedure for installing bottle cages using M5 bolts and a T20 Torx.
Guide for installing the rear thru-axle and hub, including tightening specifications.
Instructions for installing the front thru-axle and hub, and tightening dropout bolts.
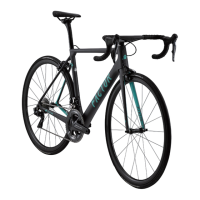
The Factor Ostro is a high-performance bicycle, designed for discerning riders who demand precision, speed, and reliability. This assembly manual provides comprehensive instructions for setting up and maintaining your Ostro, ensuring optimal performance and rider safety. The design philosophy behind the Ostro, much like a Formula 1 car, emphasizes meticulous assembly and maintenance to achieve its impressive capabilities. It is strongly recommended that assembly and ongoing maintenance be performed by a qualified bicycle mechanic to ensure proper installation and to validate the limited lifetime warranty.
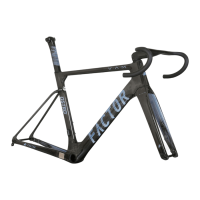
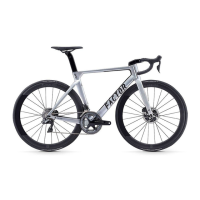
The Factor Ostro is a road racing bicycle frameset, engineered for aerodynamic efficiency, stiffness, and lightweight performance. Its primary function is to provide a stable and responsive platform for competitive cycling and high-performance road riding. The frameset integrates various components, including the seatpost, fork, bottom bracket, and internal cable routing systems, to create a cohesive and optimized structure. The internal routing for brake hoses and Di2 cables contributes to the bike's clean aesthetic and aerodynamic profile, minimizing drag and protecting cables from external elements. The D-Fork design is a key feature, offering precise steering and further aerodynamic advantages. The frame is designed to accommodate both SRAM DUB and Shimano Hollowtech II cranksets, providing versatility for different drivetrain preferences. The thru-axle system ensures secure wheel attachment and enhances stiffness, contributing to precise handling and efficient power transfer.
The Ostro is built for speed and efficiency, making it suitable for racing, fast group rides, and challenging road conditions. Its integrated design and aerodynamic features are intended to reduce rider effort at higher speeds.
Seatpost Installation and Adjustment: The seatpost is a critical component for rider fit and comfort. The manual details the process of routing Di2 wires through the seat tube and connecting them to the Junction B at the bottom bracket. It specifies the use of 7x9 mm outer rail clamps for carbon rail saddles, with 7x7 mm clamps available for traditional saddle rails. Adjusting the setback and saddle angle is straightforward, with a specified torque of 12 Nm for the M6 saddle clamp bolt. A crucial safety feature is the minimum seatpost insertion requirement of 90 mm, clearly marked on the seatpost, to prevent damage and ensure rider safety. The seatpost is secured with a grub screw tightened to 5.5-6 Nm.
Internal Brake Hose Routing: The rear brake hose is routed internally, starting from the caliper and exiting at the upper bearing of the headset. The manual emphasizes wrapping the hose in the supplied sound dampening tube to prevent rattling and ensuring sufficient slack for proper function. This internal routing not only enhances aerodynamics but also protects the hose from damage and maintains a clean aesthetic.
Di2 Cable Routing: The Ostro features comprehensive internal routing for Shimano Di2 electronic shifting cables. The process involves routing the rear derailleur Di2 cable through the chainstay and the front derailleur Di2 cable through the seat tube to the bottom bracket exit port. Di2 cable grommets are installed to secure the cables and protect the frame. All Di2 cables connect to the Junction B, which is strategically placed for easy access and integration. The manual highlights the importance of patience and mechanical skill for this task, suggesting the use of internal cable routing kits like the Park Tool IR-1 for easier installation.
D-Fork Assembly and Barstem Integration: The D-Fork is a unique design element that requires specific assembly steps. The steerer tube, which has a threaded insert, needs to be pre-cut 3 mm below the top of the stem. It is advised to chase the threads with an M6x1.0 tap after cutting to remove any burrs. The assembly involves installing both top and bottom headset bearings, sliding the fork steerer, brake hose, and Di2 wires through the top bearing. The compression ring is then slid into place, ensuring its slot faces the back of the steerer. The Di2 wires and brake hoses are fed through the barstem, which then slides onto the fork steerer after applying assembly compound. The anti-compression plug is inserted, and the headset is preloaded to remove play before torquing the barstem to 5.2 Nm. The top cap cover is installed, with a notch that aligns with the slot on the back of the barstem. This integrated system provides a stiff and aerodynamic front end.
Bottom Bracket Installation: The frame is designed for a BBT-47 bottom bracket. The installation process involves cleaning the inside of the frame bottom bracket and cups with isopropyl alcohol. A layer of high-quality assembly paste (such as Morgan Blue Auqaproof Paste or r.s.p. Creak Freak Assembling Paste) is applied to the threads of both bottom bracket cups. The cups are then threaded into the frame and torqued to 30 Nm for the drive side and 40 Nm for the non-drive side, using a Park Tool BBT-47. The manual provides specific instructions for both SRAM DUB and Shimano Hollowtech II cranksets, detailing the sequence of reducers and spacers. For SRAM DUB, 29 mm reducers and spacers (1mm+1mm+3mm+29mm reducer on the drive side, and 29mm reducer+3mm on the non-drive side) are used. For Shimano Hollowtech II, 24 mm Wheels MFG reducers and spacers (24mm reducer on the drive side, and 24mm reducer+1mm+1mm+0.5mm on the non-drive side) are installed.
Computer Mount and Bottle Cage Installation: The Ostro features an integrated computer mount. Installation involves releasing a bolt, removing the cover, installing the computer mount, and tightening two bolts to 2 Nm. Bottle cages are installed by tightening M5 bolts with a T20 Torx to 2 Nm. These features enhance the bike's utility for training and racing.
Thru-Axle Installation: The thru-axle system ensures secure wheel mounting. For the rear wheel, a rear hub is installed in the dropout with the free hub on the non-drive side to allow better access. Loctite 243 is applied to the bolt threads, and the bolt is threaded in without tightening, allowing the insert to align. The thru-axle is then installed with a nylon washer and tightened to 12 Nm. After ensuring correct dropout insert alignment, the dropout bolt is tightened to 1 Nm. The process is similar for the front wheel, with the rotor mount on the drive side. The thru-axle is installed with a nylon washer and tightened to 12 Nm.
Proper maintenance is crucial for the longevity and performance of the Factor Ostro, as well as for validating its limited lifetime warranty.
Regular Cleaning and Inspection: The manual implicitly encourages regular cleaning, particularly of the bottom bracket area, using isopropyl alcohol before assembly. This suggests that keeping the bike clean and free of debris is a general maintenance practice. Regular inspection of all torqued bolts, especially those for the seatpost, barstem, computer mount, bottle cages, and thru-axles, is essential to ensure they remain at the specified torque values.
Lubrication and Assembly Paste: The use of grease only, isopropyl alcohol, and assembly paste (Morgan Blue Auqaproof Paste or r.s.p. Creak Freak Assembling Paste) is specified for various assembly steps. This indicates that proper lubrication and anti-seize measures are integral to preventing wear, corrosion, and creaking noises. For instance, assembly paste is applied to bottom bracket threads and carbon prep compound is recommended for the seatpost clamp.
Thread Chasing: The recommendation to chase the threads in the steerer tube with an M6x1.0 tap after cutting highlights the importance of clean threads for secure and proper assembly, preventing damage to components.
Component Compatibility: The manual mentions the availability of different rail clamps for saddles (7x9 mm for carbon, 7x7 mm for traditional), indicating that Factor provides options for component compatibility. It also notes that any third-party components included or installed on Factor bicycles are subject to their respective manufacturers' guarantees, emphasizing the need to adhere to those guidelines for maintenance and warranty purposes.
Professional Assembly and Maintenance: The overarching recommendation for assembly and maintenance by an authorized Factor dealer or qualified bicycle mechanic is a key maintenance feature. This ensures that specialized tools and expertise are used, which is vital for a high-performance bicycle like the Ostro. This also plays a role in maintaining the validity of the limited lifetime warranty.
Warranty Conditions: The limited lifetime warranty, applicable to the original owner, covers defective materials and workmanship, provided the bicycle is operated under normal conditions, used as intended, and properly maintained according to the owner's handbook. This warranty does not cover normal wear and tear, paint/finish, or third-party components. Any Factor components subject to normal wear and tear are covered by a one-year warranty. Modifications from the original condition, abnormal or commercial use, damage from failure to follow instructions, and accident/neglect are excluded from the warranty. Registering the product within 15 days of purchase is necessary to qualify for the warranty. This framework encourages responsible ownership and adherence to maintenance guidelines.
| Brake Type | Disc |
|---|---|
| Handlebar | Black Inc Integrated Barstem |
| Tire Size | 700c |
| Frameset | OSTRO VAM |
| Groupset | Shimano Dura-Ace Di2 |
| Seatpost | OSTRO VAM |
| Stem | Black Inc Integrated Barstem |