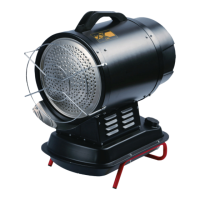
This document is an instruction manual for the Fanmaster HDR20 Industrial Diesel Radiant Heater.
Function Description
The Fanmaster HDR20 is an industrial diesel or kerosene portable radiant heater featuring an open combustion chamber. It is designed for industrial use, providing heating through radiant heat. The operating principle involves an internal burner fan supplying airflow for proper combustion. This air mixes with high-pressure fuel, which is drawn from the tank by an electrical pump and delivered to the nozzle under high pressure. Adequate ventilation is required for its operation, and it is not intended for domestic or recreational vehicle use.
Important Technical Specifications
The HDR20 model offers significant heating capabilities and specific operational parameters:
- Heat Output: 20KW (equivalent to 68,240 BTU)
- Air Flow: 165 L/s
- Fuel Type: Diesel or Kerosene
- Fuel Consumption: 1.7 L/h
- Fuel Nozzle Size: 0.4 gph
- Voltage: AC220-240V/50Hz
- Current Rating: 0.46 A
- Electrical Power: 110 W
- Net Weight: 18 kg
- Tank Capacity: 10.5 L
- Operating Range: Approximately 6.1 hours on a full tank.
Usage Features
The manual outlines clear instructions for assembling, operating, and shutting down the heater, emphasizing safety and proper usage.
Assembly:
- Remove the heater from its carton and inspect for damage. Contact Fanmaster if damaged.
- Remove the two screws from the front fixed ring.
- Place the protection panel on the bottom.
- Align the holes and re-fit the two screws.
- Install the front grill by aligning four holes and fixing with screws.
- Install the handle by aligning two holes and fixing with screws.
- Install the stand feet by aligning four holes and fixing with screws.
Operating Instructions (Start-Up):
- Position the heater on a flat, level, non-flammable, and solid surface in an upright position.
- Ensure the heater is not near walls, corners, low ceilings, below a power socket outlet, or on moving vehicles.
- Keep the heater away from flammable, combustible, explosive, or corrosive materials, as well as curtains or similar materials that could block air inlet/outlet.
- Do not block or restrict the air inlet and outlet.
- Keep the power cable away from heat sources, sharp edges, cutting, and moving parts.
- Avoid exposing the heater directly to weather or excessive humidity, and do not place it near a bath, shower, or swimming pool.
- Maintain minimum safety clearances: Side: 0.6m, Air inlet side: 1m, Top: 1.5m, Hot air outlet side: 3m.
- Fill the tank with clean Diesel or Kerosene only.
- Connect the plug to a relevant power source. The electrical system must comply with local regulations and include a Residual-Current Device (RCD).
- Turn the "ON/OFF" switch to "ON" (I). The heater will turn on after a few seconds.
- Check the position of the thermostat.
Operating Instructions (Shutdown):
- Move the switch to the "OFF" (O) position.
- Never disconnect the heater from the mains to stop it during operation.
- Always allow the cooling sequence to complete to prevent damage to internal components from residual heat.
- Do not cover the heater or block the air inlet and outlet.
- The heater outlet is very hot during and after operation; use personal protective equipment if needed.
- Unplug the heater before moving it. Never pull the cable to unplug or move the unit.
Safety Warnings:
- Read instructions carefully and keep the manual for future reference.
- Only persons who have read and understood the instructions should assemble, adjust, or operate the heater.
- Failure to follow instructions can result in property damage, serious injury, or loss of life due to fire, explosion, burns, asphyxiation, carbon monoxide poisoning, and/or electrical shock.
- Adequate ventilation is required; do not use in enclosed environments. Unvented portable heaters consume oxygen from the existing area.
- Do not store or use gasoline, petrol, or other flammable/combustible vapors/liquids near the heater.
- Keep solid combustibles (building materials, paper, cardboard) a safe distance from the heater.
- Never use the heater in spaces containing volatile or airborne combustibles, or products like gasoline, solvents, paint thinner, dust particles, or unknown chemicals.
- Direct-fired heaters can cause carbon monoxide (CO) poisoning if used incorrectly (e.g., indoors without adequate air circulation) or if not properly working. CO poisoning can be fatal.
- Unplug the appliance before maintenance.
- Always check the power cable for damage. If damaged, it must be replaced by Fanmaster, a service agent, or qualified personnel.
- The front outlet is very hot; do not touch.
- Do not leave the heater unattended when in use.
- Never use the heater with wet hands or when the heater or power cable is wet.
- Children must be supervised and should not play with the heater.
- The heater is not intended for use by persons (including children) with reduced physical, sensory, or mental capabilities, or lack of experience and knowledge.
Maintenance Features
Regular cleaning, maintenance, and proper storage are crucial for the heater's longevity and safe operation.
Before Maintenance:
- Shut down, unplug, and allow the heater to cool for at least 15 minutes.
- Do not attempt electrical repairs; contact qualified personnel.
- Ensure water does not enter the unit during cleaning.
- Do not open the enclosure to clean inner parts or spray water into the heater.
- Never use solvents, gasoline, toluene, or similar aggressive chemicals.
Regular Cleaning:
- Wipe the enclosure with a soft sponge or cloth. For very dirty parts, use a sponge wetted with lukewarm water and a mild detergent, then dry with a clean cloth.
- Regularly inspect the power cable for wear, cracks, or damage; have it replaced by qualified personnel if necessary.
Before Seasonal Use (Recommended Checks):
- Fuel Filter:
- Remove the plug on the fuel tank.
- Remove the filter from the tank.
- Take out the fuel suction hose.
- Clean the fuel suction hose and filter with clean diesel or kerosene.
- Replace the filter if very dirty.
- Fuel Tank:
- Empty the fuel tank.
- Flush out the fuel tank with clean fuel and dispose of the fuel properly.
Maintenance Schedule:
- Fuel Tank: Clean a minimum of once a year.
- Fuel Nozzle: Clean or replace once per season.
- Fuel Filter: Clean or replace once per season.
- Photocell: Clean or replace once per season.
- Ignition Device: Clean or replace every 1000 hours of operation.
- Fan Blades: Clean as required.
Storage:
- Before storing, ensure the heater is perfectly cool and dry.
- Cover the unit with a blanket or tarp.
- Store it in a dry, ventilated place.
Troubleshooting
The manual provides a comprehensive troubleshooting guide for common issues:
Problem: FO (ON/OFF switch on when plugged in)
- Cause: The ON/OFF switch is in the ON position when plugged in.
- Solution: Disconnect the plug, turn the switch to "O" (OFF), reconnect the plug, and switch the heater to "I" (ON).
Problem: F1 (No Fuel, Fuel is contaminated, Photocell dirty/damaged, Fuel Filter dirty/blocked, Ignition error)
- No Fuel:
- Solution: Turn the switch to "O" (OFF), refill the fuel tank.
- Fuel is contaminated:
- Solution: Turn the switch to "O" (OFF), empty and refill the fuel tank. Clean the filter using clean fuel.
- Photocell is dirty or damaged:
- Solution: Clean the photocell with a soft cloth or tissue.
- Fuel Filter is dirty or blocked:
- Solution: Clean the fuel filter with clean fuel.
- Ignition error:
- Solution: Contact Fanmaster.
Problem: F2 (Damaged cable, Sensor is damaged)
- Damaged cable:
- Solution: Replace or contact Fanmaster.
- Sensor is damaged:
- Solution: Replace or contact Fanmaster.
Problem: F3 (Internals overheating, Tilting sensor intervened)
- Internals overheating:
- Solution: Turn the heater off and wait until it has cooled down.
- Tilting sensor intervened:
- Solution: Ensure the heater is on a flat, level ground.
Problem: LO (External Temperature is below -9°C)
- Solution: No specific solution provided, but indicates operation outside recommended temperature range.
Problem: CH (Continuous operation (55°C))
- Solution: No specific solution provided, indicates continuous operation at a specific temperature.
Problem: Heater does not run (Switch in "O" position, No power, Thermostat setting, Temperature sensor override, Fuse damaged)
- Switch in "O" position:
- Solution: Turn the switch to "I" (ON).
- No power:
- Solution: Check if the plug is properly connected to the power source and check the power supply.
- Thermostat setting:
- Solution: Adjust the thermostat higher than the ambient temperature.
- Temperature sensor override:
- Solution: Wait for 10 minutes and try to start the heater again.
- Fuse damaged:
- Solution: Replace the fuse.
Problem: Motor/Pump runs but no flame (No Fuel, Ignition device dirty, Fuel Filter dirty/blocked, Fuel Nozzle dirty/blocked, Photocell dirty/damaged/incorrectly installed, Dirty fuel)
- No Fuel:
- Solution: Turn the switch to "O" (OFF), refill the fuel tank.
- Ignition device is dirty:
- Solution: Check and clean electrodes.
- Fuel Filter is dirty or blocked:
- Solution: Clean the fuel filter with clean fuel.
- Fuel Nozzle is dirty or blocked:
- Solution: Clean the fuel nozzle with clean fuel or replace it.
- Photocell is dirty, damaged or installed incorrectly:
- Solution: Clean the photocell with a soft cloth or tissue. Replace if needed.
- Dirty fuel:
- Solution: Empty and refill the tank with clean fuel, then empty again.
Problem: Fan blocked or spins too slowly (Fan is damaged)
- Fan is damaged:
- Solution: Check and replace the fan assembly.
Warranty
The product comes with a 12-month warranty from the date of purchase. Claims require proof of purchase and can be made at the store of purchase or online via the Fanmaster website. The warranty is provided by Fanmaster Pty Ltd and is in addition to other rights and remedies under Australian Consumer Law.
Exclusions from Warranty:
- Defects caused by accident, misuse, abuse, improper installation or operation, lack of reasonable care, unauthorized modification, loss of parts, tampering, or attempted repair by unauthorized persons.
- Products not installed, operated, or maintained to a satisfactory level.
- Damage caused by improper power input or improper cable connection.