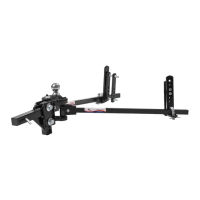
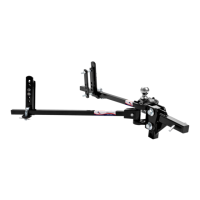
The Fastway e2 Round Bar Hitch is a weight distribution and sway control system designed to improve towing performance and safety. It is manufactured by Progress Mfg. Inc. and is available in various models with different weight capacities.
Function Description:
The e2 Hitch system works by distributing a portion of the trailer's tongue weight from the tow vehicle's rear axle to its front axle and the trailer's axles. This helps to level the tow vehicle and trailer, reducing sag at the rear of the tow vehicle and improving steering, braking, and overall stability. The round bar design also incorporates integrated sway control, which helps to minimize trailer sway, a common issue that can lead to loss of control, especially at higher speeds or in windy conditions. The system aims to provide a "Faster, Easier" towing experience by making the setup and adjustment process straightforward.
Important Technical Specifications:
The manual provides a table of models with their corresponding maximum tongue weight and maximum trailer weight capacities:
- Model 94-00-0600: Max Tongue Weight: 600 lb, Max Trailer Weight: 6,000 lb
- Model 94-00-0800: Max Tongue Weight: 800 lb, Max Trailer Weight: 8,000 lb
- Model 94-00-1000: Max Tongue Weight: 1,000 lb, Max Trailer Weight: 10,000 lb
- Model 94-00-1061: Max Tongue Weight: 1,000 lb (with installed hitch ball), Max Trailer Weight: 10,000 lb
The hitch ball is not included with most models, except for 94-00-1061. The hitch ball selected must have a 1" - 1 ¼” diameter threaded shank, no longer than 2 3/8”, and its weight rating must equal or exceed the trailer's Gross Vehicle Weight (GVW). Fastway brand hitch balls should be tightened to 420 ft-lb with a 1 7/8" socket.
Torque Specifications for various components:
- (2) ¾” Shank Bolts: 250 ft-lb
- (4) ½”x 4” Link plate bolts: 65 ft-lb
- (4) ½” L-bracket nuts: 75 ft-lb
- Angle set bolt: Set against shank + ½ turn
The sway brackets are designed to be installed between 24" - 27" from the center of the coupler. The spring arms are not side-specific.
Usage Features:
The installation process is broken down into nine steps:
- Ready the Tow Vehicle and Trailer: Park on flat, level ground, chock the trailer, load the vehicle and trailer as they will be for travel, check tire pressure, and temporarily disable auto-leveling systems.
- Install the Hitch Ball: Select and install a hitch ball with the correct specifications and torque it to the manufacturer's recommendations (420 ft-lb for Fastway balls).
- Attach the Hitch Head to the Shank: Level the trailer, insert the adjustable shank into the receiver, secure it with a hitch pin, insert the spacer rivet with washers (starting with 5 washers), slide the hitch head onto the shank so the hitch ball is 0-1" above the trailer coupler, secure with ¾” bolts, conical toothed washers, and nuts, and tighten the angle set bolt until the spacer rivet is firmly against the shank.
- Assemble the Sway Brackets: Install the bracket assemblies on the trailer frame 24"-27" from the coupler center, ensuring both are equidistant. Partially assemble link plates by inserting a ½" x 4" bolt through the outside and inside link plates, then slide a ½" split washer and thread a ½" nut a few turns. For top-mounted couplers, slide the link plate assembly over the frame. For inverted/upside-down installation (bottom-mounted couplers, V-nose trailers), slide the assembly up around the frame. Ensure no gaps between the trailer frame and link plate bolts. Pinch link plates flat and hand tighten nuts, then torque to 65 ft-lb. Install L-brackets onto the outside link plate with nylock nuts, hand tightening until firm, then torque to 75 ft-lb.
- Install Spring Arms: Push the notched end of the spring arm into the bottom of the hitch head until the retaining pin snaps into place. To remove, lift the retaining pin tab and pull down or swing the arm out.
- Set Up Weight Distribution: Measure the front fender height of the tow vehicle three times: uncoupled, coupled without spring arms, and coupled with spring arms attached. Use these measurements to calculate the weight distribution percentage.
- Adjust Weight Distribution: The goal is to achieve 50-100% weight distribution. If under-distributed (less than 50%), add more spacer washers to the hitch head or raise the L-brackets. If over-distributed (more than 100%), remove spacer washers or lower the L-brackets. Adjust by raising the vehicle and trailer with the tongue jack, removing spring arms, unhitching, making adjustments, re-hitching, engaging spring arms, retracting the jack, and re-measuring.
- Adjust Trailer Pitch: After achieving good weight distribution, measure the trailer frame height at the front and rear. If the difference is more than 1 ¼”, adjust the hitch ball height (move hitch head up or down on the shank). Re-measure and re-calculate weight distribution if ball height is adjusted.
- Final Tightening: Once weight distribution and trailer pitch are correct, all bolts on the hitch must be tightened to their recommended torque specifications. Connect breakaway cable, safety chains, and electrical cable, adjust the brake controller, and retract the jack.
The manual emphasizes several warnings:
- Always adjust equipment and driving habits to match towing conditions.
- Check all hardware before each trip for wear, fatigue, proper tightening, and secure pins/clips.
- Load the trailer correctly according to manufacturers' recommendations.
- Use a hitch ball with a rating that meets or exceeds GVW and matches coupler size.
- Never cut, weld, grind, bend, or modify hitch components.
- Never exceed specified weight ratings for any towing equipment.
- Never tow with an incorrectly adjusted hitch.
- Avoid towing with the hitch engaged on rough roads, through deep ditches/dips, or while launching a boat, as this can cause excessive strain and failure.
- Do not transfer the hitch to a different tow vehicle or trailer without proper adjustment.
- No hitch setup guarantees complete sway avoidance.
- Read and understand all safety warnings and instructions.
- Replace worn or unreadable warning stickers.
- The operator is responsible for optimizing weight distribution and sway control.
- Towing with tongue weight outside 10-15% of GTW increases the risk of loss of vehicle control.
Cautions include:
- Always secure the tow vehicle and trailer with the parking brake and wheel chocks before setup or adjustment.
- Disengage weight distribution before towing or backing the trailer where there is a significant grade transition to prevent excessive strain.
- Never loosen or remove any part of the hitch while under load; use the tongue jack to relieve tension before removing L-pins.
- Do not use an impact wrench to tighten link plate or L-bracket bolts.
- Do not pound directly on the sockets to move them; use lever force of the spring arm.
Appendix - Using a Weight Distribution Hitch with Auto-Leveling Suspensions:
- Always refer to the tow vehicle owner's manual.
- Disable or turn off air bag suspension or auto-leveling systems during hitch setup.
- For 4-corner auto-leveling systems, which can decrease weight distribution by 20-25%, if possible, disable auto-leveling while driving. If not, set up the hitch for 75-100% weight distribution to compensate for the loss.
- For rear auto-leveling systems, follow Step 6 - line C instructions, allowing the vehicle to auto-level the rear before taking measurement C.
- Before hitching or unhitching with auto-leveling systems, turn off the auto-level system or place it in jack mode.
Maintenance Features:
- Before each trip, clean and lubricate friction surfaces of the head and sockets with a good quality multi-purpose or bearing grease. This includes the hitch ball and surfaces where the arm sockets rub.
- Do not lubricate the round bar arms or L-brackets.
- Check for damage or abnormal wear before each trip and replace damaged/worn parts.
- Clean dirt and debris from all friction surfaces regularly.
- Check all nuts and bolts before each trip and tighten if necessary.
- Store the hitch out of the weather when not in use.
- Use good quality spray paint to touch up the finish and prevent rust.
- Do not paint over warning stickers. Contact Fastway for free replacement if stickers become unreadable.
- A properly maintained and clean hitch will perform better and reduce wear and towing noise.
Warranty:
The Fastway e2 Hitch comes with a Limited 10 Year Warranty from Progress Mfg. Inc. against latent defects in materials and workmanship under normal use and service, excluding ordinary wear and tear. The warranty covers replacement or repair up to the value of the original purchase price for the original owner for 10 years from the first date of retail purchase. It does not cover damage from improper installation, alteration, unreasonable use, improper maintenance, or loading beyond factory-rated capacity. Labor and transportation charges for returning the product are not included. Progress Mfg. Inc. is not liable for incidental, consequential, or other damages beyond the replacement or repair of the affected part. Warranty procedures can be initiated by calling customer service at 877-523-9103 or submitting a warranty registration online at fastwaytrailer.com.