EasyManua.ls Logo

Fastway ONESTEP XL User Manual

Fastway ONESTEP XL
2 pages
To Next Page IconTo Next Page
Page #1 background imageLoading...
Page #1 background image
Instructions for Setup and Use
Chock Setup
1) Remove the chock and other parts from the packaging.
Remove the bolt and nut holding the double arms to the
wedge using the hex key provided for adjustments, and a
9/16” socket. See Figure 1.
Figure 1
Figure 2
4) Temporarily place the second clevis pin into the hole
that aligns best between the double and single arms. Do
not put the retainer clip into place on the pin yet.
3) Set the chock between the tires and extend them
out until the wedges touch the tires. See Steps 3 - 5
in the standard instructions.
2) Using the same nut and bolt, install the extra
single arm onto that same wedge. The bolt should
go through the end of the arm with the single hole.
See Figure 2.
5) Slide the chocks out from the tires. Remove the clevis
pin, and slide the chock arms apart one hole, then replace
the pin. Clip the pin into place.
Continue on back
6) Place the chock between the tires again. It should t snuggly between the tires, with the center arms not
dropping all the way to the ground. Step down on the center arms to lock the chock into place. Pull up on the
cable handle to remove the chock. See Figure 3.
7) Re-adjust the chock as necessary by moving the clevis pin to different holes, or by moving the end bolts that
attach the arms to the wedges to a different hole.
Figure 3
XL
TM

Other manuals for Fastway ONESTEP XL

Question and Answer IconNeed help?

Do you have a question about the Fastway ONESTEP XL and is the answer not in the manual?

Fastway ONESTEP XL Specifications

General IconGeneral
BrandFastway
ModelONESTEP XL
CategoryAutomobile Accessories
LanguageEnglish

Summary

Chock Setup Instructions

Initial Chock Assembly

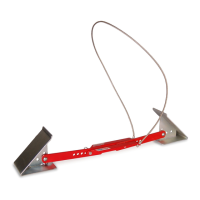
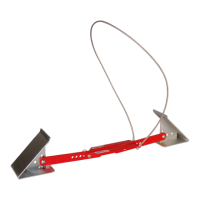
Assemble the chock by attaching the extra single arm to the wedge using the provided nut and bolt.

Chock Placement and Adjustment

Position the chock between tires, adjust arms for snug fit, and secure with clevis pin.

Securing and Removing the Chock

Step on center arms to lock chock in place; pull cable handle to remove.

Safety and Warranty Information

Usage Warning

Do not use on steep grades; always remove chock before towing. Damage from driving over chock is not covered.

Limited One Year Warranty

Warrants against defects in materials/workmanship for one year from purchase.

Additional Fastway Products

Fastway Zip Breakaway Cable

Coiled design prevents the breakaway cable from dragging on the ground.

Fastway Flip Automatic Jack Foot

Adds 6" instantly, stores itself, and requires no pins or bending.

Related product manuals