EasyManua.ls Logo

Fastway onestep User Manual

Fastway onestep
3 pages
To Next Page IconTo Next Page
Page #1 background imageLoading...
Page #1 background image
Instructions for Setup and Use
1)
Remove wheel chock from packaging, and remove the center
cotter pin (a) and clevis pin (b) from the arms.
2) Set the chock between the tires and extend them out until the
wedges touch the tires.
3) Slide the clevis pin into one of the holes in the arms to
temporarily hold them in place. Don’t insert the cotter pin yet.
4) Remove the chock, and remove the clevis pin, then slide the
arms apart until the next set of holes line up.
5) Place the clevis pin into one of the sets of holes, and then
replace the cotter pin to secure it.
If you are not able to lengthen or shorten the chock to t your
axle spacing using the arm holes for adjustment, the bolts
holding the ends of the scissor arms can be moved. Use the
included hex key (Allen wrench) and a socket wrench to move
the bolts to either of the other two adjustment holes in the
wedges.
AVERTISSEMENT
AVERTISSEMENT
ADVERTENCIA
ADVERTENCIA
WARNING
WARNING
The Fastway
®
ONEstep
Chock was designed to be used on
level ground and gentle slopes. Do not use chock on grades
that are excessive or unreasonably steep. Always remember to
remove chock before attempting to tow trailer. Damage caused
by driving over the wheel chock is not covered by warranty.
a
b
Patent Pending
TM
Question and Answer IconNeed help?

Do you have a question about the Fastway onestep and is the answer not in the manual?

Fastway onestep Specifications

General IconGeneral
BrandFastway
Modelonestep
CategoryAutomobile Accessories
LanguageEnglish

Summary

Fastway ONEStep Tandem Axle Wheel Chock Setup and Use

Initial Chock Preparation

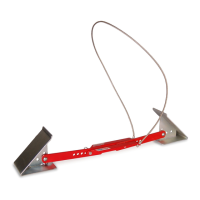
Remove wheel chock from packaging and detach center cotter pin (a) and clevis pin (b) from the arms.

Positioning and Extending Chocks

Set chock between tires and extend wedges until they touch the tires.

Temporary Clevis Pin Insertion

Temporarily insert the clevis pin into a hole in the arms without securing it.

Adjusting Arm Spacing

Remove chock, detach clevis pin, and slide arms to align with the next set of holes.

Securing the Clevis Pin

Place the clevis pin into a set of holes and secure it with the cotter pin.

Chock Locking and Removal

Step down on arms to lock chock between tires; pull handle upward to remove.

Cable Handle Placement for Removal

Lean the cable handle against the tire for easy access during removal.

Theft Deterrent Locking

Use a padlock through holes in arms or wedges as a theft deterrent.

Important Safety Warning

Use on level ground; remove before towing. Damage from driving over chock is not warranted.

Fastway ONEStepXL Tandem Axle Wheel Chock Setup

Chock Assembly and Preparation

Remove bolt/nut from double arms, install extra single arm onto wedge using the same hardware.

Initial Chock Positioning

Set chock between tires and extend wedges to touch them.

Temporary Clevis Pin Placement for XL

Temporarily place second clevis pin between double and single arms, do not secure clip yet.

Adjusting Chock Spacing for XL

Slide chocks out, remove clevis pin, move arms one hole, replace pin and clip.

Final Chock Placement and Locking for XL

Place chock snugly between tires, step on arms to lock; pull handle to remove.

Re-adjusting Chock Fit

Adjust clevis pin or end bolts to different holes for proper fit.

Related product manuals