Do you have a question about the Fender Passport Conference and is the answer not in the manual?
General guidance for safe operation and maintenance of the apparatus, including reading instructions and following warnings.
Warnings regarding water exposure, ventilation, heat sources, electrical connections, grounding, and liquid spillage.
Precautions for accessories, servicing, hearing damage from high volume, and battery safety.
Instructions on how to open the Passport case and detach the speaker cabinets from the mixer section.
Guidance on elevating speaker cabinets for optimal sound and positioning the mixer for easy access.
Steps for retrieving accessories and connecting speaker cables and the power cord to the unit and outlet.
Details on using mono channels for microphones and stereo channels for line-level audio devices.
Guidance on setting channel volume, master volume, and tone controls for optimal sound balance.
Explanation of the Signal Present/Clip Indicator LED and how to adjust controls to avoid distortion.
Function of the MASTER VOLUME knob for adjusting overall system loudness.
Detailed explanation of VOLUME, TONE, and PAD controls for individual channel adjustment.
Description of Mono, Stereo, and Headphone/Stereo Out jacks and their usage.
Information on the Power LED indicator and potential reasons for shutdown or reset.
Explanation of VOLTAGE SELECTOR, POWER switch, POWER SOCKET, and SPEAKER OUTLETS.
Details on the fuse type, rating, and replacement procedure for the power socket.
Key specifications including model type, part numbers, power requirement, dimensions, and weight.
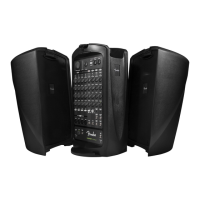
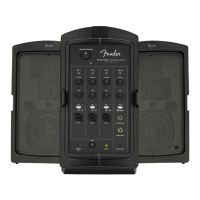
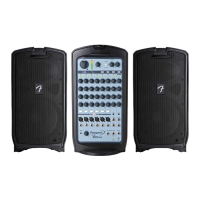
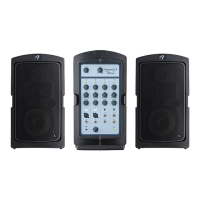
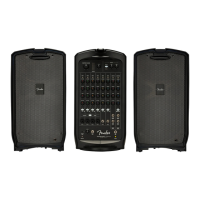
The Fender Passport Conference is a self-contained, portable audio system designed for a variety of uses, from public address to amplifying musical instruments and singing. Its design emphasizes quick and easy setup, making it suitable for covering large audiences with simple operation. The system includes everything needed for quality sound on the go, packing into a suitcase-like form factor for easy transport.
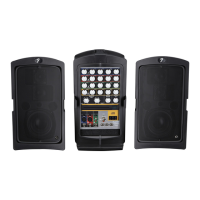
The core function of the Passport Conference is to provide a versatile audio amplification solution. It integrates a powered mixer, two full-range speaker cabinets, a microphone, and all necessary cables into a single, portable unit. This allows users to connect various sound sources, including microphones, musical instruments, and line-level audio devices such as MP3 players, CD players, or laptops for accompaniment. The system's control panel features both mono mic/line channels and stereo line channels, offering extensive flexibility for making connections and managing audio inputs.
Setting up the Passport Conference is straightforward. First, the cabinet release latches on the sides of the unit are flipped open, allowing the speaker cabinets to detach from the powered mixer section. Next, the storage compartment on the rear of the mixer is opened to retrieve the microphone, power cord, and speaker cables. For optimal sound, the speaker cabinets should be elevated on Passport Speaker Stands or sturdy tables and placed far apart to maximize stereo separation. The mixer should be positioned close to the performer for easy access to the control panel. The speaker cables are then plugged into the left and right speaker jacks on the back of the mixer, and connected to the corresponding left and right speakers. Before plugging the supplied power cord into a grounded A/C power outlet, ensure the power switch is off.
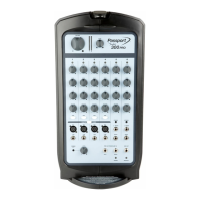
Microphones, instruments, and other sound sources are connected to separate channels using the appropriate input jack. The mono channels on the left are used for monophonic sources like microphones, while the stereo channel on the right accommodates stereo/mono sources such as CD players, MP3 players, keyboards, and other line-level audio devices. Both XLR and 1/4" inputs are compatible with microphone or line inputs. The PAD switch can be used for line-level signals to prevent clipping. It is possible to use both inputs at the same time, but the signal levels of each input need to be adjusted at their sources. For stereo sources, the 1/8" STEREO jack can be used, which mutes the L/MONO and RIGHT input jacks. Alternatively, separate 1/4" connections can be used for each channel, or the L/MONO jack alone can be used for a mono output through both speakers.
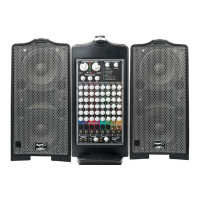
The MASTER VOLUME knob adjusts the overall loudness of the system. To begin, it should be rotated fully counter-clockwise, along with all channel VOLUME knobs. After connecting equipment, the Passport should be switched on, and the Power LED will illuminate green. When connecting a microphone or other source, its VOLUME knob is slowly turned up while watching the signal LED above it. The LED indicates signal strength: green for small signals, yellow for strong signals, and red for clipping (distortion). For best performance, VOLUME and TONE controls should be set to keep the LED yellow or green. If the LED turns red, reduce VOLUME or TONE settings. If it still turns red, the PAD button should be pressed to reduce input sensitivity by 20dB. Each channel's VOLUME knob adjusts its relative loudness, allowing for a balanced mix.
The TONE knobs control the tone character of each channel. Starting in the center detent position, where there is no equalization effect, users can experiment by turning each TONE control to achieve the desired sound. It is recommended to have someone walk around the room to ensure clear and consistent coverage for the audience.
A STEREO / PHONES OUT jack is available for connecting recording equipment or headphones. The MASTER VOLUME does not affect this output, but each channel control does. The LEVEL knob adjusts the output level of this jack to accommodate the input level requirements of external equipment.
The rear panel includes a VOLTAGE SELECTOR for adjusting the voltage setting when traveling to countries with different requirements. The POWER switch turns the Passport on or off. The POWER SOCKET connects to a grounded A/C outlet, ensuring proper voltage selection. SPEAKER OUTLETS are provided for connecting the Passport speakers using the supplied cables.
The Power LED illuminates green when the Passport is on. If audio output shuts off, the unit may have entered a protective shutdown due to electrical or thermal issues. The Passport will reset once the problem is resolved. If it doesn't reset, the FUSE in the POWER SOCKET should be checked. The signal present/clip indicator LED provides visual feedback on input signal levels, helping users prevent clipping and distortion.
In case of a failed fuse, the power cord should be unplugged, and the fuse holder pried out of the POWER SOCKET. It is crucial to replace the fuse only with one of the same type and rating to ensure continued safe operation.
The device should be cleaned only with a dry cloth. Ventilation openings should not be blocked, and the unit should not be installed near heat sources. Maintaining at least 6 inches (15.25 cm) of unobstructed air space behind the unit is necessary for proper ventilation and cooling. The power cord should be protected from being walked on or pinched, especially at plugs and receptacles.
If the apparatus is damaged in any way (e.g., damaged power-supply cord, liquid spilled, objects fallen into, exposed to rain/moisture, not operating normally, or dropped), all servicing should be referred to qualified service personnel. The mains plug of the power supply cord should remain readily operable for complete disconnection from AC mains.
The device should not be exposed to rain or moisture, or to dripping or splashing liquids. No objects filled with liquids, such as vases, should be placed on the equipment.
For products with internal or external batteries, batteries and/or the product should not be exposed to excessive heat (sunshine, fire, etc.). There is a danger of explosion if the battery is incorrectly connected or replaced. Only the same or equivalent type battery specified in the instructions or on the product should be used.
Amplifiers and loudspeaker systems are capable of producing very high sound pressure levels that can cause temporary or permanent hearing damage. Care should be used when setting and adjusting volume levels during use.
| Type | Portable PA System |
|---|---|
| Power Output | 175 Watts |
| Channels | 5 |
| Microphone Inputs | 3 x XLR/1/4" Combo |
| Auxiliary Input | 1/8" Stereo |
| Built-in Effects | Reverb |
| Inputs | 3 x XLR/1/4" combo, 1 x 1/8" Stereo |
| Outputs | 1 x 1/8" Headphone |