EasyManua.ls Logo

Ferm HDM1014 - Technical Data; Noise and Vibration; Description (Fig. A); Assembly

Ferm HDM1014
104 pages
Print Icon
To Next Page IconTo Next Page
To Previous Page IconTo Previous Page
Loading...
EN
As the colours of the wires in the mains cable of
the unit may not correspond to the coloured
markings identifying the terminals in the plug,
proceed as follows:
 
connected to the terminal which is marked with
the letter N or coloured black.
 
connected to the terminal which is marked with
the letter L or coloured red.
TECHNICAL DATA
HDM1014
  
  
  
 


 



  
  
  
  
NOISE AND VIBRATION
HDM1014

Sound pressure (L
pa
  
Acoustic power (L
wa
  
 
 
2

 
2
1.5

Sound pressure (L
pa
  
Acoustic power (L
wa
  
 
 
2

 
2
1.5
2

Vibration level
The vibration emission level stated in this
instruction manual has been measured in
accordance with a standardised test given in EN

another and as a preliminary assessment of
exposure to vibration when using the tool for the
applications mentioned
 
different or poorly maintainted accessories,

 
it is running but not actually doing the job, may

Protect yourself against the effects of vibration by
maintaining the tool and its accessories, keeping

patterns

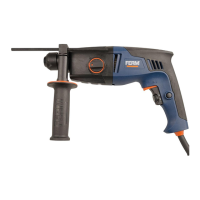
Your hammer drill has been designed for drilling
holes into wood, steel, and masonry. The
machine can also be used as a demolition

 
 
 
4. Chuck
5. Locking sleeve
 
 
 
 
 
ASSEMBLY
4
Before assembly, always switch off the
machine and remove the mains plug



2

Immediately sharpen or replace blunt

Mounting
 
accessory.
 
 
 
counterclockwise until it locks into place.
 
Removing
 
 

Related product manuals