40 ferrismowers.com
56
57
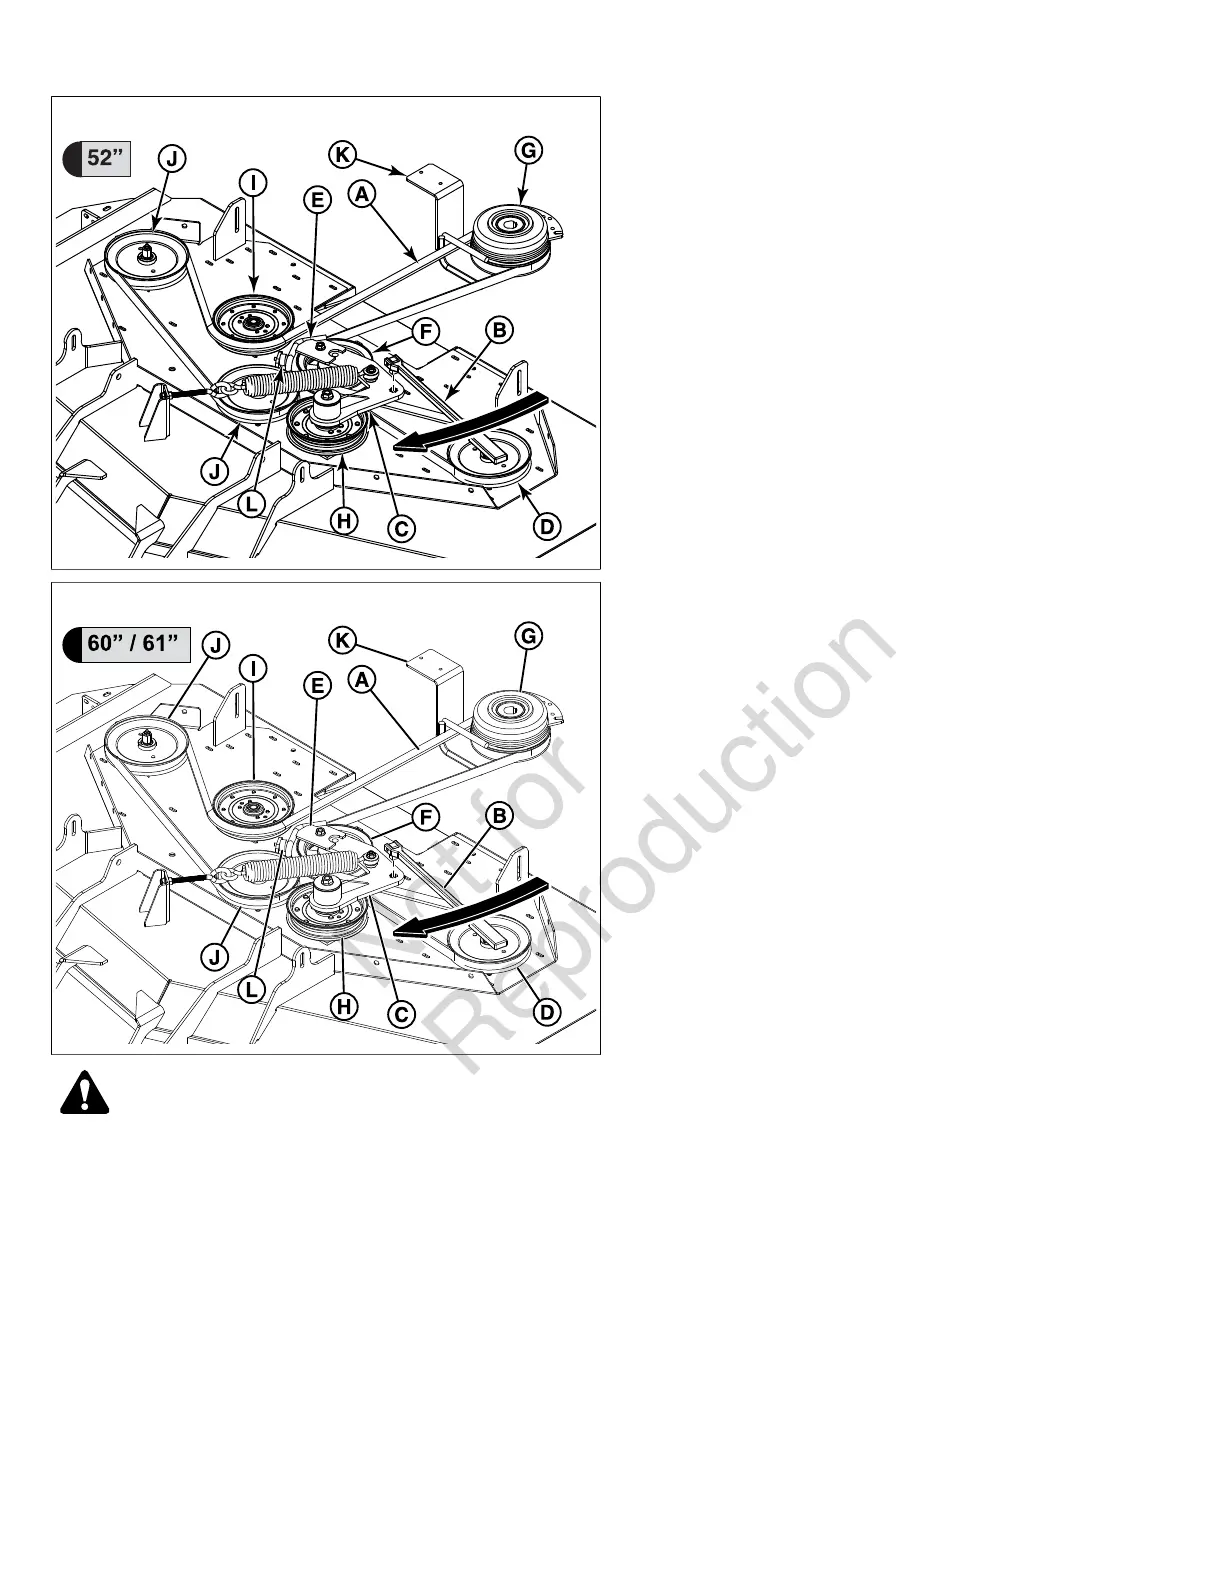
WARNING
Use extreme caution when rotating the idler arm with the
breaker bar, due to the increased tension in the spring
as the idler arm is being rotated. Injury may result if the
breaker bar is prematurely released while the spring is
under tension.
3. Using a 1/2" breaker bar (B) place the square end in
the opening in the idler arm (C) and rotate the idler arm
clockwise, which will relieve tension on the belt exerted
from the idler arm. Remove the belt from the left hand
side spindle pulley (D). Pull the length of the belt removed
from the left hand spindle pulley towards the center of the
deck.
4. Remove the belt from the belt guide (E) installed on the
adjustable idler pulley (F).
• 52" Mower Decks: Rotate the idler arm clockwise
so that it is pulled away from the idler arm stop (L,
Figure 56). To remove the belt from the belt guide,
start with the leg of the belt between the adjustable
idler pulley and the PTO clutch pulley (G) and press
the belt down below the belt guide and then pull
it around and then above the belt guide. Carefully
release the tension on the breaker bar.
• 60" / 61" Mower Decks: Rotate the idler arm
clockwise so that it is pulled away from the idler
arm stop (L, Figure 57). To remove the belt from the
belt guide, start with the leg of the belt between the
adjustable idler pulley and the PTO clutch pulley
(G) and raise the belt up and out of the belt guide.
Carefully release the tension on the breaker bar.
5. Remove the old belt from the remaining front stationary
idler pulley(s) (H, Figures 56 & 57), rear stationary idler
pulley (I), and the remaining spindle pulleys (J).
6. Install the new belt onto the right hand side and the
center spindle pulleys (J) and the PTO clutch pulley (G).
Make sure that the V-side of the belt runs in the pulley
grooves and that the belt is correctly routed through
the PTO clutch belt guide (K) and that the back side of
the belt contacts the faces of the front stationary idler
pulley(s) (H) and the rear stationary idler pulley (I).
7. Install the belt into the belt guide installed on the
adjustable idler pulley.
• 52" Mower Decks: Rotate the idler arm clockwise
so that it is pulled away from the idler arm stop. To
install the belt into the belt guide, start with the leg of
the belt between the adjustable idler pulley and the
PTO clutch pulley and raise the belt up into the belt
guide. Pull the length of the belt towards the left hand
spindle pulley. Carefully release the tension on the
breaker bar.
• 60" / 61" Mower Decks: Rotate the idler arm
clockwise so that it is pulled away from the idler arm
stop. To install the belt into the belt guide, start with
the leg of the belt between the adjustable idler pulley
and the PTO clutch pulley and lower the belt down
and into the belt guide. Pull the length of the belt
towards the left hand spindle pulley. Carefully release
the tension on the breaker bar.
8. Verify that the V-side of the belt runs in the grooves of
the right hand side and center spindle pulleys and the
PTO clutch pulley. Verify that the back side of the pulley
contacts the face of the adjustable idler pulley, front
stationary idler pulley(s), and the rear stationary idler
pulley. Verify that the belt is correctly routed through the
belt guides.
9. Rotate the idler arm clockwise and install the belt on the
left hand spindle pulley.
10. Carefully release the tension on the breaker bar.
11. Set the mower deck to the 3-1/2" (8.9 cm) cutting height.
12. Use the Mower Deck Drive Belt Tensioning Spring Length
chart to determine the correct spring length for your unit.
 Loading...