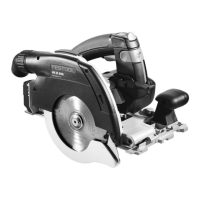
7.5 Changing the saw blade
WARNING
Risk of injury, electric shock
► Always disconnect the mains plug from the
socket before performing any work on the
machine.
CAUTION
Risk of injury from hot and sharp insertion
tool
► Do not use any blunt or faulty insertion
tools.
► Wear protective gloves when handling an
insertion tool.
Remove the saw blade
► Swivel the machine to 0° before replacing
the saw blade and adjust the maximum cut
ting depth.
► Turn the lever [5-2] as far as it will go.
► Slide the safety lock [5-1]
upwards and
push the saw unit downwards until it clicks
into place.
► Loosen the screw [5-5] using the Allen
key [5-3]
.
► Remove the saw blade [5-7].
Inserting the saw blade
WARNING! Check the screws and flange for
contamination and only use clean and undam
aged parts.
► Insert the new saw blade.
WARNING! The direction of rotation of the
saw blade [5-8]
and saw [5-6] must match.
Serious injuries may occur in the event of
non-compliance.
► Insert the outer flange [5-9]
so that the pin
engages in the recess on the inner flange.
► Tighten the screw [5-5].
► Reposition the lever [5-2].
7.6 Fitting the viewing window/splinter
guard
The
viewing window (transparent) [6-1] pro
vides a view of the saw blade and optimises
dust extraction.
With 0° cuts, the
splinter guard (green) [6-2]
also improves the quality of the cutting edge of
the sawn-off workpiece on the upper side.
► Insert the splinter guard [6-2].
► Screw the rotary knob [6-3]
through the
long hole in the splinter guard.
► Make sure that the nut [6-4]
is seated se
curely in the splinter guard.
► CAUTION!
Only use the rotary knob sup
plied with your plunge-cut saw. The rotary
knob of another saw may be too long and
jam the saw blade.
Sawing a splinter guard
You must bed in the splinter guard before using
it:
► Set the machine to maximum cutting depth.
► Set the machine speed to 6.
► Place the machine for sawing the splinter
guard on a test piece of wood.
7.7 Dust extraction
WARNING
Heath hazard posed by dust
► Always work with an extractor.
► Comply with national regulations.
Festool mobile dust extractor
A Festool mobile dust extractor with a suction
hose diameter of 27/32 mm or 36 mm (36 mm
recommended due to the reduced risk of clog
ging) can be connected to the extractor connec
tor .
The adapter on a 27 diameter suction hose is
inserted into the angle adapter . The adapter on
a 36 diameter suction hose is inserted over the
angle adapter .
CAUTION! A static charge may build up if no
antistatic suction hose is used. The user may
receive an electric shock and the power tool's
electronics may be damaged.
8 Working with the electric
power tool
When working on the machine, observe
all of the safety warnings that are listed
at the start as well as the following rules:
Before starting
– Before each use, check whether the drive
unit with the saw blade correctly and fully
swivels back up into its initial position in
the protective housing. Do not use the saw
if the upper end position is not secured.
Never clamp or secure the swivelling drive
unit at a specific cutting depth. This would
mean that the saw blade is not protected.
– Check the plunging mechanism prior to use
and do not use the machine if it does not
work correctly.
English
23

 Loading...