CAUTION: READ AND FOLLOW ALL SAFETY GUIDELINES AND WARNINGS BEFORE HANDLING OR
ATTEMPTING ANY WORK ON YOUR FIELD ONE PAINTBALL MARKER. SHOULD YOU BE UNSURE AT ANY
POINT, STOP AND GET HELP FROM A FIELD ONE PAINTBALL CERTIFIED TECHNICIAN.
LOAD UP
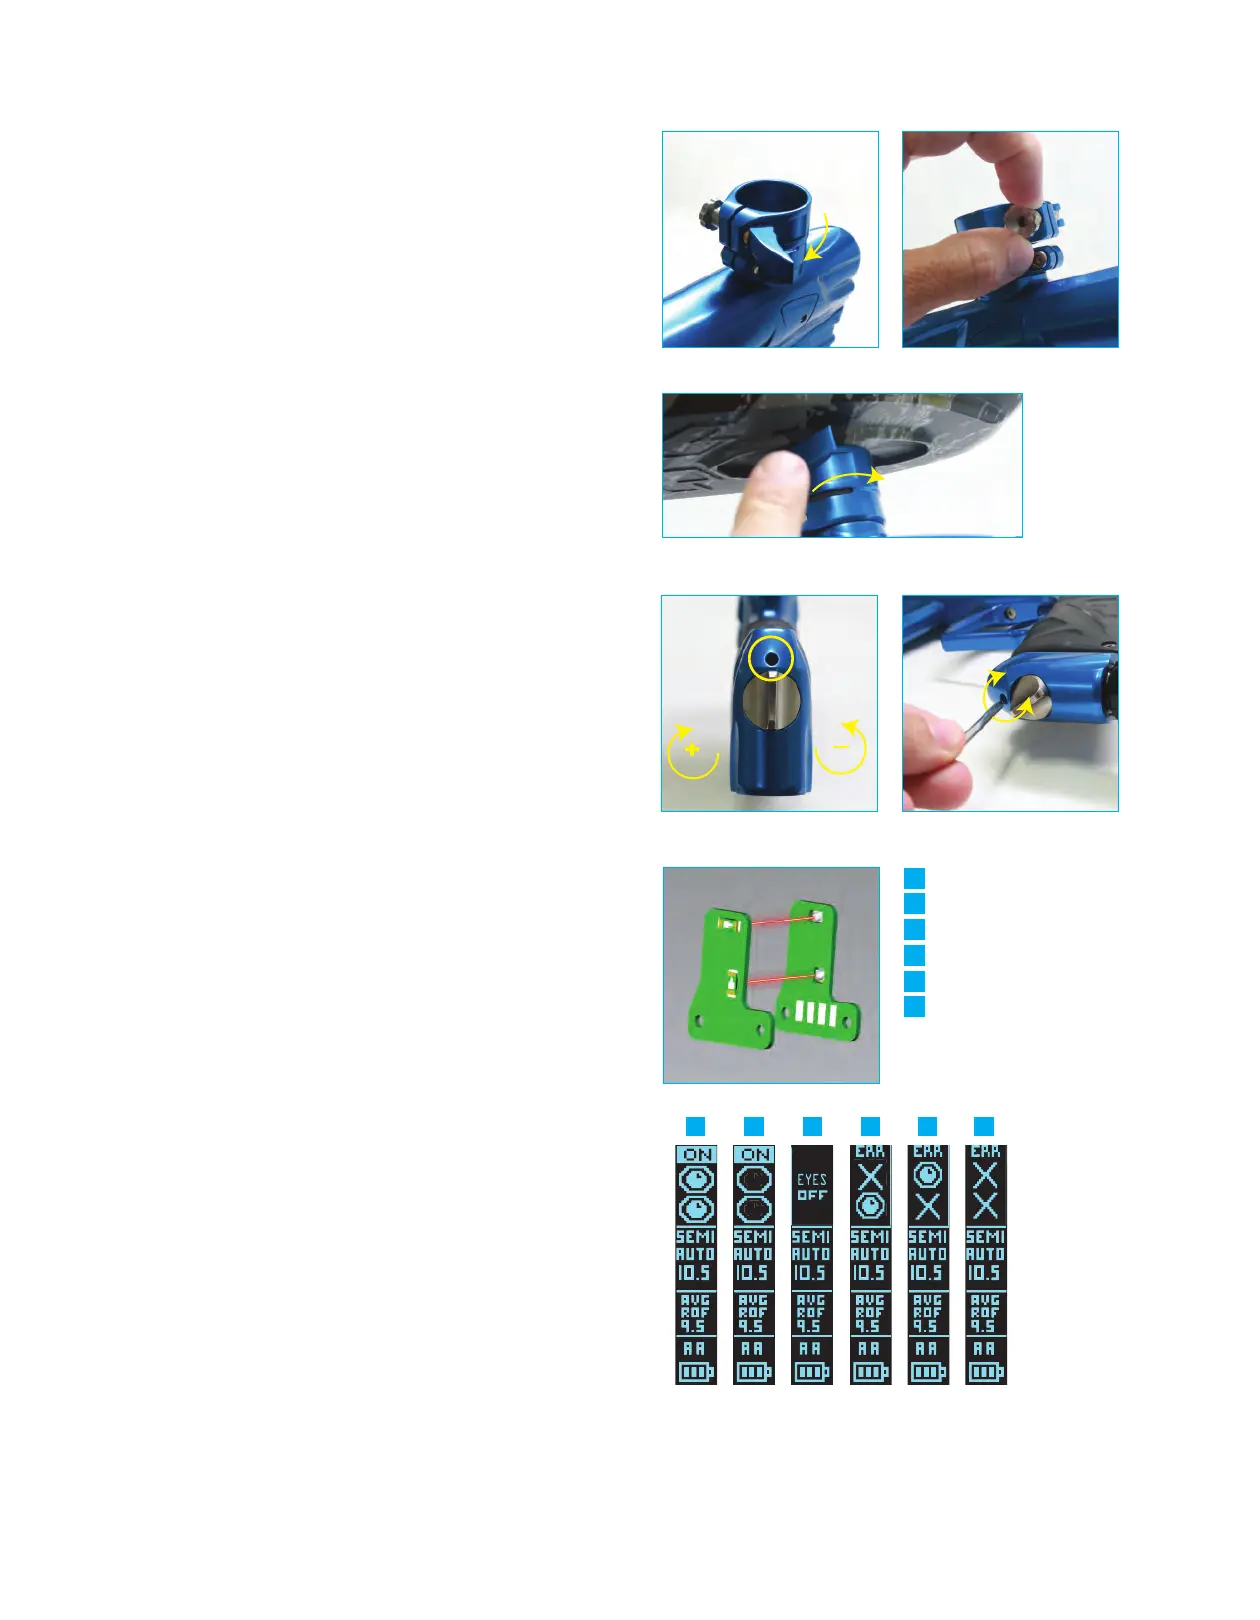
- Attach your loader into the Lever Lock Feedneck by
opening the lever
(fig 5A)
. You may loosen the locking lever if
necessary by turning either the lever or the stainless steel thumb
screw
(fig 5B)
. Insert the loader into the feedneck and lock the lever
securing the loader in place
(fig 5C)
. The Lever Lock is designed to
hold the loader snug in the feedneck but should not be overtightened.
Overtightening the feedneck lever can cause damage to the feedneck
or loader neck. Once your loader is in the feedneck, adjust the thumb
screw to reach the desired level of tension. The Field One Force is
capable of high rates of fire. It is recommended that you use a high
performance motorized loader to get the most consistent rate of fire
and the highest possible performance from your Field One Force.
Make sure your barrel blocking safety device is in place before loading
your paintballs into the loader.
ADJUST YOUR VELOCITY - You must test your velocity at the start of
each paintball session or when you change paintball size or barrel
bore size. Make sure that your loader is filled with paintballs and
turned on. Whenever operating your marker, you must wear eye
protection specifically designed for paintball and compliant with ASTM
standards. Once in a safe area to fire your marker, remove the barrel
cover. Pull the trigger to fire the paintball marker over the chronograph
to measure the velocity. To adjust your velocity insert a ⅛ inch allen
wrench into the velocity adjustment screw
(fig 6A)
located on the
bottom of the Cam Drive ASA just forward of the Cam Drive ASA Knob
(fig 6B)
. To increase the velocity turn the screw clockwise
(facing you). To decrease the velocity turn the screw counter clockwise
(facing you). The range of adjustment is about 15 feet per second
(FPS) per quarter turn. Shoot 2 shots in between each adjustment to
stabilize the pressure. Only adjust the velocity adjustment screw by ¼
turn between chronograph measurements as this adjustment can be
sensitive. WARNING: DO NOT adjust the velocity of your Force
marker in excess of 300 FPS. Check with your local field or
tournament organization for the recommended maximum velocity
setting.
4C ILLUMINATE EYE SYSTEM (4C-ES) - Your Field One Force is
equipped with the 4C Illuminate Eye System consisting of 2 sets of
break-beam eyes (upper and lower)
(fig 7A)
, this feature allows the
Force to achieve maximum rates of fire without chopping paint. Even
with a high performance motorized loader, the Force needs proper eye
operation to avoid breaking/chopping paintballs in the breech. The eye
indicator located on the upper portion of the OLED HOME SCREEN
will display the status of the 4C-ES
(fig 7B)
. When your Force marker
is powered ON the 4C-ES system is active (ON) by default. When the
4C-ES is active and working properly the marker will not shoot unless
there is a ballt present in the breech (breaking the invisible beam
between the eyes). To turn the 4C-ES OFF tap the power button twice
within 1 second. You will notice that the OLED display indicates that
the 4C-ES status is OFF. You must turn off the 4C-ES in order to fire
your marker without paintballs (dry fire). It is not recommended that
you dry fire your marker excessively. To toggle between “EYES ON”
and “EYES OFF,” tap the power button twice within 1 second. Playing
with your 4C-E
S “OFF” will greatly increase your chances of breaking
paint. If the eye indicator on your OLED screen shows that the eyes
are blocked/eye malfunction (ERROR), you may have to clean the
eyes to restore proper function.
A
AB
C
D
E
F
Eyes on Ball Loaded
Eyes on breach empty
Eyes off
Top eye fault (clean eyes)
Bottom eye fault
Both eyes fault (clean eyes)
Eye function HUD (fig 7B)
A
AB
C D E F
(fig 5A) (fig 5B)
(fig 5C)
(fig 6A)
+
(fig 6B)
-
(fig 7A)
(fig 7C)
+
 Loading...