EasyManua.ls Logo

Fisher & Paykel OR60SDBSX2 - User Manual

Fisher & Paykel OR60SDBSX2
10 pages
Print Icon
To Next Page IconTo Next Page
Loading...
Care and cleaning
Always turn off the oven at the wall first. Ensure the oven has cooled down completely before starting.
Before you start cleaning your cooker, please:
Read these cleaning instructions and the ‘Safety and warnings’ section at the start of this
user guide.
Turn the power to the cooker off at the wall.
Make sure the cooker is a safe temperature to touch.
Do not use a steam cleaner.
Do not keep flammable substances in the oven.
General advice
Wipe down the cooktop and wipe out the oven after every use.
Wipe up spills. Avoid leaving alkaline or acidic substances (such as lemon juice or vinegar) on the surfaces.
Do not use cleaning products with a chlorine or acidic base.
Cleaning the outside of the cooker
Do not use abrasive cleaners, cloths or pads on the outside surfaces.
Immediately wipe off any caustic cleaners if they are spilled onto the oven door handle.
Wipe the outside surfaces often, using warm water and a mild household detergent. The stainless steel may also
be cleaned with a suitable cleaner and polish.
https://producthelp.fisherpaykel.com/nz/Cook/Freestanding_Cookers/Electric/OR60SDBSX2/User_Guide_OR60SDBSX2_(59…
Updated: Wed, 12 Apr 2023 11:21:52 GMT
Powered by
1

Other manuals for Fisher & Paykel OR60SDBSX2

Question and Answer IconNeed help?

Do you have a question about the Fisher & Paykel OR60SDBSX2 and is the answer not in the manual?

Summary

Care and cleaning

General advice

Offers general tips for cleaning the cooker, including spill management and avoiding specific cleaning agents.

Cleaning the outside of the cooker

Details methods for cleaning exterior surfaces, recommending gentle approaches and suitable cleaning products.

Cleaning the gas cooktop

Burner parts and trivets

Provides instructions for cleaning burner components and trivets, emphasizing correct reassembly for safety.

Replacing the auxiliary and semi-rapid burners

Replacing the triple-ring wok burner

Cleaning the inside of your oven

Cleaning the fat filter

Explains how to clean the fat filter, its importance for fan element longevity, and cleaning methods.

Cleaning the oven door glass

Drawer

Removing the oven door

Replacing the oven lamp

Overview

This document provides comprehensive care and cleaning instructions for a Fisher & Paykel freestanding cooker, encompassing both its electric oven and gas cooktop components. The manual emphasizes safety and proper maintenance to ensure the longevity and optimal performance of the appliance.

Function Description:

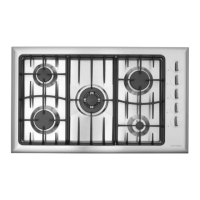
The Fisher & Paykel freestanding cooker is a versatile kitchen appliance designed for both cooking and baking. It features a gas cooktop for surface cooking and an electric oven for baking, roasting, and grilling. The cooktop includes various burner types, such as auxiliary, semi-rapid, and triple-ring wok burners, catering to different cooking needs. The electric oven is equipped with side racks, an oven door with removable glass panels, a fat filter, and an oven lamp, all designed for ease of use and maintenance.

Usage Features:

The cooker is designed for intuitive operation, allowing users to prepare a wide range of dishes. The gas cooktop offers precise heat control for various cooking tasks, from simmering to high-heat searing. The different burner types accommodate various pot and pan sizes, including a dedicated triple-ring wok burner for specialized cooking. The electric oven provides consistent heat for baking and roasting, with features like removable side racks to facilitate the placement and retrieval of dishes. The oven door is designed for easy removal, which is particularly useful for thorough cleaning or when accessing the oven cavity for maintenance. The fat filter in the oven helps to manage grease and maintain a cleaner cooking environment.

Maintenance Features:

The manual provides detailed instructions for maintaining all parts of the cooker, highlighting the importance of regular cleaning to prevent buildup and ensure efficient operation.

General Advice:

  • Post-Use Cleaning: It is recommended to wipe down the cooktop and clean out the oven after every use to prevent food residue from hardening.
  • Spill Management: Promptly wiping up spills is crucial, especially avoiding alkaline or acidic substances like lemon juice or vinegar, which can damage surfaces.
  • Cleaning Product Restrictions: Users are advised against using cleaning products with a chlorine or acidic base.

Cleaning the Outside of the Cooker:

  • Abrasive Cleaners: Abrasive cleaners, cloths, or pads should not be used on outside surfaces to prevent scratching.
  • Caustic Cleaners: Any caustic cleaners spilled on the oven door handle must be wiped off immediately.
  • Regular Cleaning: The outside surfaces should be cleaned often with warm water and a mild household detergent.
  • Stainless Steel Care: For stainless steel parts, a suitable cleaner and polish can be used. If using a commercial stainless steel cleaner, it's essential to check the label to ensure it does not contain corrosive chlorine compounds.

Cleaning the Gas Cooktop:

  • Daily Maintenance: The gas cooktop should be cleaned daily following specific instructions.
  • Monthly Maintenance: Monthly cleaning involves removing all burner parts, washing them with a non-abrasive detergent, rinsing in cold water, drying thoroughly, and replacing them. The ignitor should be carefully cleaned with a toothbrush and methylated spirits.
  • Every 3-4 Years: A thorough check on all gas components by an authorized gas Service Agent is recommended every 3-4 years.
  • Burner Parts and Trivets: These parts can be cleaned with hot soapy water or non-abrasive detergents. Spills should be cleaned regularly to prevent them from burning on. These parts should not be washed in a dishwasher. After cleaning, all burner parts and flame spreaders must be dry before replacement. Correct positioning of the burner flame spreader and cap is critical to avoid serious problems. To prevent damage to the electronic ignition, burners should not be lit without all parts correctly in place.

Replacing Auxiliary and Semi-Rapid Burners:

  • Part Replacement: Burner parts should be carefully replaced as per the provided figures.
  • Ignitor Cleanliness: The ignitor must always be clean to ensure trouble-free sparking and should be cleaned with a toothbrush and methylated spirits.

Replacing the Triple-Ring Wok Burner:

  • Burner Ring Fit: The burner ring must be fitted to the housing as shown in the figures, ensuring it cannot rotate.
  • Cap and Ring Positioning: Correct positioning of the cap and ring is illustrated to guide users.

Cleaning the Inside of the Oven:

  • Enamel Cleaning: Abrasive cleaners, cloths, or pads should not be used on the enamel. The enamel should be cleaned when cool, using household detergents or an ammonia-based cleaner. "Off-the-shelf" oven cleaners can be used if manufacturer instructions are carefully followed.
  • Removable Components: For easier cleaning, the side racks, oven door, and fat filter can be removed. The grill element is self-cleaning.

Cleaning the Fat Filter:

  • Post-Use Cleaning: The fat filter must be cleaned after every use to prevent blockage and extend the life of the fan element.
  • Light Soiling: For light soiling, the filter can be placed in a dishwasher on a normal wash cycle.
  • Heavy Soiling: For very dirty filters, place them in a saucepan with two tablespoons of clothes washing powder or one tablespoon of dishwashing powder, bring to a boil, and soak for at least 30 minutes. Rinse in clean water and dry.

Cleaning the Oven Door Glass:

  • Abrasive Cleaners: Harsh abrasive cleaners or sharp metal scrapers should not be used on the oven door glass to avoid scratching and potential shattering.
  • Inner Glass Panel Removal: The inner glass door panel can be easily removed by unscrewing two fixing screws for cleaning.
  • Re-assembly: When re-assembling, ensure the inner glass is correctly positioned and the screws are not over-tightened.

Drawer Maintenance:

  • Removal: The drawer comes out like a normal drawer.
  • Storage Restriction: Flammable materials should not be stored in the drawer.

Removing the Oven Door:

  • Step-by-Step Removal: The manual provides a detailed, multi-step process for removing the oven door, involving opening the door, hooking swivel retainers, lifting the door to disengage the hinge notch, and pulling the door forwards.
  • Replacement: To replace the door, the steps should be repeated in reverse order.

Replacing the Oven Lamp:

  • Safety First: Turn off power to the cooker and allow the oven cavity and heating elements to cool down.
  • Protective Cover: Remove the protective cover "B."
  • Bulb Replacement: Unscrew and replace bulb "A" with a new one suitable for high temperatures (300°C) with specific voltage (230-240V), frequency (50Hz), base type (E14), and wattage matching the original bulb.
  • Re-fit Cover: Re-fit the protective cover "B."
  • Warranty Note: Oven bulb replacement is not covered by the warranty.

This comprehensive guide ensures that users can effectively maintain their Fisher & Paykel freestanding cooker, promoting safety, cleanliness, and prolonged appliance life.

Fisher & Paykel OR60SDBSX2 Specifications

General IconGeneral
Width60 cm
FinishStainless Steel
Safety FeaturesFlame failure protection
MaterialStainless Steel
Product TypeCooktop
Ignition TypeElectronic Ignition

Related product manuals