Type 2500
11
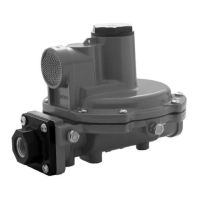
Controller/Transmitter Output Connection
As shown in figure 11, the output pressure connection
is on the back of the controller/transmitter case. After
connecting the output pressure line, turn on the supply
pressure, adjust the filter/regulator to the appropriate
supply pressure required for the controller/transmitter
and check all connections for leaks.
Prestartup Checks
Adjustments are shown in figure 12 unless otherwise
indicated. Open-loop conditions must exist when per-
forming the prestartup checks. To obtain open-loop
conditions:
make sure there is no process flow through the
final control element, or
disconnect the controller/transmitter output signal
line and connect it to a pressure gauge.
During prestartup, the displacer must be positioned
from its maximum to its minimum range of operation.
Provide a means to change the process variable (the
process level or interface). If the process variable can-
not be varied sufficiently, use the precalibration proce-
dures in the Calibration section to simulate the pro-
cess variable changes required for these checks.
Make sure the RAISE LEVEL dial on the controller is
mounted with the correct side facing out. The dial is
marked on both sides with an arrow. The arrow points
to the left on one side and to the right on the other.
When the sensor is mounted to the left of the control-
ler/transmitter, the arrow on the raise level dial should
point to the left, as shown in figure 12. If the sensor is
to the right, the arrow should point to the right. If nec-
essary, remove the two mounting screws, turn the dial
over so the arrow points correctly, and reinstall the
mounting screws. The level directions shown on the
dial will be correct for both direct-acting and reverse-
acting controllers. For a transmitter, use the same side
of the ZERO ADJUSTMENT dial for both right- and
left-hand sensor mountings.
On a controller or transmitter with an optional mechan-
ical indicator assembly, the travel indicator plate is
also marked with an arrow on both sides. If the sensor
is to the left of the controller/transmitter, the arrow on
the plate should point to the left. If the sensor is to the
right, the arrow should point to the right. If necessary,
reinstall the plate so that the arrow points in the cor-
rect direction.
Set the PROPORTIONAL BAND control on a Type
2500 or 2500S controller, or the SPECIFIC GRAVITY
control on a Type 2500T transmitter, as follows:
Sensor with Both Standard Torque Tube and
Standard Volume Displacer—If the torque tube is
standard and the displacer volume is close to that
listed in table 2, use figure 13 to find the PROPOR-
TIONAL BAND or SPECIFIC GRAVITY setting. Lo-
cate the specific gravity of the process fluid on fluid
level applications, or the difference between minimum
and maximum specific gravity on interface level or
density applications, on the vertical axis of the chart.
From this location, trace horizontally to the curve with
the desired percentage of displacer used, then trace
vertically up or down to determine the proper dial set-
ting on the horizontal axis.
Sensor with Nonstandard Torque Tube and/
or Displacer with Other than Standard Volume—If
the construction does not have a standard wall torque
tube or has a displacer volume that deviates signifi-
cantly from the volume listed in table 2, or both, the
PROPORTIONAL BAND or SPECIFIC GRAVITY dial
setting does not necessarily indicate the actual propor-
tional band or specific gravity. To determine the cor-
rect dial setting, solve the following equation:
Corrected
Dial Setting
Required
(
L
100
)(SP GR)
V
a
V
r
(X)
where:
L
= percentage of displacer length desired for full
output pressure change (e.g., if 80% of dis-
placer is used, L = 80)
SP GR = specific gravity of
the process fluid (for inter
-
face level control, use the difference be-
tween the specific gravity of the two fluids;
for specific gravity control, use the differ-
ence between the upper and lower range
limits of specific gravity).
V
a
= actual displacer volume, cubic inches listed
on the sensor nameplate.
V
r
= standard displacer volume, cubic inches, from
table 2.
X = torque tube factor (1.0 for standard torque
tubes, 2.0 for thin-wall torque tubes, or 0.5
for heavy-wall torque tubes).

 Loading...