Do you have a question about the FlexRadio FLEX-6600M and is the answer not in the manual?
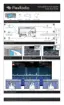
Carefully remove the top cover using T8 Torx screws to access internal components.
Identify the Micro SD card located on the CPU board within the radio's chassis.
Remove protective Kapton tape from the Micro SD card connector assembly.
Slide the connector latch and lift to remove the old Micro SD card.
Insert the new Micro SD card, ensuring it is seated flush and the latch closes properly.
Reconnect the 13.8V DC input and the Ethernet cable.
Turn on the radio and verify successful boot on SmartSDR with a solid green Power LED.
Power off the radio, allow it to shut down completely, and disconnect all cables.
Apply a new piece of Kapton tape over the Micro SD card connector assembly.
Carefully reinstall the top cover and secure it with the appropriate T8 Torx screws.
| Brand | FlexRadio |
|---|---|
| Model | FLEX-6600M |
| Category | Transceiver |
| Language | English |