DocumentIdentifier:MR04‐mul_AC04/16
Copyright©2016FLIRSystems,Inc.www.flir.comForadditionallanguagesvisitwww.flir.com/test
3
4
5
6
1
2
3
7
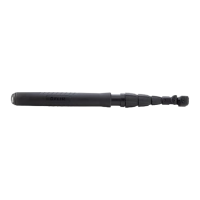
USERGUIDE
MR04‐EXTENSIONPOLE
Introduction
ThankyouforselectingtheFLIRExtensionPoleModelMR04.WhenconnectedtoaFLIR
MoistureprobesuchasMR05ImpactPinProbeorMR06WallCavityProbe,theMR04allows
theusertomeasuremoistureinwoodandotherbuildingmaterialsindifficulttoreachareas
fromasafedistance.
SafetyInstructions
Thisdeviceshouldbeusedonlyforpurposesoutlinedinthisguide.Misusemaycause
damagetotheMR04and/orexternaldevices,andcancausepersonalinjury.
Keeptheextensionpolepackedwhennotinuse.NotethattheMR04canbestoredinthe
MR07orMR08carry
caseforconvenience.
Donotallowchildrentohandletheextensionpole.
Description
1. Extendercontrols
2. Angleadjustmentscrew
3. Probemountreleasebuttons
4. Probemountplate
5. Probemountscrew
6. Probestabilizer
7. Probemountscrewdial
OperatingInstructions
1.
CarefullyremovetheMR04extensionpolefromitspackaging.
2.
Pressthereleasebuttons(3)toremovethe mountplate(4).
3.
Connectthemountscrew(5)totheprobeandtightenwiththedial(7).
4.
Thestabilizernotch(6)preventstheprobefromrotating.
5.
Reconnectthemountplate(4)totheextensionpole.
6.
UsetheMR04extendercontrols(1)toextendthepoletothedesiredlength.
7.
Usetheangleadjustmentscrew(2)tosetthedesiredangle.
8.
Operatethemoisturemeterandprobeasdescribedintheiruserguide.
9.
HoldtheMR04
handlegripfirmlywhenmaneauveringtheconnectedprobe.
Specifications
Adjustmentangle:±90
o
Dimensions:47.8cm(18.83”)collapsed;134.3cm(52.88”)extended;x4cm(1.6”)x5.5cm(2.2”)
Weight:466g(1lb.)
Compatibleprobes:MR05ImpactPinProbeandMR06WallCavityProbe
Warranty
FLIR Systems, Inc. warrants this device to be free of defects in parts and workmanship for 2 (two) years from date of
shipmentproviding:
DeviceispurchasedfromFLIRCommercialSystemsoranAuthorizedreseller
Deviceisregisteredonlineatwww.flir.com/test/warrantywithin60daysofshipment
FLIRisnotifiedwithin30daysofadefectbeingfound
ContactFLIRReturnMaterialAuthorizationbeforereturningtheproductforaReturnAuthorizationnumber
Thesenderisresponsibleforshippingcharges,freight,insuranceandproperpackagingtopreventdamageintransit.
Thiswarrantydoesnotapplyto
defectsresultingfromactionoftheusersuchasmisuse,improperwiring,operationoutside
ofspecification,impropermaintenanceorrepair,orunauthorizedmodification.
FLIRSYSTEMS,INC.SPECIFICALLY DISCLAIMS ANY IMPLIED WARRANTIES OR MERCHANTABILITY OR FITNESSFOR A SPECIFIC
PURPOSEANDWILLNOTBELIABLEFORANYDIRECT,INDIRECT,INCIDENTALOR
CONSEQUENTIALDAMAGES.
FLIR’stotalliabilityislimitedtorepairorreplacementoftheproduct.Thewarrantysetforthaboveisinclusiveandnoother
warranty,whether written or oral,is expressed or implied.To read the entire 2 (two) year warranty agreementplease visit
www.flir.com/test/warranty
ForTechnicalSupport:emailTMSupport@flir.comorcall+1855‐499‐3662(option3)