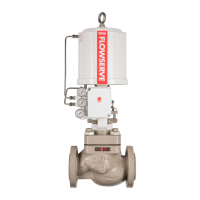
Valtek GS General Service Valve FCD VLENIM0300-00-A4 08/14
15
flowserve.com
body of the valve.
20. Install and finger tighten the bonnet nuts (114) to the
bonnet bolts (108).
21. Install the packing box ring (93) and the new packing (88).
NOTICE
Install and push two packing rings
consecutively using the Tamping
Tool and pre-tighten it using the Compression Tool.
Repeat the procedure with remaining rings. Rotate
each ring 180° from the overlapping point. Make sure
each ring is clean. Dirty rings result in stem leakage.
(See Table 18, Page 23)
22. Install the upper stem guide (87), Belleville springs
(109), and the packing follower (80). Tighten the pack-
ing follower with your fingers clockwise until resis-
tance can be felt.
NOTICE
The belleville springs (109) must be
stacked in series.
23. Tighten the bonnet nuts (114) in four steps - 30%,
60%, 100%, and all around 100% - using a crosswise
pattern (See Section 14: Torque Requirements).
NOTICE
Check the plug’s freedom of movement
by lifting it approximately ~10 mm (0.4
inch) between tightenings. Loosen the bolted connection
and start again if it proves difficult to move the plug.
24. Finish packing follower tightening with a wrench (See
Table 7, Page 9).
NOTICE
Do not over tighten the packing.
Over tightened packing may produce
higher friction and reduce product service life.
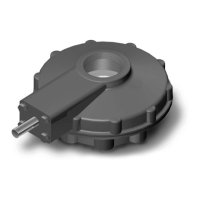
25. Replace the pneumatic diaphragm or multi-turn actua-
tor and accessories (See page 19).
26. After reinstalling the control valve in the pipeline,
perform 3 full strokes and check the tightening of the
packing follower and bonnet bolting.
27. Log the maintenance interval and the work performed.
Disassembly of the valve with a Bellows Seal
Bonnet Assembly.
1. Turn the bonnet nuts (114) counter clockwise to loosen
(See Figure 10: Disassemble / Reassemble the valve
with bellows seal bonnet type A).
2. Turn the packing follower (80) counter clockwise to
loosen.
3. Remove the Belleville springs (109).
4. Remove the upper stem guide (87).
5. Place the Ring Nut Tool (See Section 16: Special Tools)
on the stem (50) and turn slowly.
WARNING
Crushing hazard ! Lifting
the bonnet and plug from
the control valve involves personal physical risk by
falling parts.
Please exercise caution.
NOTICE
Exercise care with a pressure bal-
anced plug design. While removing
the pressure balanced plug the cage may stick to the
plug head then become detached while lifting the plug
and stem out of the valve. Secure the cage as you re-
move the plug and stem.
6. Remove the bonnet gasket (58).
7. Insert the Seat Change Tool (See Section 16: Special
Tools) into the body of the valve until the pin clicks
into place. Use a suitable torque wrench to remove the
seat ring.
8. Remove the seat ring (20) and profile ring (55).
9. Turn the bonnet nuts (110) counter clockwise to loosen.
10. Remove the head (7) and upper bonnet gasket (59).
NOTICE
There are two different bellows seal
designs.
Type
Size
Twist lock between
plug and stem
Connection between
bellows and bonnet
A 15 - 50
1/2“ - 2“
Lock bushing Clamped
B 65 - 150 3“ - 6“ Lock pushing Screwed
Table 12: Bellows seal bonnet types
11. Disassembling each type of Bellows Seal Assembly:
Type A Bellows Seal Assembly:
Lower the plug (50) into a three jaw-chuck with soft
brackets and turn the plug from the stem and bonnet
(6 / 40) counter clockwise to loosen then move the
bellows seal assembly up and out.
Type B Bellows Seal Assembly: