Fluke 433, 434, 435
Service Manual
3-14
13. Fluke 433/434: check for a voltage readout V rms between 0.0 ... 2.0 V.
Fluke 435: check for a voltage readout V rms between 0.00 ... 0.40 V.
14. Check the 400 V range according to the table below.
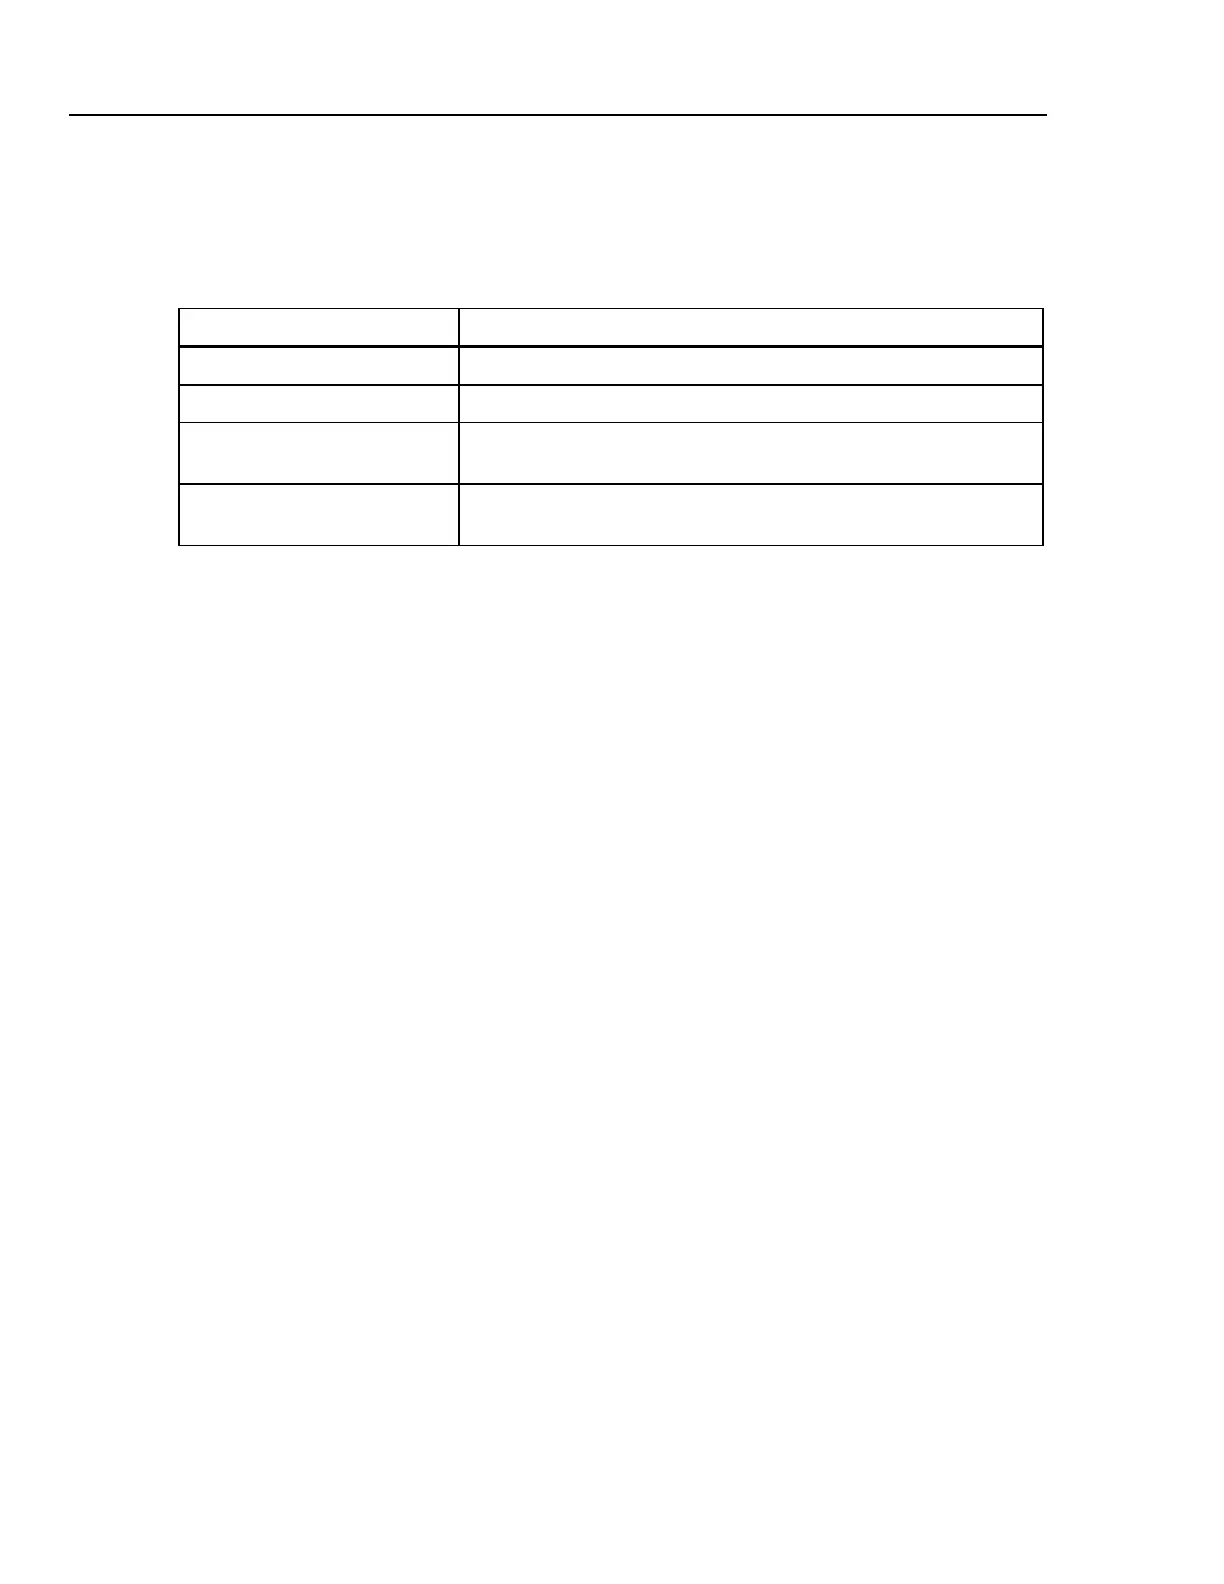
Table 3-10. Accuracy Check of Voltage Channel N (Neutral)
Set Calibrator to Readout at Voltage Channel N
0 Hz, 0 V, OPR Fluke 433/434: 0.0 ... 2.0 V, Fluke 435: 0.00 ... 0.40 V
200 V, 50 Hz, OPR Fluke 433/434: 198.0 ... 202.0 V, Fluke 435: 199.60 ... 200.40 V
400 V, 50 Hz, OPR Fluke 433/434: 398.0 ... 402.0 V, 49.99 ... 50.01 Hz
Fluke 435: 399.60 ... 400.40 V, 49.990 ... 50.010 Hz
800 V, 50 Hz, OPR Fluke 433/434: 798.0 ... 802.0 V, 49.99 ... 50.01 Hz
Fluke 435: 799.60 ... 800.40 V, 49.990 ... 50.010 Hz
15. Set the Calibrator to STBY.
Optional Test. Bandwidth Check of Channel N (*):
Note: for Fluke 435 you must use the Fluke 5700A Calibrator. This instrument is able to
generate 219.99999 V as a maximum at 3 kHz. Therefor a 50 Hz reference voltage of 215
V must be adjusted.
16. Set the Calibrator to 400 V (5700A: 215 V), 50 Hz and OPR.
17. Now check the voltage channel N. Use the Calibrator’s field edit function (5500A:
FIELD EDIT key, 5700A: AMPL/FREQ key) to adjust the Calibrator to an Analyzer
readout of 400.0 V / 215.00 V.
18. Increase the frequency to 3 kHz.
Fluke 433/434: Check for a readout of 379.8 V or more.
Fluke 435: Check for a readout of 204.25 V or more.
19. Set the Calibrator to STBY.
3.7.5 Verification of voltage inputs in 6 kV range (Transients)
Note: the tests in this paragraph can be skipped for Fluke 433.
Set the Analyzer to Transients mode (Analyzer remains in 400 V, 50 Hz nominal).
Press MENU, select Transients, then F5 – OK.
In the START screen: Voltage Swell must be on; the other 4 functions must be off.
Then press F5 - START.
Accuracy Check of Channel A/L1, B/L2, C/L3:
1. To check the A/L1, B/L2, C/L3 inputs: connect the N input to Ground (See Figure 3-
3).
2. Set the Calibrator to 0 Hz, 0 V and then to OPR.
3. Check for a voltage readout V rms between 0 ... 10 V in the screen header.