MAINTENANCE PURGE VALVE DRAINING
WARNING: ALWAYS DISCONNECT ALL APPLIANCES IN THE AQUARIUM FROM ELECTRICITY SUPPLY
BEFORE PLACING HANDS IN THE WATER, BEFORE PUTTING ON OR TAKING OFF PARTS, AND
WHENEVER THE FILTER EQUIPMENT IS BEING INSTALLED, MAINTAINED OR HANDLED.
Filter media must be periodically replaced or cleaned in accordance with instructions on individual
packages. Please refer also to the “Maintenance Frequency Chart” at the beginning of this
instruction manual. Prior to periodic media care the FX6 filter canister must be drained.
The FX6 filter offers you two methods to drain the canister:
•Option1:PurgeValveDraining
•Option2:FilterPumpDraining(kitsoldseparately).
Purge Valve Draining
Larger, heavier particles of aquarium debris will collect in the bottom of the canister, outside the bottom
media basket. The purge valve at the base of the unit allows for partial discharge of this heavy debris. There
is no need to open the filter lid or disconnect the hosing.
To use the purge valve to drain the water from the filter canister you could use the supplied drain hose that
is long enough to reach from the canister to a drain or basin.
1. Turn the IN and OUT valves in sequence to the closed (horizontal) position.
2. Unplug the pump from the electrical power supply.
3. Be certain the purge valve is in the closed (vertical) position; turn the lock nut clockwise to
loosen it, then remove the rubber drain cap.
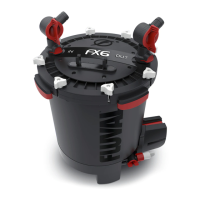
4. Attach one end of the supplied hose to the purge
valve, and position the other end in an appropriate
basin or discharge drain. Be sure the hose is secured to
the purge valve.
5. First, turn the purge valve to the open (horizontal)
position by turning it counterclockwise. Then
disconnect the OUT valve: press its release button, and lift it from the filter lid. It is a good idea to
have a cloth handy as some water will escape when removing the AquaStop valve.
6. Water will immediately begin to drain from the canister. Since this is a gravity fed method,
water will stop draining once the water level in the canister and drain bucket equalize. Once this
happens simply close the valve and empty the bucket. Repeat the draining process until enough water
is removed to make the canister light enough to carry to your work area.
7. Once a sufficient amount of water has been removed, close the purge valve and disconnect
the drain hose. Replace the rubber drain cap and secure with the locknut, turn the locknut counter
clockwise to secure the drain cap in place. Disconnect the IN valve and move to an appropriate work
area.
EN-18