HYDRO TECH PERFORMANCE MONITOR |
ADVANCED FILTRATION SYSTEM
Read all instructions before beginning.
instruction, please visit
follow a photo slide show of these step-by-step
CAUTION: DO NOT PLUG IN FILTER UNTIL SETUP
IS COMPLETE AND UNIT IS FILLED WITH WATER.
This is a gravity-fed system! For it to work properly,
all installation requirements must be properly
cm) below your aquarium’s water level but
never more than 4.9 ft. (150 cm). The hosing
supplied with the unit is 9.8 ft. (3 m) long. Do not
use longer and/or different type hosing as the
diminished and the filter may not operate correctly.
NEVER INSTALL THE FILTER ABOVE THE
The aquarium water level should
never be more than 6 in. (15 cm) below your
completely beneath the aquarium in such a way
easy reach and can be removed easily for
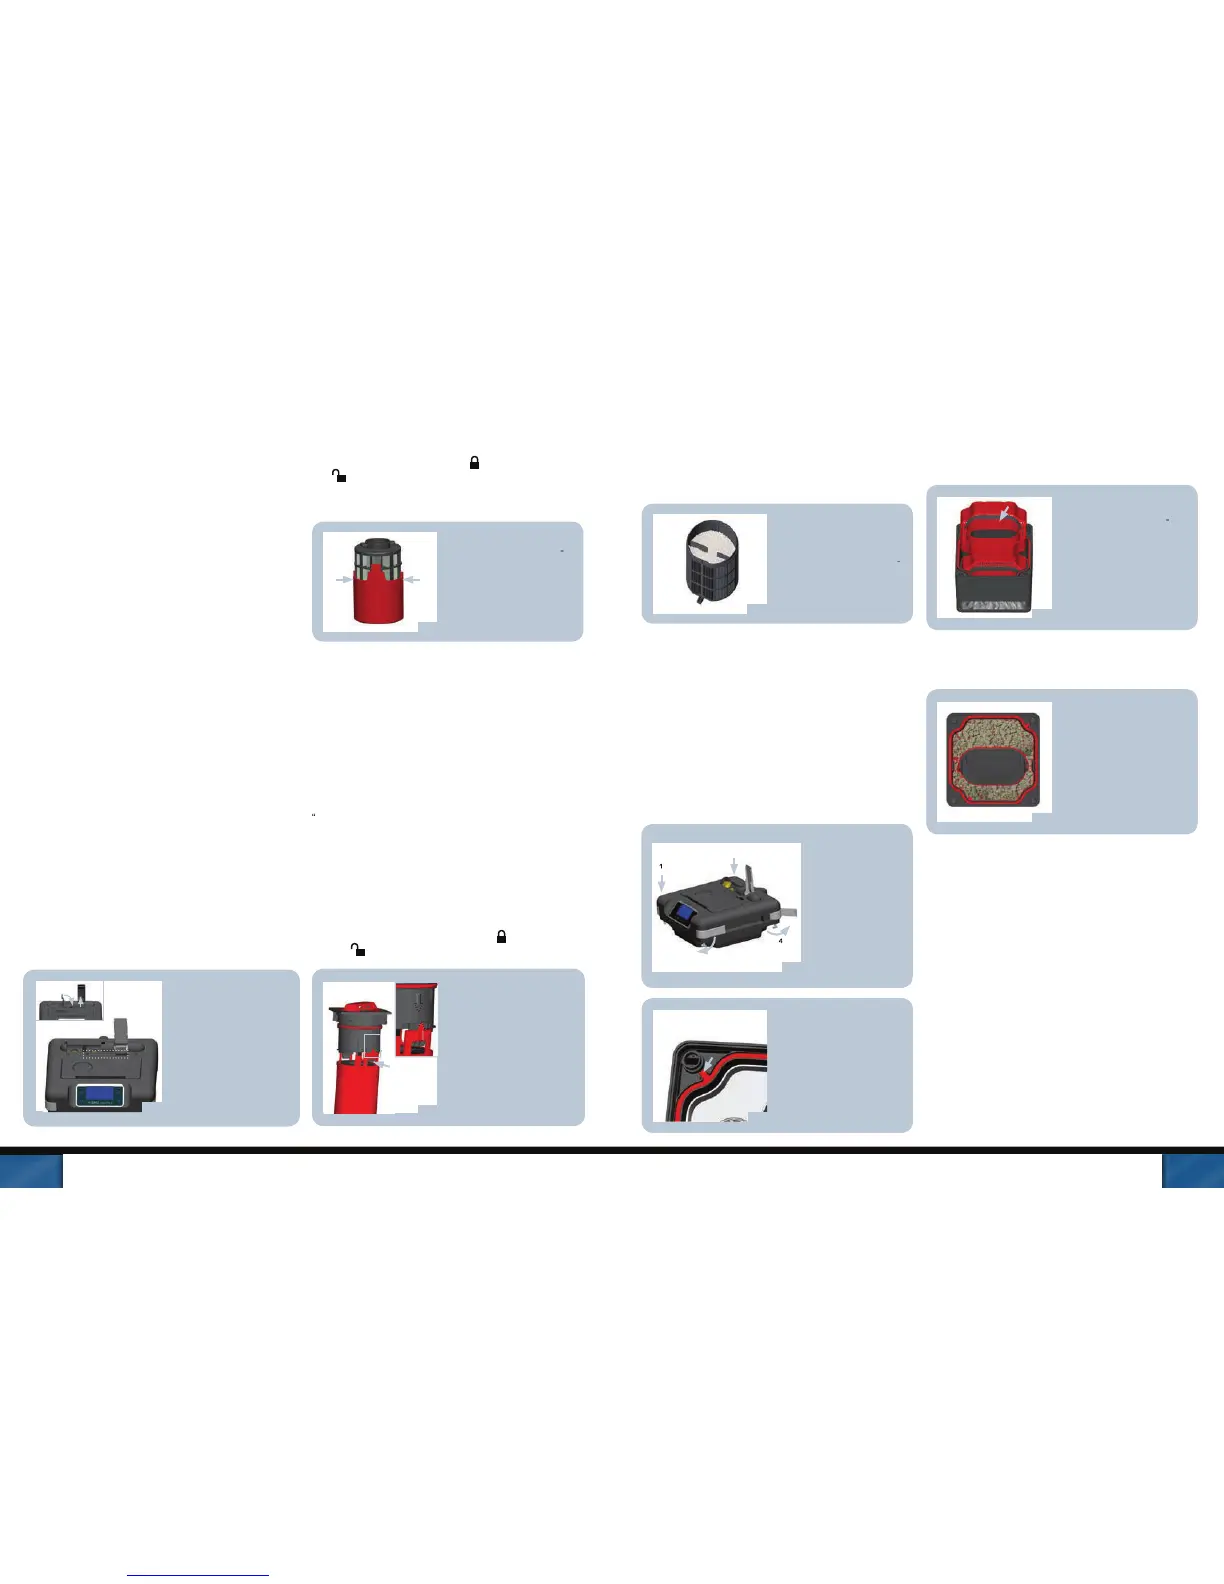
Open the cartridge lid. Open the cartridge lid.
valve lever must be valve lever must be
completely up and the completely up and the
black Aquastop release black Aquastop release
lever must be lever must be
completely pushed completely pushed
down in order to open down in order to open
left (when facing the filter), by turning the knob
counter-clockwise from the “ ” position to the
“ ” position. Pull out the cartridge.
separate it from the priming chamber.
To remove the cartridge To remove the cartridge
from its red dirt collecfrom its red dirt collec
tion cup, simultaneously tion cup, simultaneously
squeeze the ridged areas squeeze the ridged areas
found on either side of found on either side of
the cup’s grooves.the cup’s grooves.
with fresh water to remove any impurities. Note
that debris is collected on the interior of the
mechanical cartridge to the priming chamber
using a clockwise motion.
(preferably into a bucket.)
The mechanical cartridges
should be rinsed every 14 days— sooner if the
” warning appears. The filter cartridge
included is a general usage cartridge. To remove
smaller debris in salt water or in low-sediment
aquariums, a fine cartridge can be purchased.
To find an online retailer visit
B. Preparation of Chemical Filter Cartridge
the right (when facing the filter), by turning the
knob counter-clockwise from the “ ” position
the “ ” position. Pull out the cartridge.
Release the chemical Release the chemical
cartridge cup from the cartridge cup from the
assembly head by assembly head by
pushing against one of pushing against one of
the two marked black the two marked black
clips located in the clips located in the
middle of the cartridge. middle of the cartridge.
While pressing the clips, While pressing the clips,
pull the cup downwards. pull the cup downwards.
from the cartridge cup and then remove the
plastic bag. After rinsing it thoroughly with tap
water, place the cartridge back into the bottom
cup making sure it’s properly aligned.
If using another loose or If using another loose or
granulated chemical granulated chemical
media i.e. Fluval Lab media i.e. Fluval Lab
Series Nitrate or PhosSeries Nitrate or Phos
phate remover, fill the phate remover, fill the
cup to 1 cm below the cup to 1 cm below the
particles or debris on the outer lip or underneath
the cap. Debris in either area can prevent a
proper seal from taking place.
cartridge cup. It can only be re-assembled
following the correct left to right orientation.
See arrows in G.3. Re-attach cartridge cup to
C. Insert the filter gasket
Open the silver Open the silver
metal lid fasteners metal lid fasteners
located on each located on each
corner of the filter. corner of the filter.
Take off the filter Take off the filter
head and carefully head and carefully
set it aside so not set it aside so not
to damage the to damage the
sensors on the sensors on the
underside of underside of
Align the red silicone Align the red silicone
seal into the black seal into the black
groove located around groove located around
the interior rim of the the interior rim of the
canister. Run your canister. Run your
finger all the way finger all the way
around the gasket to around the gasket to
make sure it is seated make sure it is seated
D. Biological Media Baskets
out the biological basout the biological bas
kets (the Fluval G3 has kets (the Fluval G3 has
two baskets; the Fluval two baskets; the Fluval
G6 has three biological G6 has three biological
Remove G-nodes from the plastic bags, mixing the
small and large G-nodes evenly into each basket.
Leave enough space at Leave enough space at
the top—no nodes should the top—no nodes should
be protruding from the be protruding from the
upper edges of the upper edges of the
problems when stacking problems when stacking
the baskets, there should the baskets, there should
be a minimum 5mm be a minimum 5mm
between the basket edge between the basket edge
water to remove any dust particles.
aligning large grooves on the baskets with the
edges inside the canister.
the biological media baskets.
so that all four corners of the lid are all the way
down. If any of the corners won’t go all the way
down, check that all corner fasteners are fully
STEP 3: INSTALLING THE FILTER
A. Preparation of Pre-Filter Cartridge
 Loading...