HYDRO TECH PERFORMANCE MONITOR | ADVANCED FILTRATION SYSTEM
EN.6
QUICK START GUIDE
EN.7
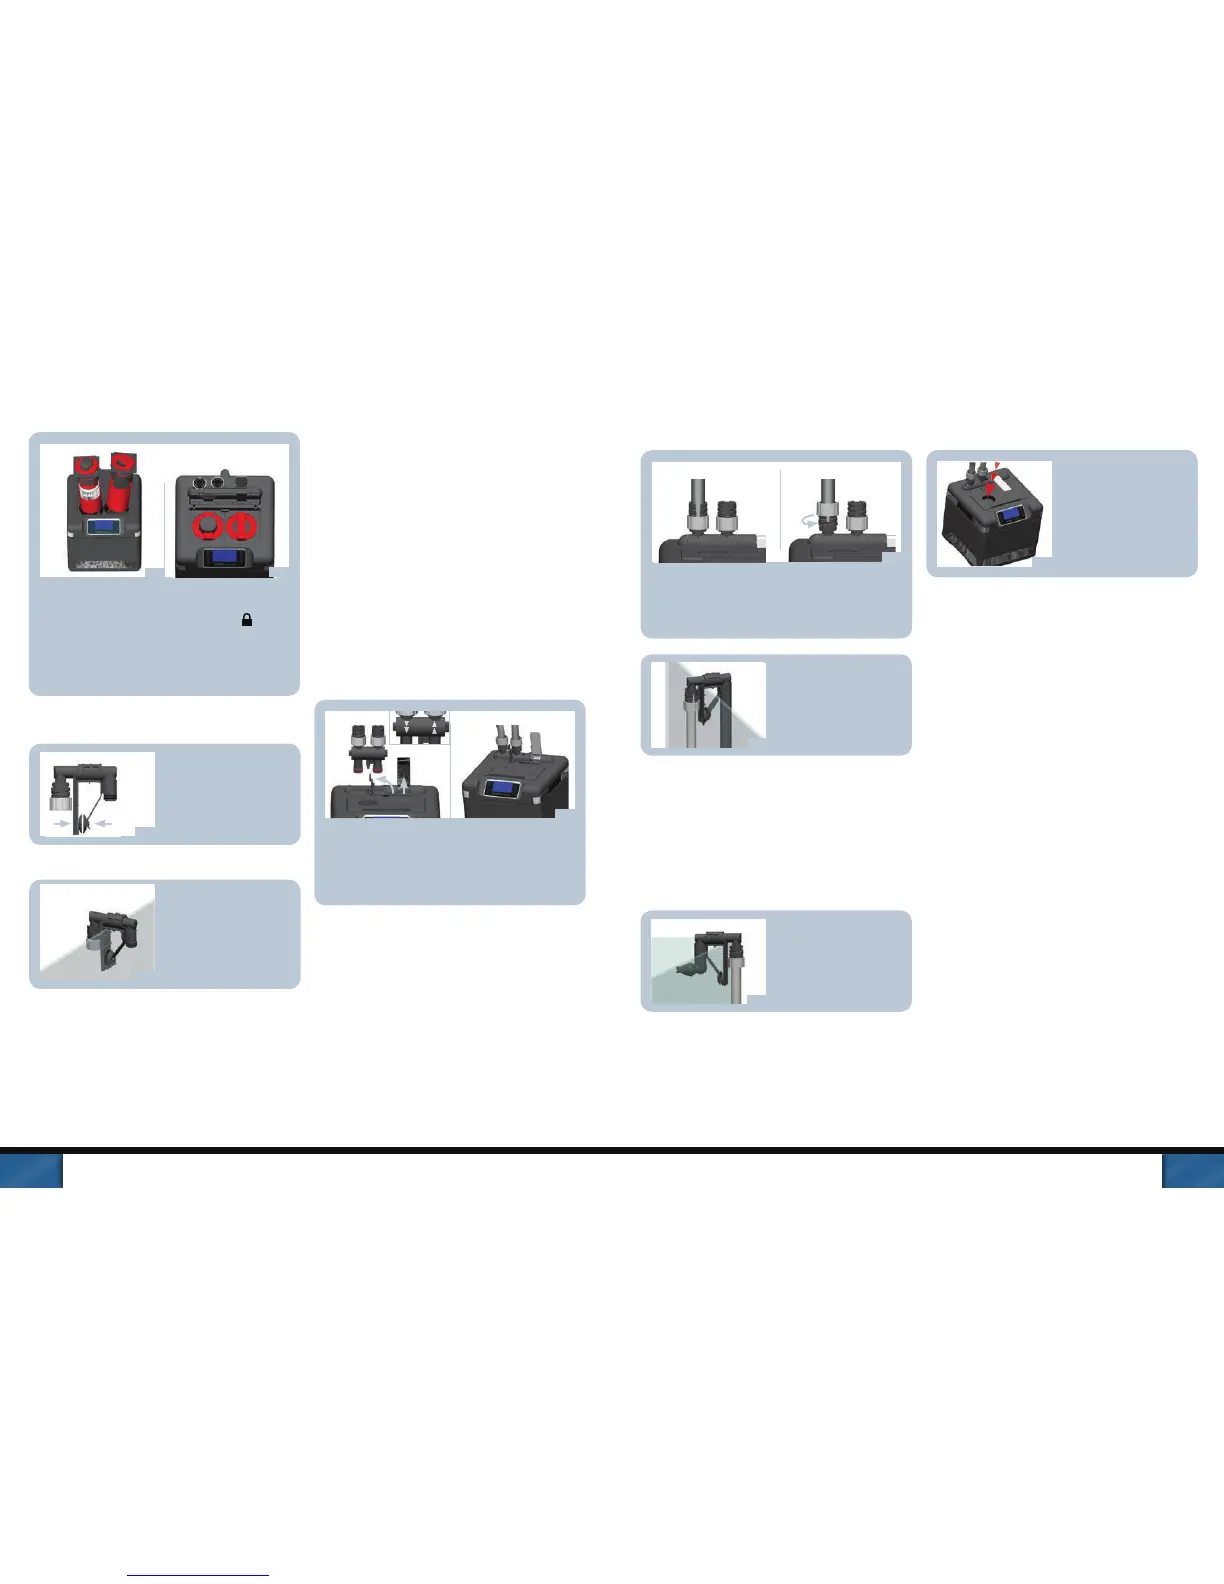
Replace the mechanical and chemical cartridges
back into place making sure to align them properly
and then turning the knobs clockwise to “ ”
cartridges into place.
If the cartridge lid doesn’t close, the cartridges have
not been installed properly.
Insert two suction cups
on each side of the rim
attachment assemblies
so the suction cups are
facing each other.
ÊUÊ"iÊÀÊ>ÌÌ>ViÌÊÜÊ`ÊÌiÊÌ>iÊÃÌÀ>iÀÊ
and the other the output nozzle or spray bars.
STEP 4: INSTALL RIM ATTACHMENTS
A. Placement
At opposite ends, place
the rim assembly over
aquarium’s back rim,
making sure the rim with
the nut is on the outside.
B. Install Telescopic intake stem
ÊUÊ*ÕÃÊÌiÊÌiiÃV«VÊÌ>iÊÃÌiÊvÕÞÊÌÊÌiÊ
cross rim assembly up to the top. The intake
strainer must be placed at least 3 in (7.5cm)
from the bottom of the aquarium gravel.
Important: Position the telescopic intake strainer
as far away as possible from any air source (e.g. air
stones, aeration devices, protein skimmers, the out-
put nozzles or spray bars). Air entering the intake
strainer will reduce filter efficiency.
C. Install Output nozzles
ÊUÊ/iʺ9»ÊÕÌiÌÊViÃÊÜÌÊÌiÊÕÌ«ÕÌÊââiÃÊ
attached. To use the spray bars, first remove the
output nozzles by twisting them to one side so
they pop off the “Y”. You can then attach the
spray bars directly to the “Y” outlet.
STEP 5: CONNECTING HOSES
Important: Hosing should always follow a straight
path from the filter to the aquarium rim with some
slack but no loops. The filter will not work efficiently if
the hose is too long or too short.
A. Install the Aquastop
ÊUÊvÌÊÌiÊÃÛiÀÊ+1-/"*ÊÛ>ÛiÊiÛiÀÊÊÌ«ÊvÊ
the filter to a full upright position. Next lift the
Aquastop release lever to the left. Important: to
avoid damaging the Aquastop levers, always
follow the recommended sequences/procedures
and never force anything.
NOTE: Don’t force the silver valve lever or release
lever. If it doesn’t close easily then you need to
reinstall the Aquastop assembly making sure to align
it properly.
ÃiÀÌÊÌiÊ+1-/"*Ê6>ÛiÊÌÊÌiÊÌ«ÊvÊÌiÊ
filter, with indicator arrows facing front and close
ÌiÊ+1-/"*ÊÀii>ÃiÊiÛiÀ°Ê/ÃÊi}>}iÃÊÌiÊ
+1-/"*ÊÛ>Ûi°Ê/iÊ«ÕÊÌiÊ>µÕ>ÃÌ«ÊÛ>ÛiÊ
lever down.
The intake hose will connect to left side of the
+1-/"*ÊÛ>ÛiÊ`ÜÊ>ÀÀÜ®°Ê*ÕÃÊiÊi`ÊvÊÌiÊ
hose all the way onto the barbed adaptor, turn the
nut counter-clockwise as tightly as possible without
forcing it.
UÊ-ÌÀiÌVÊÌiÊÃiÊÕ«ÊÌÊ
the intake cross rim
>ÃÃiLÞÊ°Ê1Ã}Ê
scissors or a utility knife,
cut the hose just above
the lock nut.
ÊUÊ/>iÊÌiÊVÀÃÃÊÀÊ>ÃÃiLÞÊvvÊÌiÊÀÊ
attachment and push the hose onto the barbed
connector, turn the nut lock clockwise securing
the hose to the rim connector. Place the intake
assembly back onto the rim attachment, pressing
it into place until you hear it ”click.”
C. Connect the output hose
ÊUÊ/iÊÕÌ«ÕÌÊÃiÊÜÊViVÌÊÊÌiÊÀ}ÌÊÃ`iÊvÊ
the Aquastop (up arrow).
Repeat this same
procedure used for the
intake hose to connect
the hose for the output
hose.
Important: Hosing should always follow a straight
path from the filter to the aquarium rim, with some
slack, but no loops. The shorter the hosing, the
better the unit will perform. Do not cut too short.
If necessary, you can always cut it shorter later.
After having topped up
the aquarium with water,
quickly and vigorously
push the priming
button all the way down
2-3 times until the water
ÃÌ>ÀÌÃÊyÜ}ÊÌÊÌiÊ
filter.
ÊUÊ7iÊÌiÊwÌiÀÊ>ÃÊV«iÌiÞÊwi`ÊÜÌÊÜ>ÌiÀÊ
and all air bubbles have stopped coming out of
return nozzles connect it to the power supply
outlet.
ÊUÊ/iÊÊ`ë>ÞÊÜÊÃÜÌVÊÊ>`Ê>vÌiÀÊ>ÊÃÀÌÊ
pause it will show the start up and setup
sequence of the filter. Once the start sequence
ÊÊ>ÃÊi`i`]ÊÌiÊ«Õ«ÊÜÊÌ>ÌiÊÌiÊÜ>ÌiÀÊyÜ]Ê
provided the filter is completely filled with water.
The pump will not operate if the filter is not
completely full of water.
ÊUÊ"ViÊÌiÊÜ>ÌiÀÊÃÊyÜ}Ê«À«iÀÞ]ÊViVÊÌiÊ
aquarium water level again and, if necessary,
restore it to adequate levels.
STEP 6. STARTING THE PUMPB. Connect the intake hose
G.9
G.10
G.11
G.12
G.13
G.14
G.15
G.17
G.16
STEP 7. FILTER SETTINGS
You are now ready to set up your filter options using
the menus.