INSTALLATION and USE
(Fluval Underwater Filter Models U1, U2, U3 and U4)
WARNING: Disconnect the plug of all aquarium appliances before placing your hands into
the aquarium water and / or performing any maintenance of any kind. Do not plug filter
in until setup is complete and aquarium is filled with water.
GETTING STARTED FLUVAL U1
1. Unpack and identify all parts. Use the parts diagram as a guide.
2. D
ecide on filter placement. Allow enough space above the filter to be able to easily
open the top cover
3. Once all parts have been identified, rinse the foam in tap water before the first
installation.
4. Insert the 3 suction cups into the 3 slots on the rear of the filter. (ill. A).
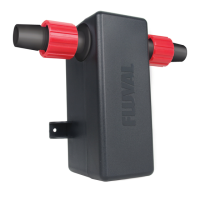
5. Insert the output nozzle with venturi vent into the output on the filter body, making
sure that the vent is facing
up. (ill. B).
6. If the Venturi System is to be used, place the Venturi valve into the top of the vent. (ill. C).
Note: In order to have the airflow /venturi work properly, it must remain above water.
Keep this in mind when putting the filter into its final position. Turning the valve located
on the top of the venturi valve will regulate the quantity of air produced.
7. The filter can now be fitted in
to the aquarium. Grasp the filter by the sides and
hold it into position. When properly positioned push against the filter adhering
the 3 suction cups to the wall of the aquarium.
Note: Be sure the line cord is correctly positioned in the slots on the back side of the
filter body (ill. D).
Note: Ensure the top outlet is at a minimum of 1 cm below the aquarium’s water surface
and if venturi valve is t
o be used it is sticking out of the water. (ill. E).
8. Plug into power source.
ADJUSTING THE WATER FLOW
By simply rotating the adjustable control knob you can adjust the flow rate. (ill. F).
MAINTAINING THE U1 FILTER
WARNING: ALWAYS DISCONNECT APPLIANCES IN THE AQUARIUM FROM THE ELECTRICAL
SUPPLY BEFORE PLACING HANDS IN THE WATER, BEFORE PUTTING ON OR TAKING OFF
PARTS, AND WHENEVER THE FILTER EQUIPMENT
IS BEING INSTALLED, MAINTAINED OR
HANDLED.
Following a routine maintenance schedule will result in a healthier aquarium and extend
the life of the filter. Fluval filters have been designed to facilitate these tasks as they can
be done within a matter of minutes. For best results please follow our maintenance
schedule recommendations.
FILTER CARTRIDGE REPLACEMENT
Replace Foam Pads every 3-6 months.
(B)
(A)
(C)
(D)
(E)
(F)
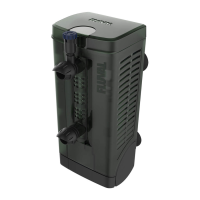
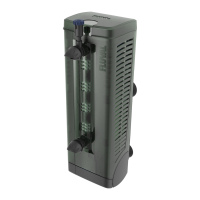
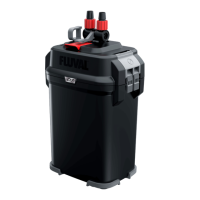
U2 - U3 - U4 PARTS
U1 PARTS
BIOMAX CARTRIDGE
FOAM PAD
FLIP TOP COVER
FLOW CONTROL
KNOB
FOAM PAD
VENTURI VALVE
DIRECTIONAL
OUTPUT NOZZLE
FILTER BODY
MOTOR
POLY/CARBON CARTRIDGES
FOAM CARTRIDGE
FRAME
FOAM CARTRIDGE
FRAME
3-WAY
FLOW CONTROL
KNOB
VENTURI
VALVE
FILTER BODY
DIRECTIONAL
OUTPUT NOZZLE
MAGNETIC IMPELLER
IMPELLER
SHAFT ASSEMBLY
FLIP TOP COVER
MOTOR
FILTER
BRACKET
SUCTION CUPS (3)
FOAM PAD
SUCTION CUPS
(4-6)
INTEGRATED
SPRAY BAR
MAGNETIC IMPELLER
IMPELLER
SHAFT ASSEMBLY