Creating a route
Next, you must create a route that tells your Element how you want to y
over the waypoints.
Press and hold
, then select Route. Press
.
Select Edit. Press
.
Press
to open the list of waypoints. Use the arrow keys
to highlight
your rst waypoint, in this case Niederhorn. Press
.
Use the arrow keys
to select the cylinder radius for the waypoint. We
recommend 400 m. Press
.
Repeat these steps to add HouseThermal and Interlaken as your second and
third waypoints on the route.
Press
to save the route and return to the Main Setup Menu.
Activating the route
Before you y, you must activate the route. (Note that entering a start time
for your route activates your Element's competition mode. For non-competi
-
tion navigation, simply enter No for the start time.)
Press and hold
. Activate Route – by pressing
.
You will see the prompt Start time. Use the arrow keys
to select No. Press
.
The route is now activated Route
and your Element will start navigating
automatically upon take-o.
Firmware update
Coming soon: Entering waypoints is about to get even easier with a pending rmware
update. You will be able to drag-and-drop waypoint les from your computer directly
into your Element's memory. Check www.ytec.ch to learn about this and other updates.
12 Navigation
2.2 Now you are ready to navigate!
Flying the route
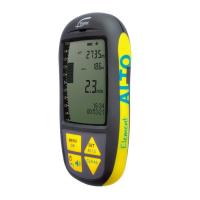
The compass rose is your key to navigation. All icons on the compass rose
indicate bearings relative to your direction of ight. Your direction of ight is
always at the very top of this display.
Compass rose
In ight, your Element will show you the direction to your next waypoint as an arrow
in the compass rose. To y to the next waypoint on your route, turn your glider until
this arrow stays pointed toward the top of the compass rose.
Navigation 13
Direction of ight
Nearest airspace
(rmware update coming soon)
Next waypoint
True north
Waypoint after next
(blinking)
Last thermal
English English