www.fmiproducts.com
56131J 29
LIGHTING
INSTRUCTIONS
1. STOP! Read the safety information,
page 28.
2. Set HI-LO knob to the lowest setting.
3. Turn off all electrical power to appliance.
4. Open control access panel.
5. Push in gas control knob slightly and turn
clockwise to the OFF position.
6. Wait ve (5) minutes to clear out any gas.
Then smell for gas, including near the
oor. If you smell gas, STOP! Follow “B”
in the safety information, page 28. If you
don’t smell gas, go to the next step.
7. The pilot is located by the main burner.
8. Turn knob on gas control counterclock-
wise to the PILOT position.
9. Push in control knob all the way and hold
in. Immediately light pilot by pressing
ignitor button until a ame appears one
minute after pilot is lit. Release knob and
it will pop back up. Pilot should remain lit.
If it goes out, repeat steps 5 through 9.
• If knob does not pop out when released,
stop and call gas supplier.
• If pilot will not stay lit after several tries,
turn gas control knob to OFF and call
your service technician or gas supplier.
10. Turn gas control knob counterclockwise
to the ON position. Knob can
be turned to ON only if control knob is
popped out.
O
F
F
P
I
L
O
T
O
N
L
O
H
I
P
I
L
O
T
EA
16AI
7
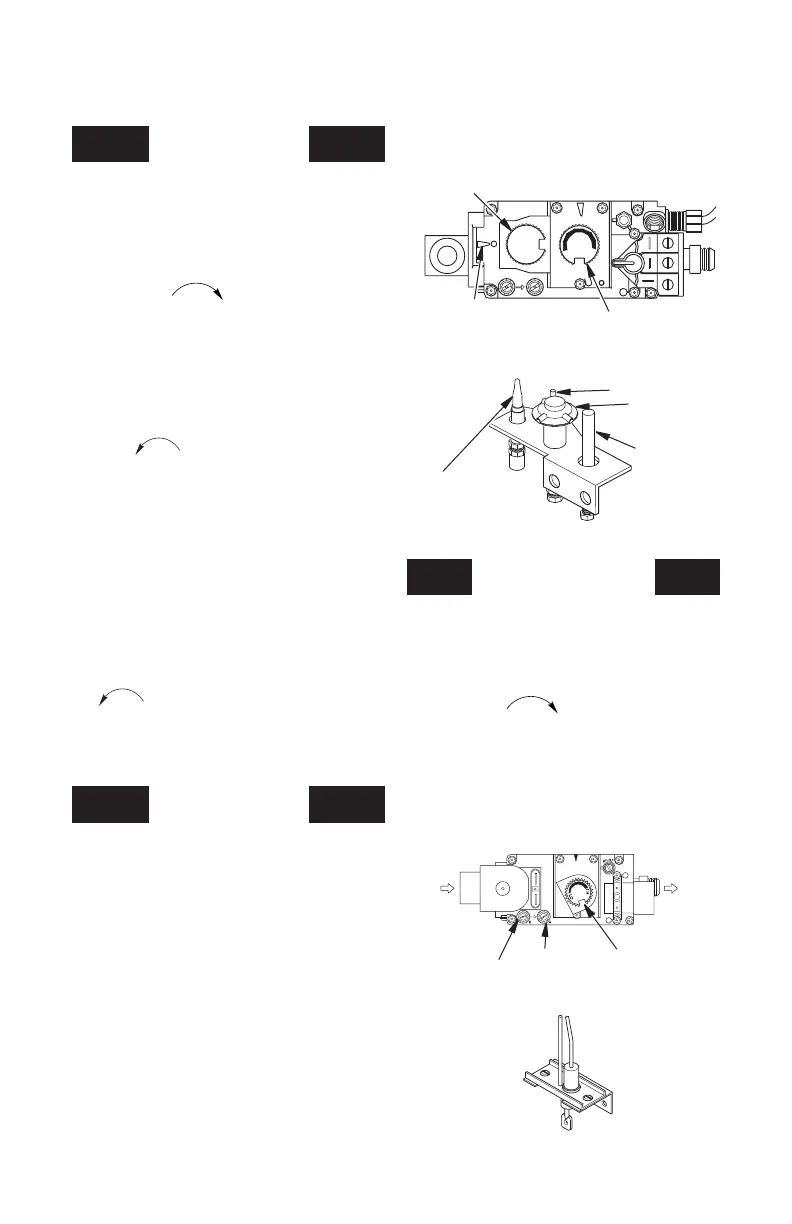
TPTH TP TH
Gas Control
Knob
Flame Adjustment
Knob
Position
Indicator
Figure 59 - Millivolt Control Valve
Figure 60 - Pilot
Thermopile
Pilot Burner
Piezo Ignitor
Thermocouple
OPERATION Continued
TO TURN OFF GAS
TO APPLIANCE
1. Turn off wall switch.
2. Turn off all electric power to appliance if
service is to be performed.
3. Remove control access panel.
4. Push in gas control knob slightly and turn
clockwise to OFF. Do not force.
5. Replace control access panel.
MILLIVOLT SySTEM
11. Set HI-LO knob to desired setting.
12. Turn on all electric power to appliance.
ELECTRONIC SySTEM
• If burner will not stay lit after several
tries, ip wall switch to OFF and call your
service technician or gas supplier.
Inlet
Pressure
Figure 61 - Electronic Control Valve
Outlet
Pressure
Flame
Adjustment
Knob
From Gas
Supply
To
Main
Burner
Figure 62 - Electrode
LIGHTING
INSTRUCTIONS
1.
STOP! Read the safety information
page 28.
2. Set thermostat to lowest setting (if ap-
plicable).
3. Turn off wall switch.
4. Open control access panel or louver.
5. Smell for gas, including near the oor. If
you smell gas, STOP! Follow “B” in the
safety information,
page 28
. If you don’t
smell gas, go to the next step.
6. The electrode is located by main burner.
7. Turn main burner wall switch to the ON
position for ignition. There will be a spark
at the electrode.
8. Replace control access panel or louver
once there is a ame at the burner.