Final Facing Fold Front
1
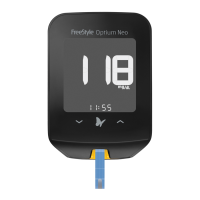
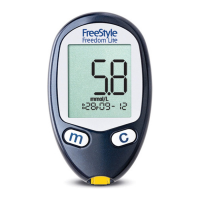
FreeStyle Optium Neo At-A-Glance
Logbook
Up Button
Power Button
• Turns meter on and o
and returns to the
Home screen
USB Port
• Insert a data cable here for
uploading test results to a
computer (data
management system
required)
Strip Port
• Insert a test strip here
Test Strip
• Insert the test strip into the meter
Target Area
• Apply blood or control solution to the white
target area at the end of the test strip
Display Window
• Displays meter Home screen
(shown here)
• Displays your test results and
other important information
Down Button
2
Meter Symbols
Symbol What It Means Symbol What It Means
Logbook Breakfast insulin dose
Meter ready for sample
application
Lunch insulin dose
Control solution result Dinner insulin dose
Units of insulin Fasting test
Insulin
Ketone
Morning long-acting insulin dose Low battery
Evening long-acting insulin dose
Connected to computer
Insulin dose setup Setup mode
Low blood glucose or pattern High blood glucose or pattern
3
Quick Start – Testing Your Blood Glucose
1. Wash and dry hands before and after testing.
Note: Check test strip expiry date.
2. Insert strip.
3. Lance test site and apply blood.
4. View result.
For more information on how to perform a test, see
Section 7.
4
Intended Use
The FreeStyle Optium Neo Blood Glucose and Ketone Monitoring System is for use outside
the body only (in vitro diagnostic use) for self testing or professional use as an aid in the
management of diabetes.
Use for measuring glucose in fresh whole blood samples taken from ngers, forearm, upper
arm or the base of the thumb. Use for measuring ketone (β-hydroxybutyrate) in fresh whole
blood samples from ngers only.
The system may also aid in the management of diabetes by providing the user with suggested
recommendations to insulin dose(s) based on healthcare professional entered data.
IMPORTANT:
•UseonlyFreeStyleOptiumbloodglucoseteststripsandFreeStyleOptiumblood
β-Ketone test strips. Other test strips may produce inaccurate results.
•Seeteststripinstructionsforuseformoreinformationaboutsampletypes.
•ReadtheinstructionsinthisOwner’sSetupGuide.Failuretofollowinstructions
may cause incorrect results. Practice the testing procedures before using the
meter.
•Followyourhealthcareprofessional’sadvicewhentestingbloodglucoselevels
and blood ketone levels.
•Observecautionwhenusingaroundchildren.Smallpartsmayconstitutea
choking hazard.
IMPORTANT:
•Onlyuseateststriponce.
•Readtheteststripinstructionsforusebeforeperformingyourrstblood
glucose or ketone test. It contains important information and will tell you how
to store and handle the test strips.
•Themeteranditsaccessoriesareforusebyasingleperson.
•Refertothelancingdeviceinsertfordetailedinstructionsonhowtousethe
lancing device.
•Donotputurineontheteststrip.
Check your ketone:
•Whenyouhaveanillness
•Whenyourbloodglucoseisabove13.3mmol/L
•Whenyouandyourhealthcareprofessionalfeelitisnecessary
5
Getting to Know Your Meter
Turning Your Meter On and O
To turn your meter on:
•Pressthe
, or
•Insertastrip
To turn your meter o:
•Pressandholdthe
for3seconds,or
•Donothingfor2minutes
Checking Your Meter Screen Every Time You Turn It On
Meter O Screen
Your meter screen should be fully black when powered
o. Each time you turn on your meter, a white start-up
testscreenwillappearfor1second.
If you see any white segments in the black o screen, or
any black segments in the white test screen, there may
be a problem with the meter. Contact Customer Care.
Note: If the meter battery is low, the
will
appear in both the meter o screen and start-up test
screen.
Start-up Test Screen
➧
6
Setting Up the Meter
To conrm that the date and time are set correctly, follow the steps below.
Set Time
1. Start with meter o (no test strip inserted)
•Press to turn on the meter
2. Press and hold the time (11:50)on the screen
for3secondsuntilthescreenchanges.
(e.g.1:23PM)
(e.g.13:23)
3. SetTimeFormat(12houror24hourclock)
•Press or to change
•Press to continue
Note: Your meter can display either a 12 h (1:23
PM) or 24 h (13:23) time format. If you prefer the
12 h format, there is no “AM”. If setting a PM time,
continue to press until you see the “PM”.
4. Set Hour
•Thehourblinks.Press
or to set the
hour
•Press to continue
5. Set Minutes
•Theminutesblink.Press
or to set the
minutes
•Press to continue
minute
hour
minute
hour
Set Date
6. Set Month
•Themonthblinks.Press or to set the
month
•Press to continue
7. Set Day
•Thedayblinks.Press
or to set the day
•Press to continue
8. Set Year
•Press or to set the year
•Press to save. Setup complete
month
day
month
day
10
View Logbook
Yourmeterlogbookcanstoreupto1,000events–includingbloodglucose,ketone,and
control solution results, insulin doses, and other meter information.
Viewing Your Logbook Events
1. WhileontheHomescreen,press to view
your logbook events.
Examples:
BloodGlucoseResult
2. Press
to scroll through to view your logbook
events.
Units of
Insulin
Insulin Dose
FastingResult
-
ControlSolutionResult
Viewing Your Blood Glucose Averages
1. WhileontheHomescreen,press to open the
logbook.
2. Whileinthelogbook,press any time to view
your 7-day average. [ ]
•Press toview14-dayaverage. [ ]
•Press toview30-dayaverage. [ ]
•Press to return to your logbook events.
Notes:
•Averagesdonotincludeglucosecontrolsolution
results.
•Controlsolutionresultsnotmarkedascontrol
solution tests may cause averages to be inaccurate.
• appear on the meter screen when there
are no current events or averages to view.
• blood glucose test results are included as
1.1 mmol/L when calculating averages.
• blood glucose test results are included as
27.8 mmol/L when calculating averages.
Press
or to scroll
through 7-, 14- and 30-day
averages.
Your average
Number of tests
in this average
Prepare to Test
1. Select your test site.
Test site choices for blood glucose testing are ngers, forearm, upper arm, or base of the thumb.
Use only ngertip blood samples for blood ketone testing.
Note: Avoidmoles,veins,bones,andtendons.Bruisingmayoccuratthetestsite.Ifbruising
occurs, consider selecting another site.
2. Wash your hands and the test site with soap and warm water.
•Rinseanddrythoroughly.
•Donot use lotion or cream on the test site.
3. Check test strip expiry date.
Do not use expired test strips; they may cause inaccurate results.
Do not use blood samples from alternative sites when:
•Youthinkyourbloodglucoseisloworchangingrapidly
•Youhavebeendiagnosedwithhypoglycaemicunawareness
•Alternativesiteresultsdonotmatchthewayyoufeel
•Youarewithintwohoursofeatingameal,takinginsulin,orexercising
Performing a Blood Glucose or Blood Ketone Test
1. Open the foil test strip packet at the notch and
tear down to remove the test strip.
2. Insert the test strip into the meter until it stops.
This will turn on the meter.
Notes:
•Besuretocheckthatyourmeterscreenisworking
properly each time you turn your meter on. If you see
any white segments in the black o screen, or any
black segments in the white test screen, there may be
a problem with the meter. (See Section 5, Getting to
Know Your Meter, for more details)
•Themeterturnsoafter3minutesofinactivity.
Remove and reinsert the unused test strip to restart
the meter.
The
blinks, indicating the meter is ready for you to
apply a sample to the test strip.
Note: KETwill appear on the screen if you have inserted a
purple blood ketone strip.
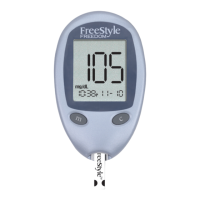
7
Testing Your Blood Glucose or Blood Ketone
8
Understanding Blood Glucose Test Results and Patterns
3. Obtain a blood sample.
Use the lancing device to obtain a blood sample.
(See lancing device instructions for use for more
information.)
4. Apply blood to the test strip.
Bring the blood drop to the white area at the end of
the test strip. The blood is drawn into the test strip.
Holdbloodtoteststripuntilyousee3shortlines
on the meter screen. This means you have applied
enough blood.
Notes:
•Ifyouaretestingbloodglucose,youwillseea
5-second countdown. If you are testing blood ketone,
you will see a 10-second countdown.
•Donot remove the test strip from the meter during
the countdown.
•Ifthecountdowndoesnotstart,youmaynothave
applied enough blood to the test strip. See test strip
instructions for use for re-application instructions. If
the countdown still does not start, remove the used
strip and discard it correctly. Start a new test with a
new test strip.
➧
-
BloodGlucoseResultexample
BloodKetoneResultexample
5. View the result.
The test is complete when the result appears on the
meter screen (examples shown). The result is stored
in memory.
Note: If you see a
this means the meter can
suggest a new meal insulin dose. Ignore this if you’re
not about to eat a meal and take your meal insulin
dose.
6. Press and hold
to turn o the meter. Discard the
used test strip correctly.
Themeterdisplaysbloodglucoseresultsinmmol/L.Theunitofmeasurementispreset.Youcannotchangethissetting.
Low Blood Glucose Results
If You See . . . What It Means What To Do
Appearswhenresultislowerthan3.9mmol/L
or the target set on the meter by your healthcare
professional.
Followyourhealthcareprofessional’s
advice to treat low blood glucose.
Apatternoflowglucosehasdeveloped.
If2lowresultsoccurwithinthepast5daysAND
botharewithinthesame3-hourtimeperiod,the
meter will display a blinking
.
Followyourhealthcareprofessional’s
advice to treat low blood glucose.
Appearswhenresultislowerthan1.1mmol/L
Severe low blood glucose or
There may be a problem with the test strip.
Repeatthetestwithanewteststrip.If
the result is LO, contact your healthcare
professional immediately.
Note: If you see the error messages E-3 or E-4, consult the Error Messages section in this Owner’s Setup Guide.
A solid
red arrow
A blinking
red arrow
IMPORTANT: Contact your healthcare professional if you have symptoms that do not match your test result, and you have
followedtheinstructionsinthisOwner’sSetupGuide.
High Blood Glucose Results
If You See . . . What It Means What To Do
Appearswhenresultishigherthan13.3mmol/L
or the target set on the meter by your healthcare
professional.
Followyourhealthcareprofessional’s
advice to treat high blood glucose.
Apatternofhighglucosehasdeveloped.
If3highresultsoccurwithinthepast5daysAND
allarewithinthesame3-hourtimeperiod,the
meter will display a blinking
.
Followyourhealthcareprofessional’s
advice to treat high blood glucose.
Blood glucose level is higher than or equal to
13.3mmol/L.
Check blood ketone if checking ketones
is part of your diabetes management
program.
Appearswhenresultishigherthan27.8mmol/L
Severe high blood glucose or
There may be a problem with the test strip.
Repeatthetestwithanewteststrip.
If the result is HI, contact your
healthcare professional immediately.
IMPORTANT: Themeterdisplaysresultsfrom1.1-27.8mmol/L.Loworhighbloodglucoseresultscanindicateapotentiallyseriousmedicalcondition.
A solid
yellow arrow
A blinking
yellow arrow
Themeterdisplaysketoneresultsinmmol/L,from0.0-8.0mmol/L.Theunitofmeasurementis
preset. You cannot change this setting.
Bloodketoneisexpectedtobebelow0.6mmol/L.
2
High blood ketone may be caused by illness,
fasting, vigorous exercise, or uncontrolled blood glucose levels.
1-3
Repeatabloodketonetestusinganewbloodketoneteststripwhen:
•HIappearsonthedisplay
•Yourresultisunusuallyhigh
•Youquestionyourresult
•Yourbloodketoneresultis0.0mmol/L,butyourbloodglucoseishigherthan16.7mmol/L
IMPORTANT: Followyourhealthcareprofessional’sadvicebeforeyoumake
any changes to your diabetes management program.
Display What It Means What To Do
Resultisbetween
0.6–1.5mmol/L.
High blood ketone.
Aproblemrequiringmedical
assistance may be occurring.
Follow your healthcare
professional’sadvice.
Resultishigherthan
1.5mmol/L.
You may be at risk of
developing diabetic
ketoacidosis(DKA).
2-6
Contact your healthcare
professional
immediately
.
Appearswhenresultishigher
than8.0mmol/L.
Very high blood ketone
or
There may be a problem
with the test strip.
Repeatthetestwithanew
test strip. If the result is HI,
contact your healthcare
professional
immediately
.
9
Understanding Blood Ketone Test Results
TABLE OF CONTENTSTABLE OF CONTENTS
11
Glucose and Ketone Control Solutions
Performing a Control Solution Test
12
Transferring Meter Data to a Computer
13
Error Messages
14
Taking Care of Your Meter
Changing Batteries
Cleaning Your Meter
15
Troubleshooting
16
Insulin Dose Logging
Set Up for Insulin Dose Logging
How to Use Insulin Dose Logging
HowtoLogAdditionalRapid-ActingInsulinDoses
17
Meter Specications
18
Other Symbols
19
References
1
FreeStyle Optium Neo At-A-Glance
2
Meter Symbols
3
Quick Start - Testing Your Blood Glucose
4
Intended Use
5
Getting to Know Your Meter
Turning Your Meter On and O
Checking Your Meter Screen Every Time You Turn it On
6
Setting Up the Meter
7
Testing Your Blood Glucose or Blood Ketone
Prepare to Test
Performing a Blood Glucose or Blood Ketone Test
8
Understanding Blood Glucose Test Results and Patterns
LowBloodGlucoseResults
HighBloodGlucoseResults
9
Understanding Blood Ketone Test Results
10
View Logbook
Viewing Your Logbook Events
ViewingYourBloodGlucoseAverages
Blood Glucose and Ketone Monitoring System
Owner’s Setup Guide
User’s Manual
ART29756-002_rev-B.indd 1 10/8/13 1:01 PM