Do you have a question about the Freestyle Libre 2 and is the answer not in the manual?
Select and prepare the application site on the upper arm for accurate glucose readings.
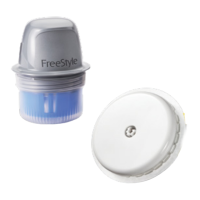
Steps to prepare the sensor applicator by removing the lid, cap, and aligning marks.
Instructions for applying the sensor to the prepared site and securing it properly.
Guides through connecting the smartphone, entering personal settings, and reviewing permissions.
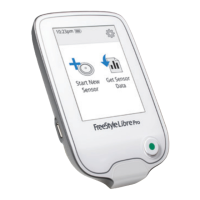
Instructions on how to scan the sensor using the app to obtain glucose readings.
Steps to configure glucose alarm settings, including low, high, and signal loss alarms.
Details on how to dismiss and interpret different types of glucose alarms and signal loss.
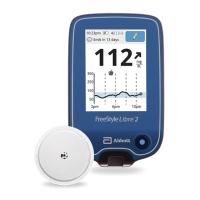
The FreeStyle Libre 2 system is a continuous glucose monitoring (CGM) system designed to help individuals manage their diabetes by providing real-time glucose readings. This system typically consists of a small, disposable sensor worn on the back of the upper arm and a compatible smartphone app that acts as a reader. The system is designed for ease of use, allowing users to check their glucose levels quickly and discreetly without the need for routine fingerstick calibrations.
The primary function of the FreeStyle Libre 2 system is to measure and store interstitial fluid glucose levels continuously. The sensor, once applied, automatically records glucose data throughout its wear period, typically up to 14 days. This data is then transmitted wirelessly to the FreeStyle Libre 2 app on a compatible smartphone when the user scans the sensor.
A key feature of the FreeStyle Libre 2 system is its ability to provide real-time glucose readings, glucose trend arrows, and a historical glucose graph. The real-time reading shows the user's current glucose level. The trend arrow indicates the direction and rate at which glucose is changing (e.g., rising quickly, falling slowly, stable). The glucose graph displays glucose patterns over several hours, allowing users to identify trends and make informed decisions about their diabetes management.
Beyond basic glucose monitoring, the FreeStyle Libre 2 system incorporates optional glucose alarms. These alarms are designed to notify users when their glucose levels fall below a set low threshold (Low Glucose Alarm), rise above a set high threshold (High Glucose Alarm), or drop to a critically low level (Urgent Low Glucose Alarm). The Urgent Low Glucose Alarm is a fixed alarm that cannot be modified or turned off, providing an essential safety feature. There is also a Signal Loss Alarm, which alerts the user if the sensor is not communicating with the app, prompting them to scan the sensor. These alarms can be customized by the user within the app, allowing them to set their preferred thresholds and choose alarm tones. The system also offers an "Override Do Not Disturb" option for alarms, ensuring critical alerts are heard even if the phone's sound is muted.
The system is designed to provide a comprehensive overview of glucose data, which can be reviewed in the app's logbook, reports, and daily patterns. This data can include average glucose, time in target range, low glucose events, and daily graphs, all of which are valuable tools for users and their healthcare professionals to assess glucose control and adjust treatment plans.
The FreeStyle Libre 2 system emphasizes a user-friendly application and monitoring process.
The sensor application process is straightforward and involves a few key steps:
The app provides a dedicated "Alarms" section where users can customize their glucose alarm settings. This includes turning alarms on or off, setting high and low glucose thresholds, and selecting alarm tones. The Urgent Low Glucose Alarm is a mandatory safety feature that cannot be disabled. Users are advised to consult their healthcare professional before making changes to their alarm settings. When an alarm sounds, users can dismiss it by swiping or tapping within the app and then scanning their sensor to view their glucose reading.
The FreeStyle Libre 2 system is designed for minimal maintenance, primarily focusing on proper sensor application and disposal.
Once applied, the sensor is designed to be worn continuously for up to 14 days. It is water-resistant, allowing users to shower, bathe, and swim while wearing it. However, prolonged submersion or exposure to extreme temperatures should be avoided as per the user manual. Users should ensure the sensor remains securely attached to the arm throughout its wear period. If the sensor becomes loose or falls off prematurely, it should be replaced.
To prevent skin irritation and ensure optimal sensor performance, it is recommended to rotate the sensor application site on the back of the upper arm with each new sensor. This practice helps to avoid repeated stress on the same skin area.
After the 14-day wear period, or if a sensor needs to be removed prematurely, the used sensor and Sensor Pack should be discarded according to local regulations. The system is designed with disposable components, eliminating the need for cleaning or sterilizing the sensor itself.
While not a physical maintenance feature, keeping the FreeStyle Libre 2 app updated on the smartphone is crucial for optimal performance. App updates often include bug fixes, performance enhancements, and new features, ensuring the system functions correctly and provides the most accurate and reliable data.
The system's design incorporates visual cues and alerts to help users troubleshoot common issues. For instance, the "codes on labels must match" instruction during assembly prevents errors. The Signal Loss Alarm prompts users to scan the sensor if communication is lost. If users encounter difficulties setting up the system, have questions about messages or readings, or experience any issues, they are advised to contact their healthcare professional or customer service for support.
In summary, the FreeStyle Libre 2 system offers a comprehensive, user-friendly, and low-maintenance solution for continuous glucose monitoring, empowering individuals with diabetes to manage their condition effectively through real-time data and customizable alerts.
| Sensor Life | 14 days |
|---|---|
| Scan Time | 1 second |
| Connectivity | Bluetooth |
| Warm-up Time | 1 hour |
| Operating Temperature | 10°C to 45°C (50°F to 113°F) |
| Water Resistance | IP27 |
| Meter Category | Continuous Glucose Monitoring |
| Alerts | High glucose, low glucose, signal loss |
| Glucose Reading Interval | 1 minute |
| Compatibility | iOS and Android |
| Alarms | Yes (high and low glucose alarms) |
| Glucose Range | 40 to 400 mg/dL |