FrSky 2.4GHz ACCST Taranis X-Lite Manual
Thank
you
for
purchasing
the
FrSky
2.4GHz
ACCST
X-Lite
digital
telemetry
radio
system. As a compact and convenient
Due to unforeseen changes in production, the information contained in this manual is subject to change without
notice.
Overview
Ensure that the battery polarity is correct when connecting batteries into the battery compartment,
otherwise X-Lite might not be powered on.
X-Lite has 4 centered sticks and will distinguish between the throttle and other sticks.
You can change the stick mode and feeling according to your requirement.
Model Setup for X-Lite internal RF Module
Step 1:
Set the Mode for X-Lite Internal RF
Refer to the table below and set the X-Lite to the mode corresponding to your receiver (D8, D16 or LR12).
Older V8 series receivers are not supported by the internal module of X-Lite but can be used with an external
DJT module in V8 mode.
X-Lite EU version only has D16-EU and LR12 mode.
Step 2:
Set the
Channel Range
The internal RF module of X-Lite supports up to 47 channels. The channel range is configurable, and needs double
check before use.
Step 3:
Set the
Receiver Number
When you create a new model, the system will assign you a receiver number automatically, but this can be easily
changed. The range of the receiver number is 00-47, with the default number being 01 (use 00 is not recommended).
Once the receiver is set to the desired number and is bound to the X-Lite, the bind procedure will not need to be
repeated unless the receiver number is changed, In this case, either set the receiver number to the previous one
or repeat the bind procedure.
Step 4: Bind
Bind refers to X-Lite binding mode. Move the cursor to
“Bind”
, press
ENTER
button, the cursor will flash and the
speaker will beep to remind you that the RF module has entered the bind mode. Then put your receiver into binding
mode and finish the bind procedure (refer to the receiver’s manual for details).Press
Enter
or
EXIT
to exit.
Step 5:
Set
Failsafe mode
There are 4 failsafe modes: No Pulse, Hold, Custom and receiver (this mode only used above opentx-v2.0.0
firmware).
Ɣ No Pulse: on loss of signal the receiver produces no pulses on any channel. To use this type, select it in the menu
and wait 9 seconds for the failsafe to take effect.
Ɣ Hold: the receiver continues to output the last positions before signal was lost. To use this type, select it in the menu
and wait 9 seconds for the failsafe to take effect.
Ɣ Custom: pre-set to required positions on lost signal. Move the cursor to
“Set”
and press
ENTER,
you will see
FAILSAFE SETTING screen below. Move the cursor to the channel you want to set failsafe on, and press
ENTER.
When moving the corresponding sticks or switches, you will see the channel bar moving. Move the channel bar to the
place you want for failsafe and long press
ENTER
to finish the setting. Wait 9 seconds before the failsafe takes effect.
Ɣ5HFHLYHU set the failsafe on the receiver (see receiver instructions) in D16 or LR12 mode, select it in the menu and
wait 9 seconds for the failsafe to take effect.
Notice:
The above instructions do not apply to D-series receivers, which require the internal RF module of X-Lite to be in D8
mode. For these receivers, failsafe must be set on the receiver side (see receiver instructions)
Ɣ6%86SRUWDOZD\VRXWSXWV1R3XOVHFRXOGQRWSHUIRUPSURSHrly on it. Set “Hold” or “Custom” for SBUS port.
Step 6: Range
Range refers to X-L ite range check mode. A pre-flight range check should be done before each flying session.
Move the cursor to
“Range”
and press
ENTER.
In range check mode, the effective distance will be decreased
to 1/30. Press
Enter
or
EXIT
to exit.
Mode of
Mode of
X-Lite
EU version
X-Lite
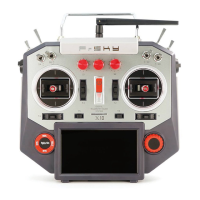
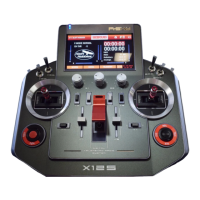
SA SB
SC SD
Power Switch
Stick
Stick
Display Screen
Trim
Navigation & ENT
Shortcut Key
Battery Cover Battery Cover
Exit
Power Indicator
Stick Stick
Antenna Port
Layout
USB PortHeadset jack Smart Port
TF Card Slot
Please connect a battery in the battery compartment before use (18500 Li-ion batteries are not included).
The voltage range should be DC 6.0~8.4V.
Be careful not to drop the battery.
Do not remove the battery from the X-Lite transmitter while the voltage warning is blinking as this could cause
internal settings and memories to be destroyed.
Do not use the transmitter if a “Backup Error” warning occurs.
Gimbal
All CNC 4 ball bearings gimbals with hall-effect sensor, PWM output supported.
transmitter, it has a multi-functional button and supports Anti-plug and over-current function. In order to make the most
of your system and to fly safely,please read this manual carefully. If you have any difficulties while using your
system, please consult the manual, your hobby dealer, or FrSky technical support.
FrSky 2.4GHz ACCST Taranis X-Lite Manual
FrSky 2.4GHz ACCST Taranis X-Lite Manual
FrSky 2.4GHz ACCST Taranis X-Lite Manual
Model Name: Taranis X-Lite
SA: 3 positions; Long Lever
SB: 3 positions; Long Lever
SC: 2 positions; Short Lever
SD: 2 positions; Short Lever
Battery Polarity
3. Headset jack is for audio output
and Smart Port is for firmware upgrade
and telemetry feedback.
Adjust sticks of X-Lite
@
7.4V
Operating Voltage Range: 6.0~8.4V (2S-18500mAh Lipos are acceptable)
Operating Current: 190mA
Operating Temperature: -20~60
Backlight LCD Screen: 128*64 outdoor readable LCD
Model Memories: 60 models (extendable by MicroSD (TF) card)
Compatibility: FrSky receivers in the D8/D16/LR12 mode, X-Lite EU version is not compatible with D8 mode.
Ɣ,nbuilt wireless trainer system (Bluetooth function):
After matching the Master transmitter and the Slave
transmitter successfully, the Slave transmitter will
transmit its information to the Master and seize
control of the model.
Ɣ+LJKVSHHGGLJLWDOLQWHUIDFH
Ɣ2XWGRRUUHDGDEOHEDFNOLJKW/&'VFUHHQLQVWDOOHG
Ɣ
Ergonomic and compact
Ɣ0XWOLIXQFWLRQDOEXWWRQVXSSRUWHG
Ɣ$QWLSOXJDQGRYHUFXUUHQWSURWHFWLRQ
Ɣ2SHQVRXUFHILUPZDUH2SHQ7;LQVWDOOHG
Ɣ
Free Link connection for telemetry supported
47
47
47
47
47