EasyManua.ls Logo

FujiFilm Mount Adapter - User Manual

FujiFilm Mount Adapter
4 pages
Print Icon
To Next Page IconTo Next Page
Loading...
BL01765-200
Using a Mount Adapter
Thank you for buying a FUJIFILM product. The FUJIFILM M MOUNT ADAPTER
allows M-mount lenses to be mounted on the X-Pro1, which in turn can process
images taken with M-mount lenses as required to maintain image quality and
correct for a variety of e ects. Note that using the M-mount adapter requires
camera  rmware version 1.10 or later; check the  rmware version before pro-
ceeding.
MOUNT ADAPTER SETTING Options
Pressing the function button on the mount adapter displays lMOUNT ADAPTER SETTINGS options.
g g
Choosing a Focal Length
If the lens has a focal length of 21, 24, 28, or 35mm, choose a matching option in the
menu at right. For other lenses, select option 5 or 6 to display the menu shown below
at left, press the selector right to display focal length settings, and use the selector to
enter the focal length.
LENS
4
LENS
5
LENS
2
LENS
3
LENS
6
LENS
1
MOUNT ADAPTOR SETTING
DISTORTION CORRECTION
FOCAL LENGTH SETTING
PERIPHERAL ILLUMINATION CORRECTION
COLOR SHADING CORRECTION
0 50mm
2
1
9
8
LENS
5
INPUT FOCAL LENGTH
SET CANCEL
21
mm
24
mm
28
mm
35
mm
50
mm
75
mm
SET
LENS
4
LENS
5
LENS
2
LENS
3
LENS
6
LENS
1
MOUNT ADAPTOR SETTING
R The camera adjusts the size of the bright frame in the optical view nder according to lens focal length.
17mm or less
17mm or less
18mm–60mm
18mm–60mm
61mm or more
61mm or more
200
2000
P
F5.6
200
2000
P
F5.6
200
2000
P
F5.6
Bright frame not displayed. Both white and blue frames are dis-
played, the former for in nity and
the latter for distances of about
2m/6.6ft.
R The camera does not automati-
cally correct for parallax.
Both red and blue frames are dis-
played. The frames are not adjusted
for focal length, making the elec-
tronic view nder the recommend-
ed choice for framing pictures.
Question and Answer IconNeed help?

Do you have a question about the FujiFilm Mount Adapter and is the answer not in the manual?

Summary

Mount Adapter Setting Options

Choosing a Focal Length

Select focal length for correct bright frame display and image processing.

Viewfinder Bright Frame Adjustment

How the bright frame adjusts based on lens focal length in the viewfinder.

Distortion Correction

Barrel Distortion Correction

Correcting outward bowing of vertical/horizontal lines in images.

Pincushion Distortion Correction

Correcting inward bowing of vertical/horizontal lines in images.

Color Shading Correction

Peripheral Illumination Correction

Mount Adapter Cautions

Overview

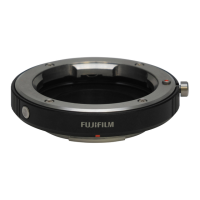
The FUJIFILM M MOUNT ADAPTER is an accessory designed to allow M-mount lenses to be used with the FUJIFILM X-Pro1 camera. This adapter facilitates the integration of M-mount lenses, enabling the X-Pro1 to process images captured with these lenses to maintain optimal image quality and correct for various optical effects. It is crucial to note that the camera's firmware must be version 1.10 or later for the M-mount adapter to function correctly. Users should verify their camera's firmware version before proceeding with the adapter's use.

Function Description:

The primary function of the FUJIFILM M MOUNT ADAPTER is to bridge the compatibility gap between M-mount lenses and the FUJIFILM X-Pro1 camera body. By physically connecting the two, it allows the camera to receive image data from the M-mount lens. Beyond simple physical adaptation, the adapter works in conjunction with the camera's internal processing capabilities to enhance and correct images. This includes addressing issues such as distortion, color shading, and peripheral illumination, which are common optical characteristics of various lenses, especially vintage ones. The adapter essentially extends the X-Pro1's versatility by opening up a wider range of lens options for photographers.

Usage Features:

The FUJIFILM M MOUNT ADAPTER offers several user-configurable settings accessible via the camera's menu system. Pressing the function button on the mount adapter displays the "M MOUNT ADAPTER SETTINGS" options.

  • Choosing a Focal Length:

    • For M-mount lenses with common focal lengths of 21mm, 24mm, 28mm, or 35mm, users can select a matching preset option directly from the menu. These presets are labeled LENS 1 through LENS 4.
    • For other focal lengths, users select option LENS 5 or LENS 6. This action brings up a sub-menu where the focal length can be manually entered. Users navigate to the focal length settings using the selector and then input the specific focal length of their lens. This manual input ensures that the camera's internal processing, particularly for viewfinder adjustments and image corrections, is tailored to the attached lens.
    • The camera dynamically adjusts the size of the bright frame in the optical viewfinder based on the selected or entered lens focal length.
      • 17 mm or less: The bright frame is not displayed in the optical viewfinder.
      • 18 mm–60 mm: Both white and blue frames are displayed. The white frame indicates infinity, while the blue frame represents distances of approximately 2 meters (6.6 feet). It's important to note that the camera does not automatically correct for parallax in this range.
      • 61 mm or more: Both red and blue frames are displayed. In this range, the frames are not adjusted for focal length, making the electronic viewfinder the recommended choice for accurate framing.
  • Distortion Correction:

    • The adapter allows for the correction of two types of lens distortion: barrel distortion and pincushion distortion.
    • Barrel Distortion: This occurs when vertical and horizontal lines not passing through the center of the image bow outwards. Users can choose from "BARREL STRONG," "BARREL MEDIUM," or "BARREL WEAK" to reduce this effect.
    • Pincushion Distortion: This occurs when vertical and horizontal lines not passing through the center of the image bow inwards. Users can select "PINCUSHION STRONG," "PINCUSHION MEDIUM," or "PINCUSHION WEAK" to mitigate this distortion.
    • An "OFF" option is also available if no distortion correction is desired.
    • To accurately determine the required amount of distortion correction, it is recommended to photograph objects featuring repeating vertical and horizontal lines, such as graph paper or building windows, and adjust the settings accordingly.
  • Color Shading Correction:

    • This feature addresses color variations (shading) that may occur between the center and the edges of the frame. The correction can be adjusted independently for each of the four corners of the image.
    • Step 1: Choose a corner. Users rotate the command dial to select the specific corner they wish to adjust. The selected corner is visually indicated by a triangle on the display.
    • Step 2: Adjust shading. Using the selector, users can fine-tune the shading until there is no visible color difference between the selected corner and the center of the image. Moving the selector left or right adjusts colors along the cyan-red axis, while moving it up or down adjusts colors along the blue-yellow axis. There are a total of 19 available positions on each axis for precise adjustment.
    • Similar to distortion correction, photographing a blue sky or a sheet of gray paper can help in determining the optimal color shading correction settings.
  • Peripheral Illumination Correction:

    • This setting allows users to adjust the brightness at the edges of the frame.
    • Users can choose values ranging from –5 to +5.
    • Positive values (e.g., +1 to +5) increase peripheral illumination, which can be beneficial for vintage lenses that often exhibit vignetting (darker corners).
    • Negative values (e.g., –1 to –5) reduce peripheral illumination, which can be used to create artistic effects, such as simulating images taken with an antique lens or a pinhole camera.
    • To determine the appropriate level of peripheral illumination correction, it is advisable to photograph a blue sky or a sheet of gray paper and observe the effects.

Important Cautions for Usage:

  • "SHOOT WITHOUT LENS" Setting: Attaching the mount adapter automatically enables the "SHOOT WITHOUT LENS" function on the camera. This is necessary because M-mount lenses do not electronically communicate with the camera in the same way native X-mount lenses do.
  • Distance Indicator: When the adapter is attached, the distance indicator in the standard displays for both the LCD monitor and the optical/electronic viewfinder will be hidden. Users will need to rely on the lens's focus scale for distance information.
  • Focus Mode Selector: Before attempting to check focus, it is essential to set the camera's focus mode selector to "M" (Manual). M-mount lenses are manual focus lenses, and the camera must be in manual focus mode to operate them effectively.
  • Viewfinder Brightness Adjustment: If users experience difficulty seeing the display in the viewfinder when the mount adapter is attached, the following steps can be taken to increase viewfinder brightness:
    1. Press the "VIEW MODE" button to enable automatic display selection using the eye sensor.
    2. Press the "Q" button to access the Quick Menu.
    3. Put your eye to the viewfinder to activate it.
    4. Highlight "LCD BRIGHTNESS" using the selector and then use the command dial to adjust the brightness level to a comfortable viewing level.

Maintenance Features:

The manual does not explicitly detail specific maintenance features for the adapter itself. However, general best practices for camera accessories apply:

  • Keep the adapter clean and free from dust and debris, especially the lens and camera mounting surfaces, to ensure proper connection and prevent damage.
  • Store the adapter in a protective case when not in use to avoid scratches or impacts.
  • Handle the adapter carefully during mounting and unmounting to prevent damage to the lens or camera body.

In summary, the FUJIFILM M MOUNT ADAPTER is a sophisticated accessory that not only provides physical compatibility for M-mount lenses on the X-Pro1 but also integrates advanced image processing capabilities to optimize image quality and offer creative control over various optical characteristics. Its user-friendly interface for focal length selection and comprehensive correction options for distortion, color shading, and peripheral illumination make it a valuable tool for photographers looking to expand their lens choices and fine-tune their images.

FujiFilm Mount Adapter Specifications

General IconGeneral
BrandFujiFilm
ModelMount Adapter
CategoryCamera Accessories
LanguageEnglish

Related product manuals