Field Procedures
CAMERA USE
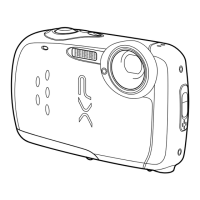
Instructions for the Fuji XP10 Digital C
The Fuji XP10 is
automatic operation which
should provide good pictures in all field conditions.
Please do not change any of the settings other than those described
below. Please insert your hand through the camera strap for safekeeping.
Press
Framing the Picture
Position the main subject in the focus area and use the zoom
buttons to frame the picture in
T to zoom in.
Focusing and Shooting
The camera will focus on whatever you see in the center ofthe
screen. Press the shutter button
(large button on top of the
camera) halfway down
focus is obtained, two beeps will be heard.
down the rest of the way to take the picture.
hold the button down until you hear the shutter cl
light, the shutter will be slightly delayed while the scene is
illuminated by the automatic flash. In the unlikely event
is not obtained, a red message “AF!” will appear on the
screen. In that case, find another object at the same dista
from you, press the button half-
way down to obtain a focus
on that object,
then, while keeping the button pressed half
way, move the camera
to again view the picture you wish to
take.
Checking the Picture
In order to check the picture, press the
back of the camera. If the picture is satisfactory, note all required
information in the photo log sheet. If not, delete the picture and retake it.
While in this mode, you can move back and forth between the stored pictures
us
ing the right and left sides of the Menu/OK button on the back of the
camera.
You can also zoom in on a picture you are viewing by using the
zoom lever on the upper-
right back of the camera.
Press the shutter button to return to shooting mode.
1
Instructions for the Fuji XP10 Digital C
amera
use. The camera has been set for
should provide good pictures in all field conditions.
Please do not change any of the settings other than those described
below. Please insert your hand through the camera strap for safekeeping.
On and Off
top and
an image
the screen, and the
Press the small button again to turn the camera off.
Position the main subject in the focus area and use the zoom
W to zoom out or
The camera will focus on whatever you see in the center ofthe
(large button on top of the
-focus. When
focus is obtained, two beeps will be heard.
Press the button
down the rest of the way to take the picture.
Make sure you
hold the button down until you hear the shutter cl
ick. In low
light, the shutter will be slightly delayed while the scene is
illuminated by the automatic flash. In the unlikely event
focus
is not obtained, a red message “AF!” will appear on the
screen. In that case, find another object at the same dista
nce
way down to obtain a focus
then, while keeping the button pressed half
-
to again view the picture you wish to
In order to check the picture, press the
review arrow button on the
back of the camera. If the picture is satisfactory, note all required
information in the photo log sheet. If not, delete the picture and retake it.
While in this mode, you can move back and forth between the stored pictures
ing the right and left sides of the Menu/OK button on the back of the
You can also zoom in on a picture you are viewing by using the
right back of the camera.
Press the shutter button to return to shooting mode.
Halfway
13
th
Edition, 2011
should provide good pictures in all field conditions.
Please do not change any of the settings other than those described
below. Please insert your hand through the camera strap for safekeeping.
Press the small button again to turn the camera off.
While in this mode, you can move back and forth between the stored pictures
Click
the way down