44
Recording / Dubbing
EN
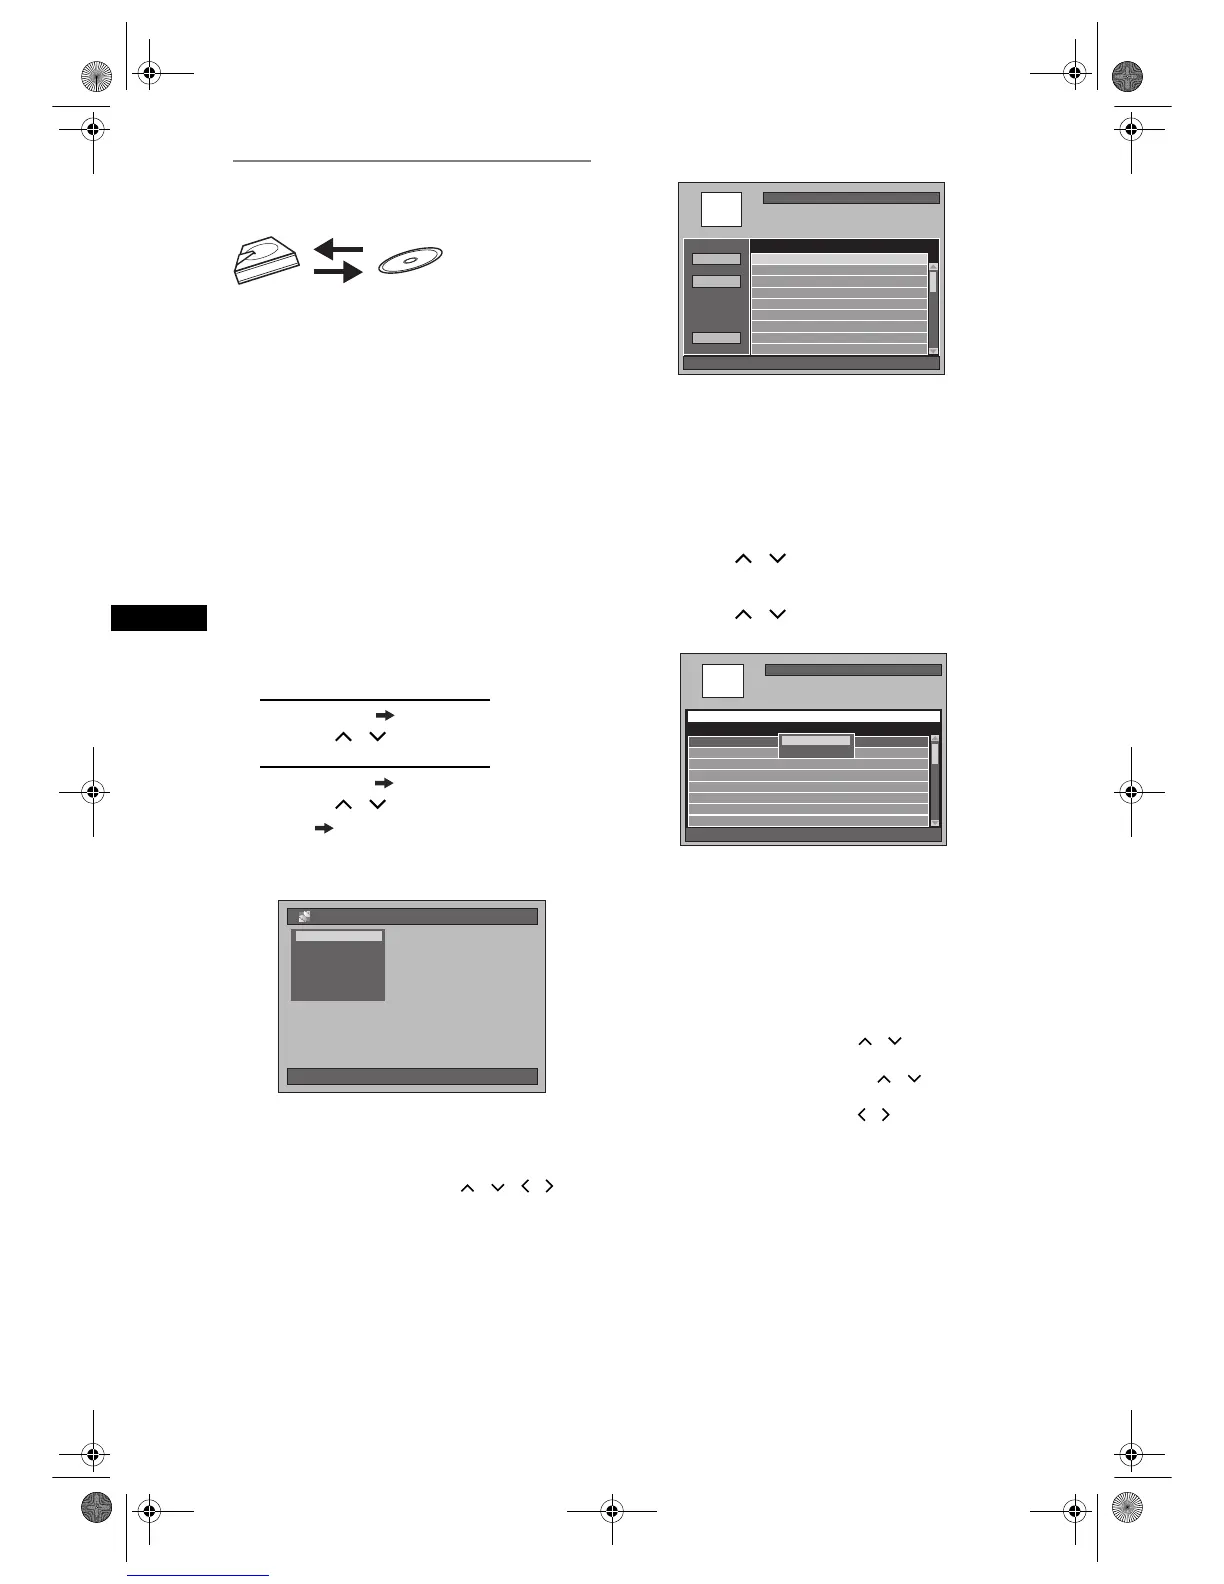
Bi-directional Dubbing between HDD
and DVD
The basic procedure to make a dubbing from the
Setup Menu is as follows:
1 Select dubbing direction.
2 Register titles in the Dubbing Title List.
3 Edit the Dubbing Title List as you prefer.
4 Select Rec Mode.
5 Start dubbing.
When you dub a title has bilingual audio to Video
mode DVD-RW / R, select an appropriate audio
format in the “Bilingual Recording Audio” menu on
page 31.
1 Insert a recordable disc when
dubbing from HDD to DVD.
Insert a disc to be dubbed when
dubbing from DVD to HDD.
2 Press [DUBBING].
The Dubbing Direction will appear.
3 For HDD to DVD dubbing:
Select “HDD DVD Dubbing” using
[Cursor
/ ], then press [ENTER].
For DVD to HDD dubbing:
Select “DVD HDD Dubbing” using
[Cursor
/ ], then press [ENTER].
“DVD HDD Dubbing” is not
available when the Video mode disc
recorded by other units is inserted.
4 Select “Add to Title”.
• If “Add to Title” is already highlighted, press
[ENTER].
• If one of the Dubbing Titles is highlighted, select
“Add to Title” using [Cursor
/ / / ],
then press [ENTER].
• To switch Original and Playlist, press [SYSTEM]
before you press [ENTER].
Example: HDD ➞ DVD
• If you have registered any dubbing before, they
will be listed in the Dubbing Title List.
To sort the titles:
1 Press [ENTER] anywhere in the Title List.
2 Select “Title Sorting”.
3 Select the desired sort type and press
[ENTER].
5 Select a desired title using
[Cursor
/ ], then press [ENTER].
6 Select “Register” using
[Cursor
/ ], then press [ENTER].
Example: HDD Original
The selected title is added to the Dubbing Title
List.
• Contents in the Dubbing Title List will be deleted
when you exit by pressing [STANDBY-ON] or
select the different dubbing direction.
7 Repeat steps 4 to 6 until you register
all the programmes to be dubbed.
To delete a title:
1 Select a title using [Cursor
/ ], then press
[ENTER].
2 Select “Delete” using [Cursor
/ ], then
press [ENTER].
3 Select “Yes” using [Cursor
/ ], then press
[ENTER].
01/01/07(Mon) 19:34
Dubbing
DVD➔HDD DubbingDVD➔HDD Dubbing
HDD➔VCR DubbingHDD➔VCR Dubbing
VCR➔HDD DubbingVCR➔HDD Dubbing
DVD➔VCR DubbingDVD➔VCR Dubbing
VCR➔DVD DubbingVCR➔DVD Dubbing
HDD➔DVD Dubbing
HDD
➔DVD Dubbing
Remain
Title to dub
4300MB
1/1
P01 12:22 (1:04:40) XP
P01P01 11:22 (0:14:13) XP11:22 (0:14:13) XP
Mode
SP
SPSP
Add to Title
All Erase
Start
001/001
HDD Original
P01 11:19 (0:00:06) SP 11/04/07(Wed)
P01 11:22 (0:14:13) XP 10/04/07(Tue)
P02 09:19 (0:22:40) SP 09/04/07(Mon)
P01 12:22 (1:04:40) XP 11/04/07(Wed)
Title Name Recording Date
P01 12:22 (1:04:40) XP
Title SortingTitle Sorting
Register
E3B41BD_EN_+nasi.book Page 44 Wednesday, February 7, 2007 6:49 PM


 To Next Page